Hugo+Github Pages快速搭建个人博客二: 添加giscus评论系统
hugo-theme-relearn 主题添加giscus评论系统
通过上文我们已经实现了博客最重要的发布与展示功能,而作为一个技术博客,如果有一个评论系统供读者进行交流是再好不过了。经过对各个评论系统的横向比较,最终选择的giscus作为评论系统的引擎,那么下面就开始将giscus添加至系统中。
1. 安装giscus
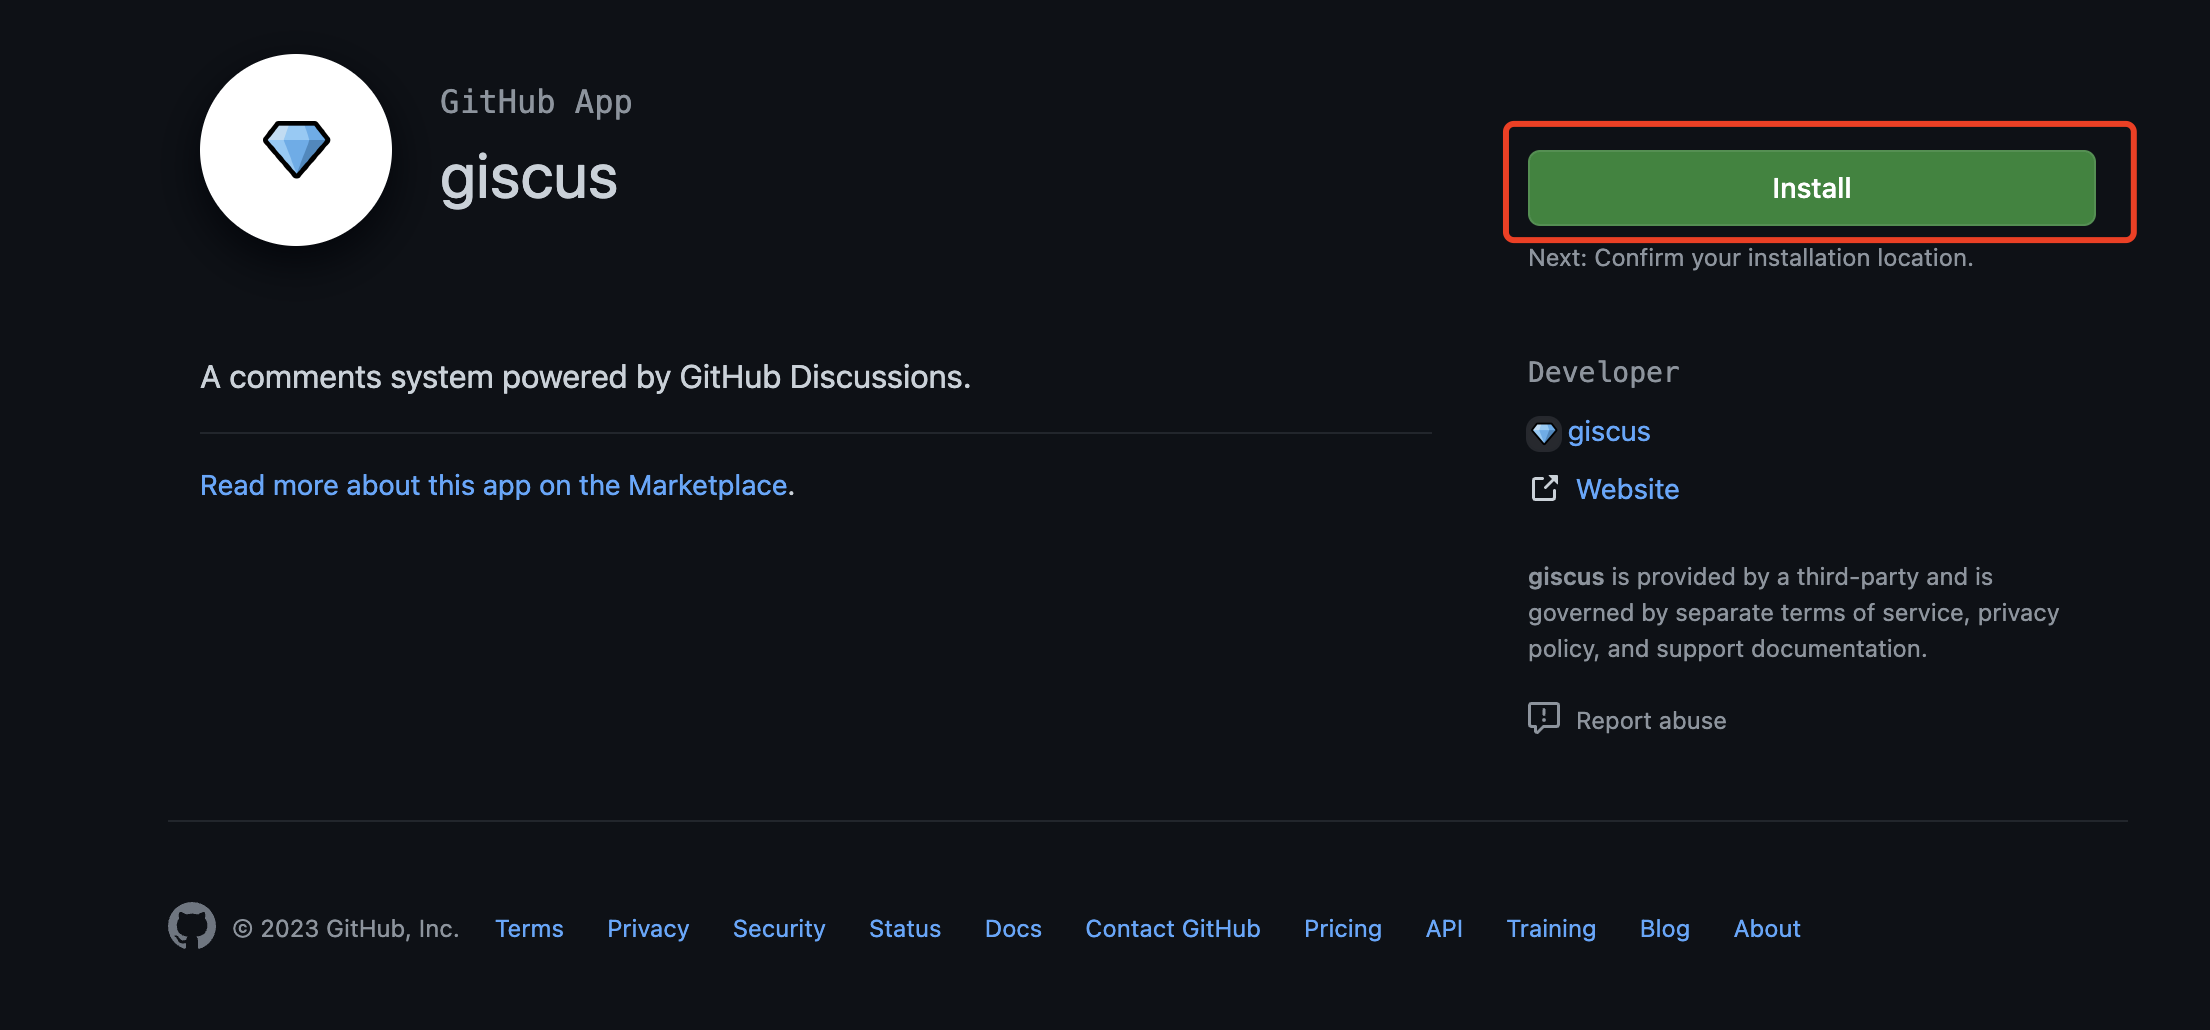
点击https://github.com/apps/giscus访问github中的giscus app安装页面,点击install
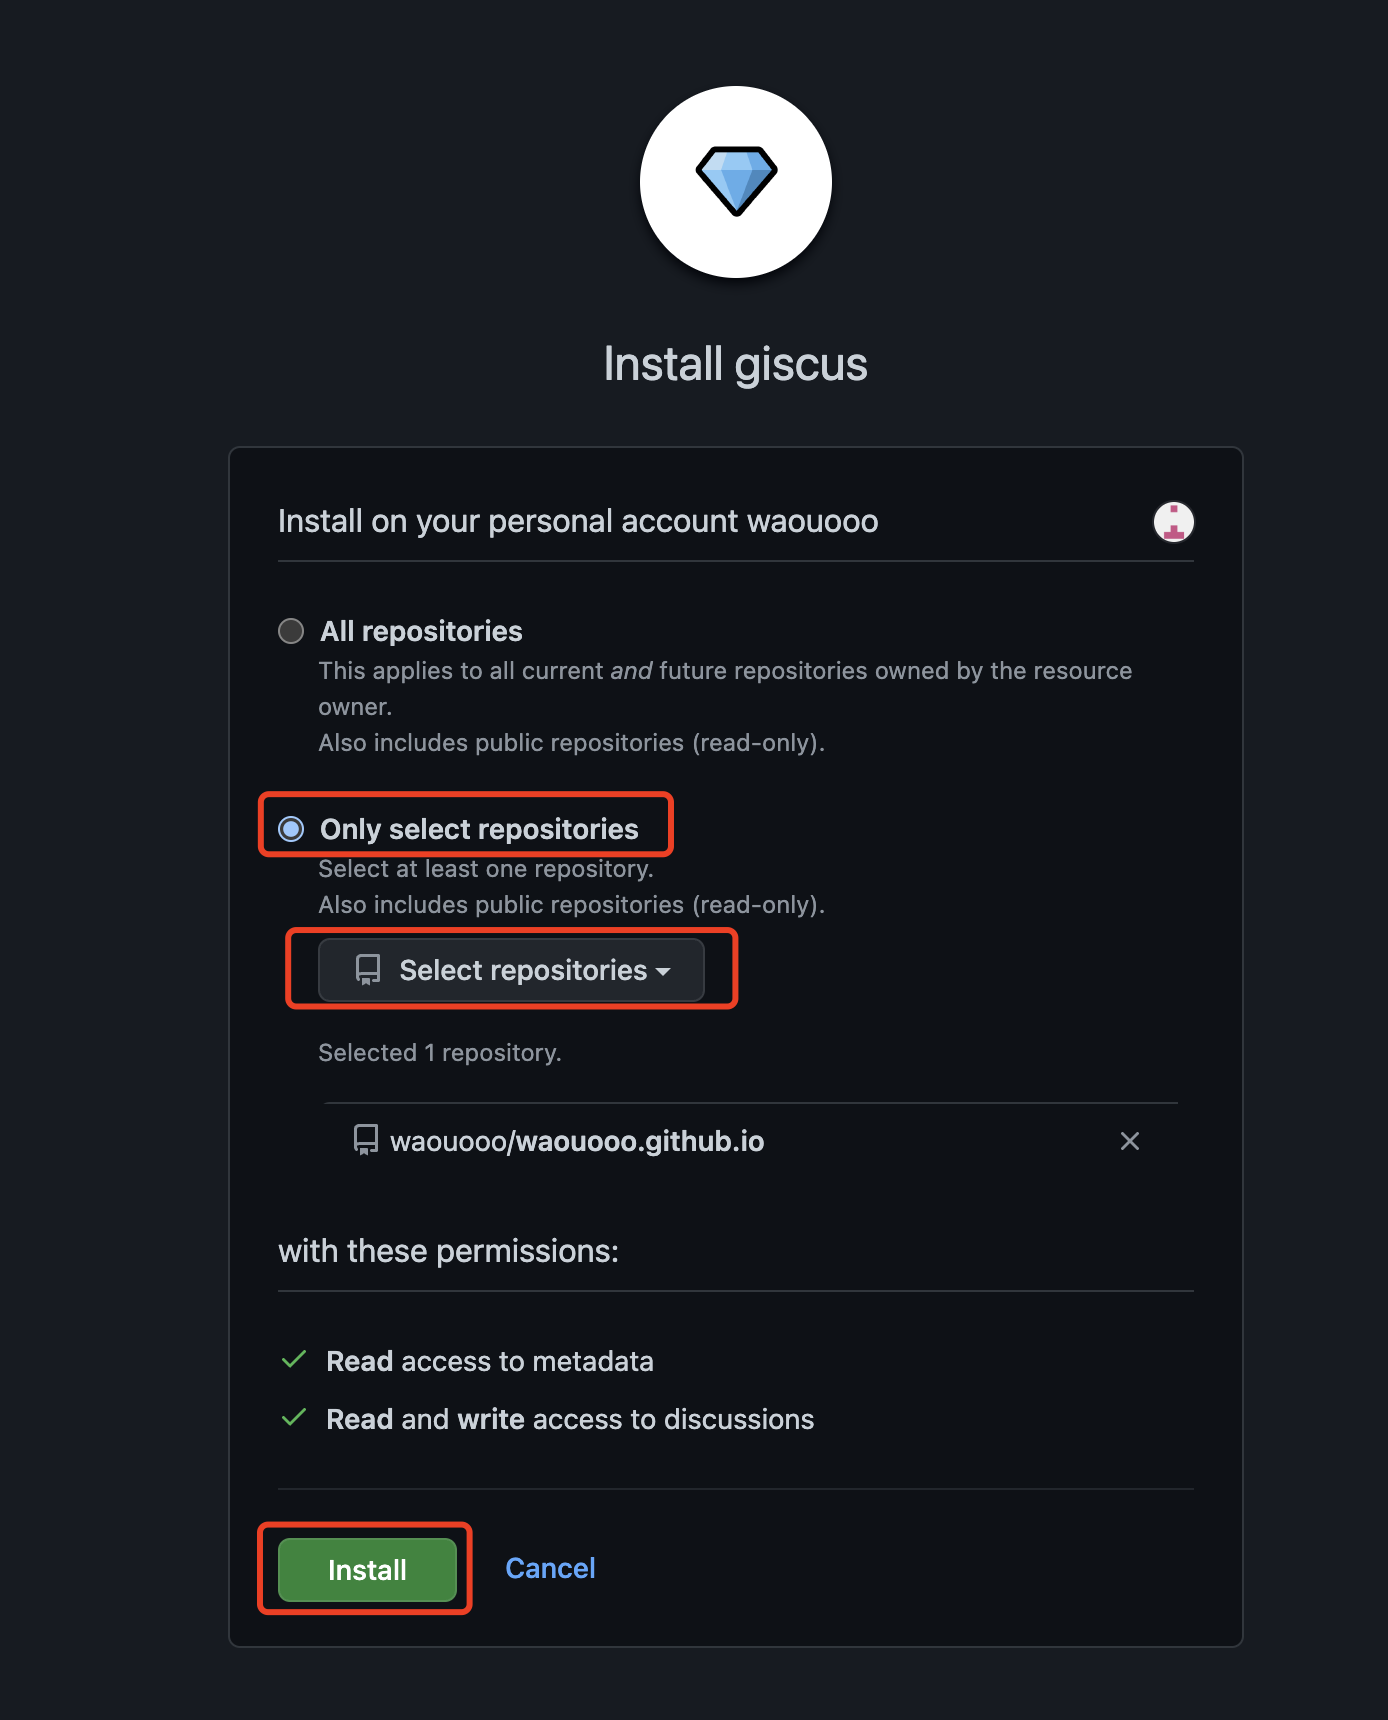
选择指定仓库进行安装:
验证github账号密码

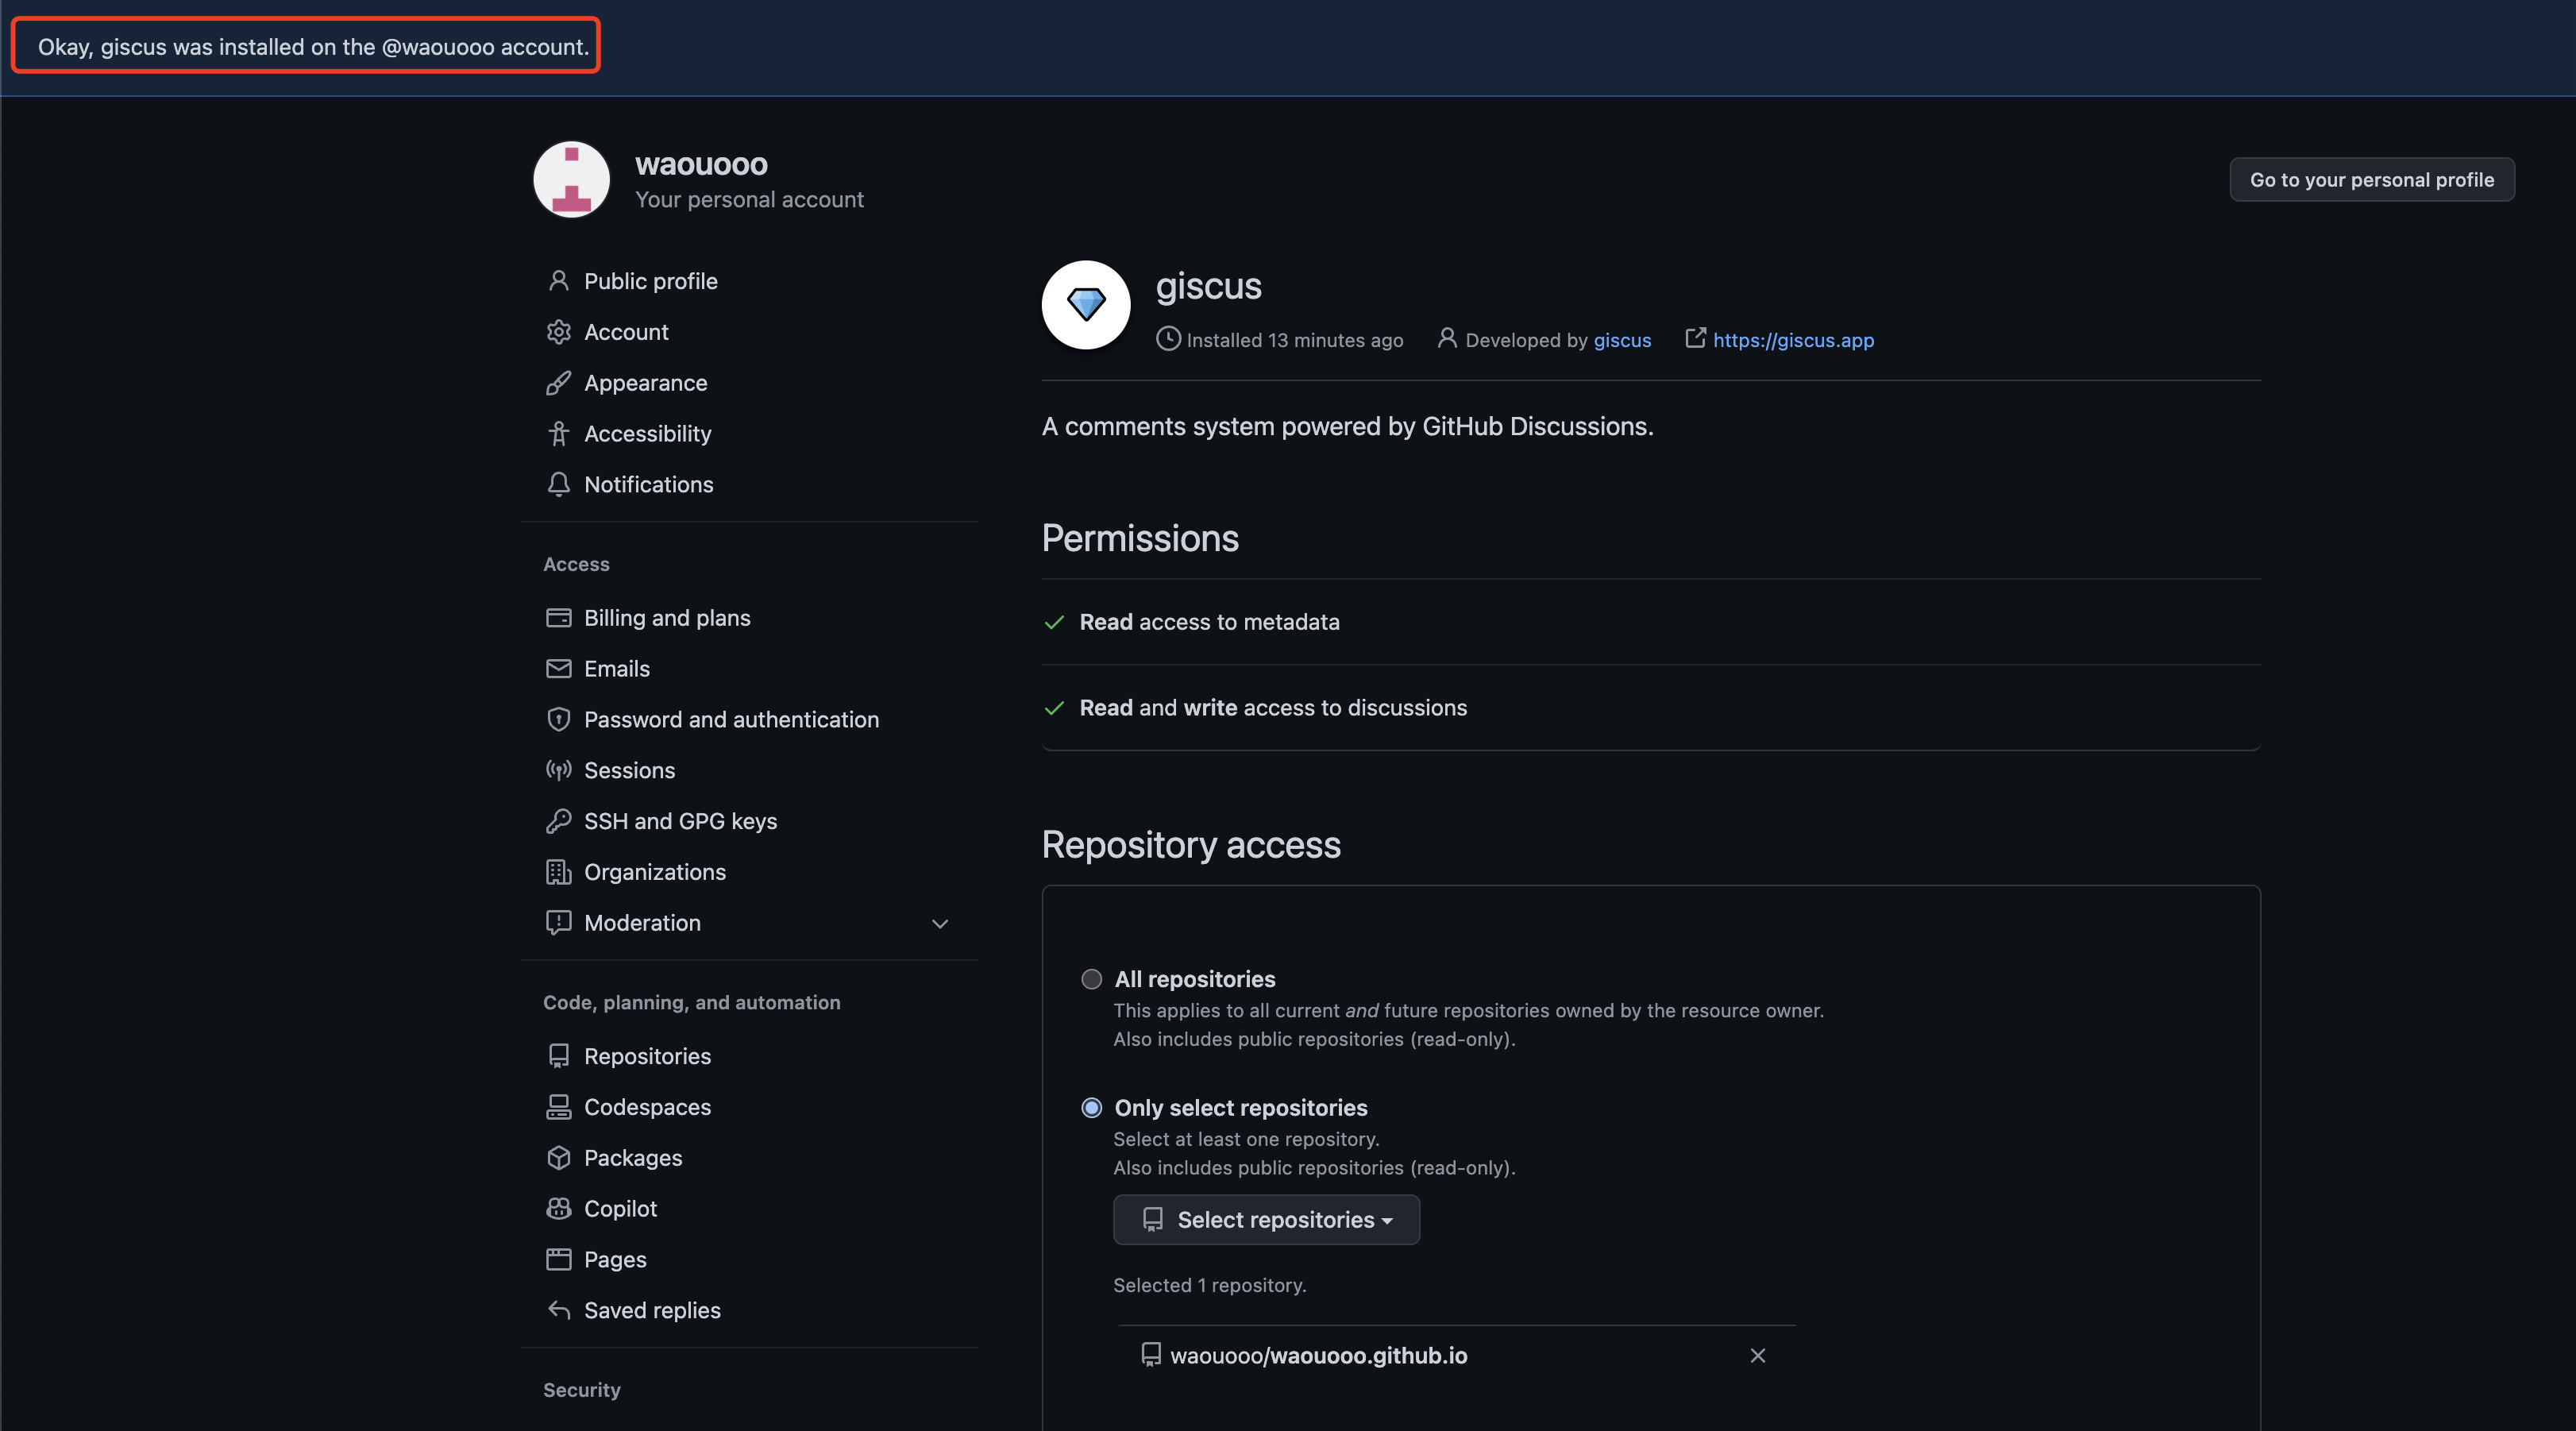 至此 waouooo.github.io仓库已安装上giscus
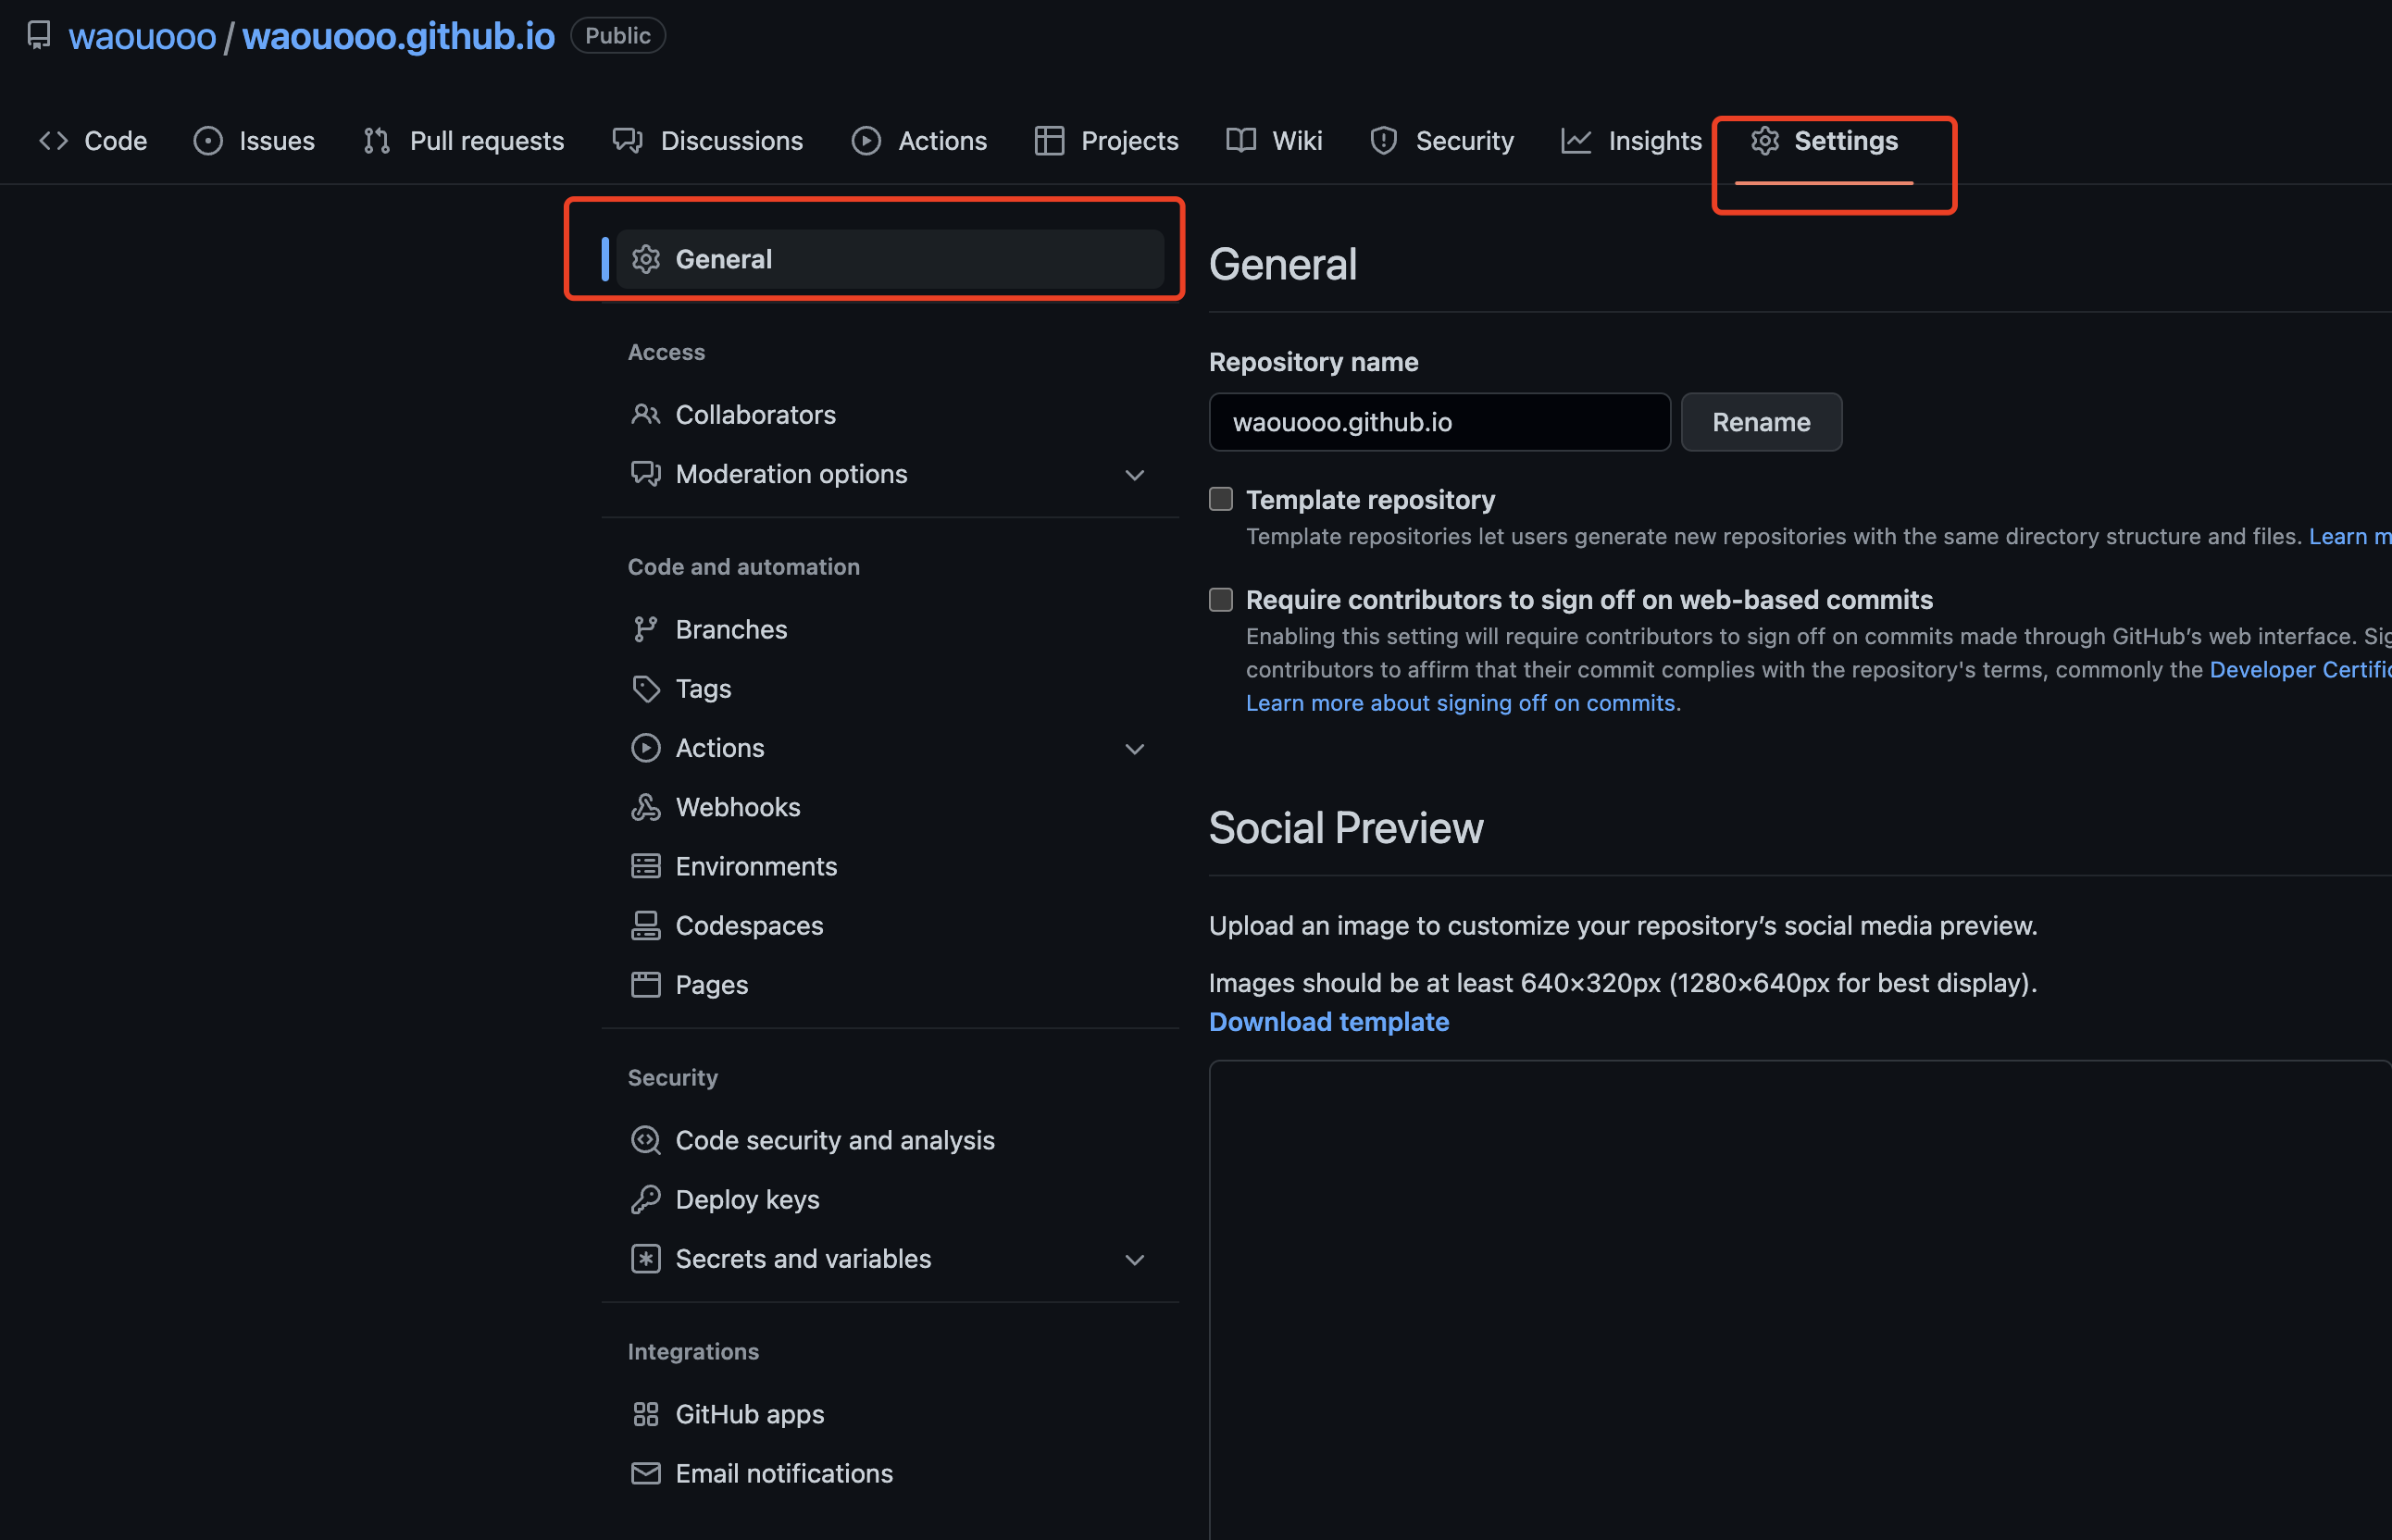
2. 打开Github仓库的Discussions功能
1) giscus是由 GitHub Discussions 驱动的评论系统,因此需要在github上有仓库开启Discussions功能对评论进行托管,我们这里就直接选择博客站点仓库开启Discussions:

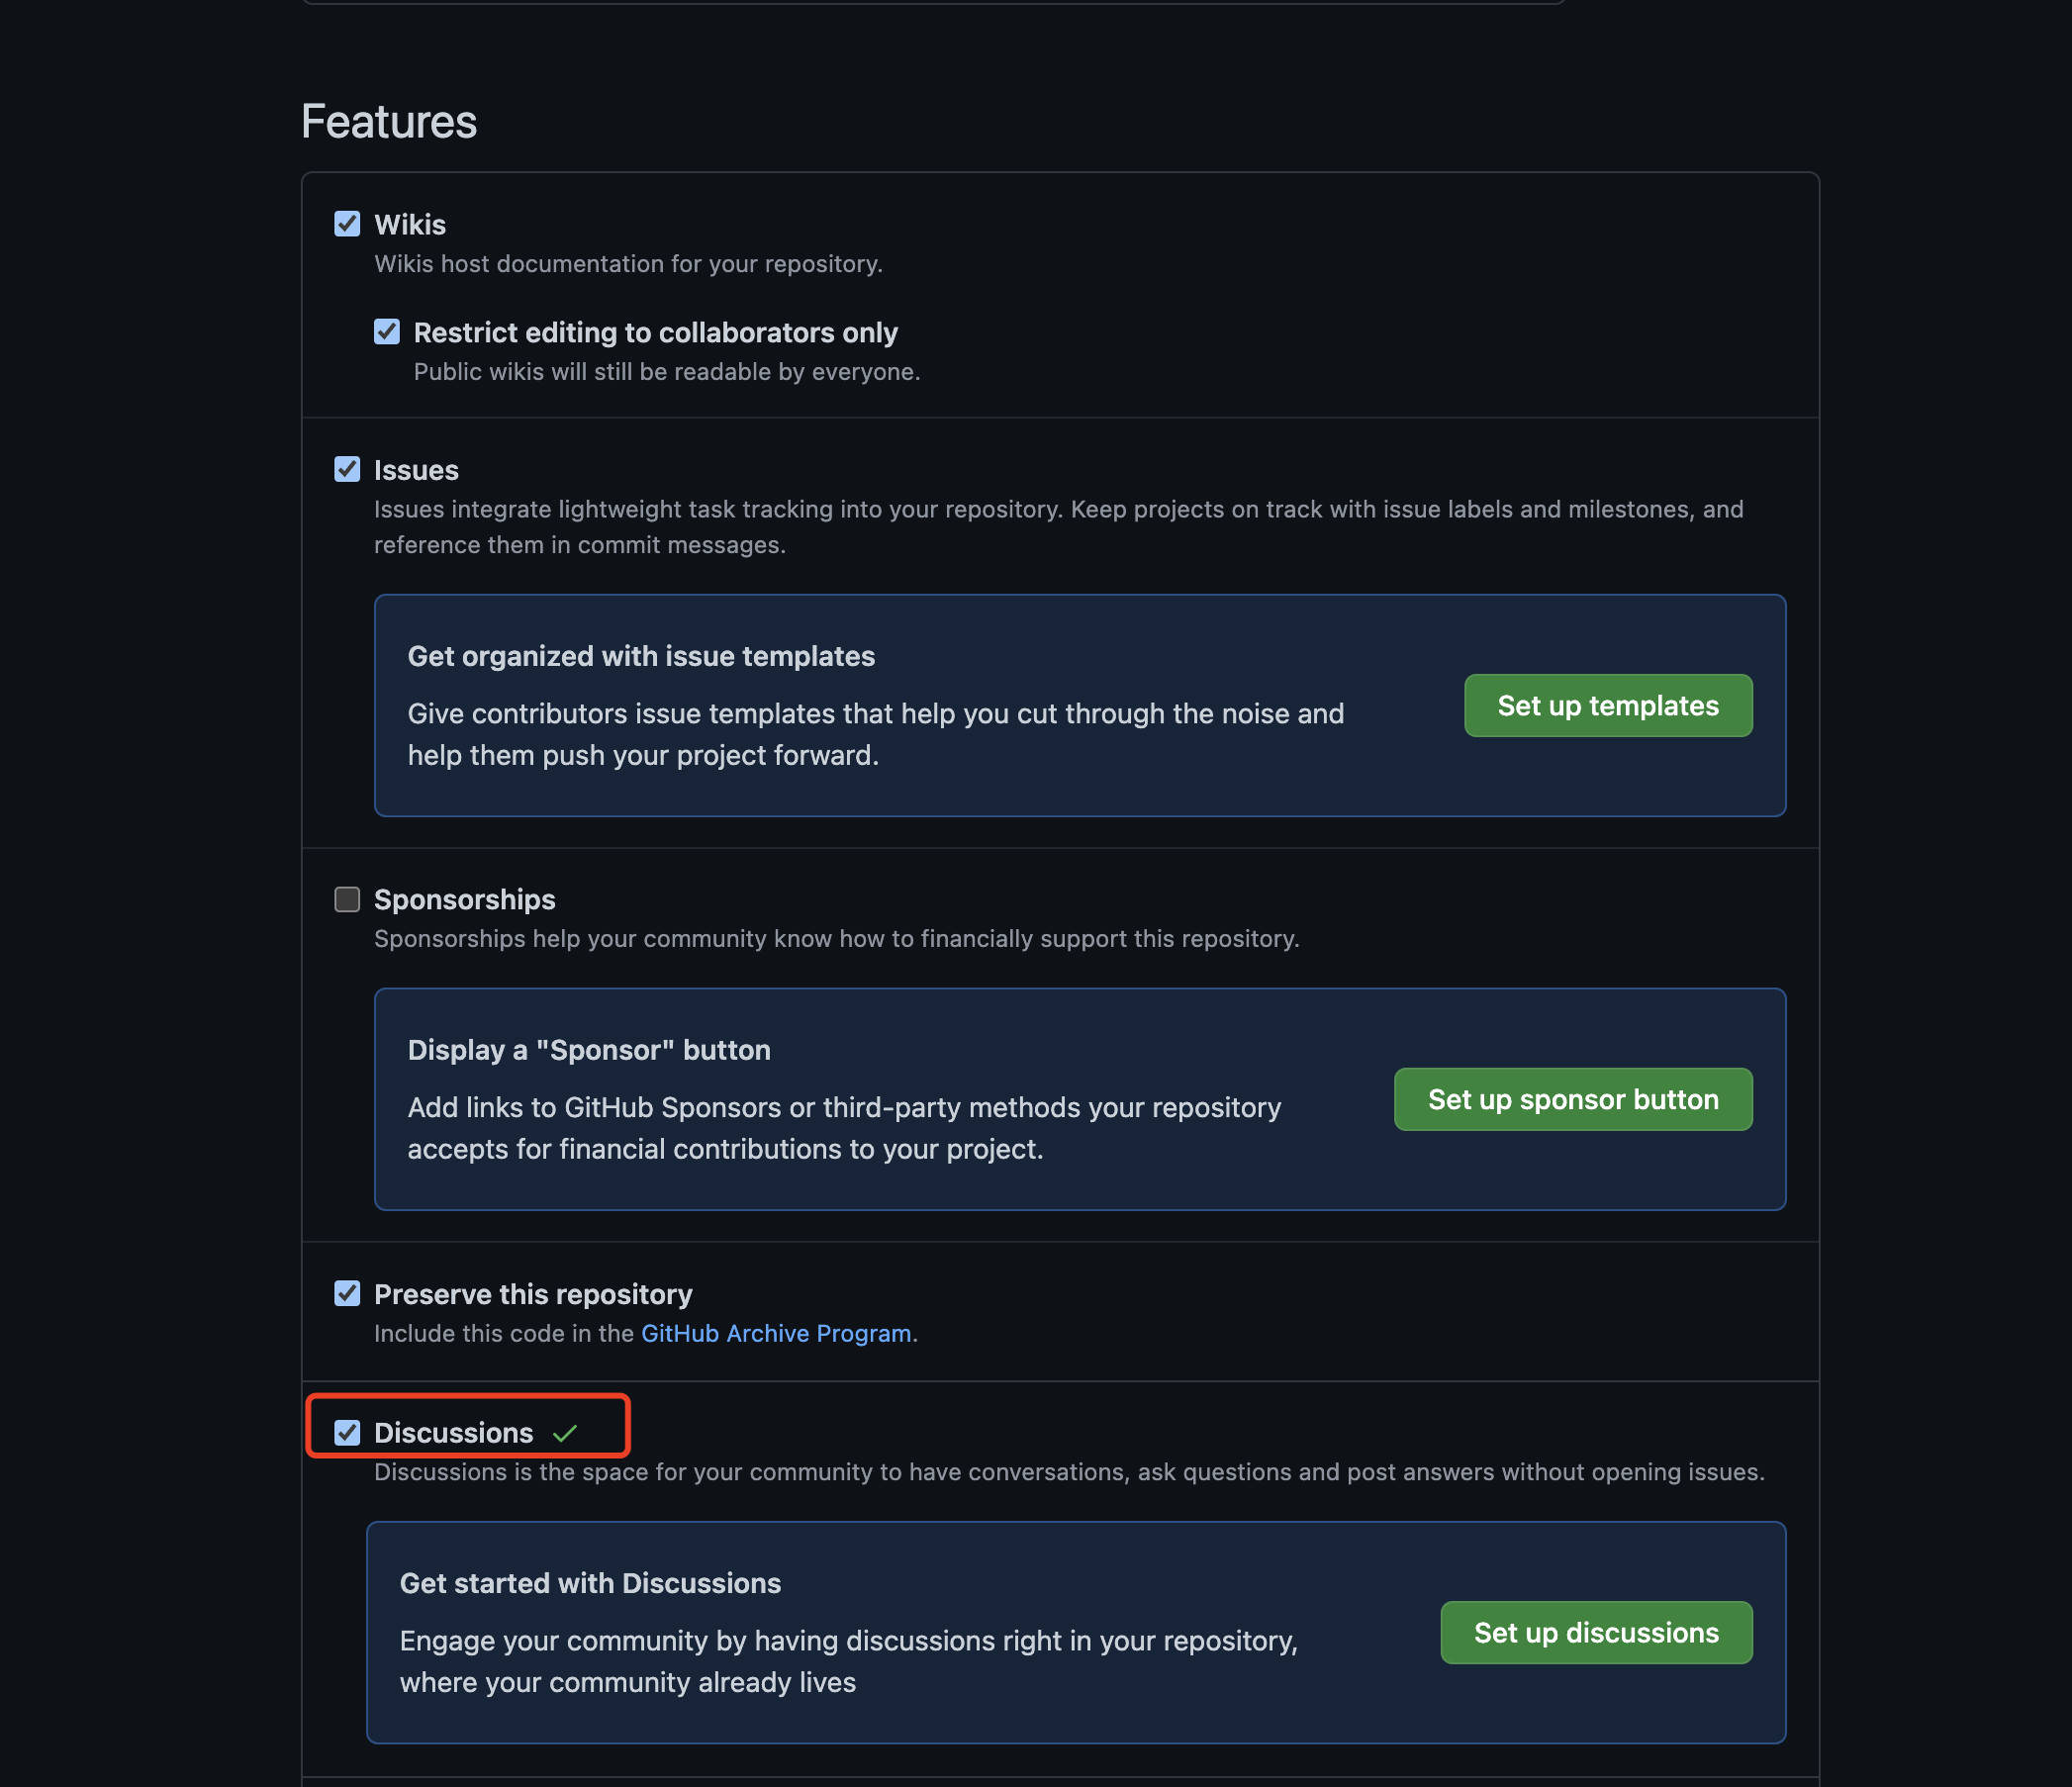
2) 在settings的General栏往下拉,找到Features
3) 勾选✅上Discussions
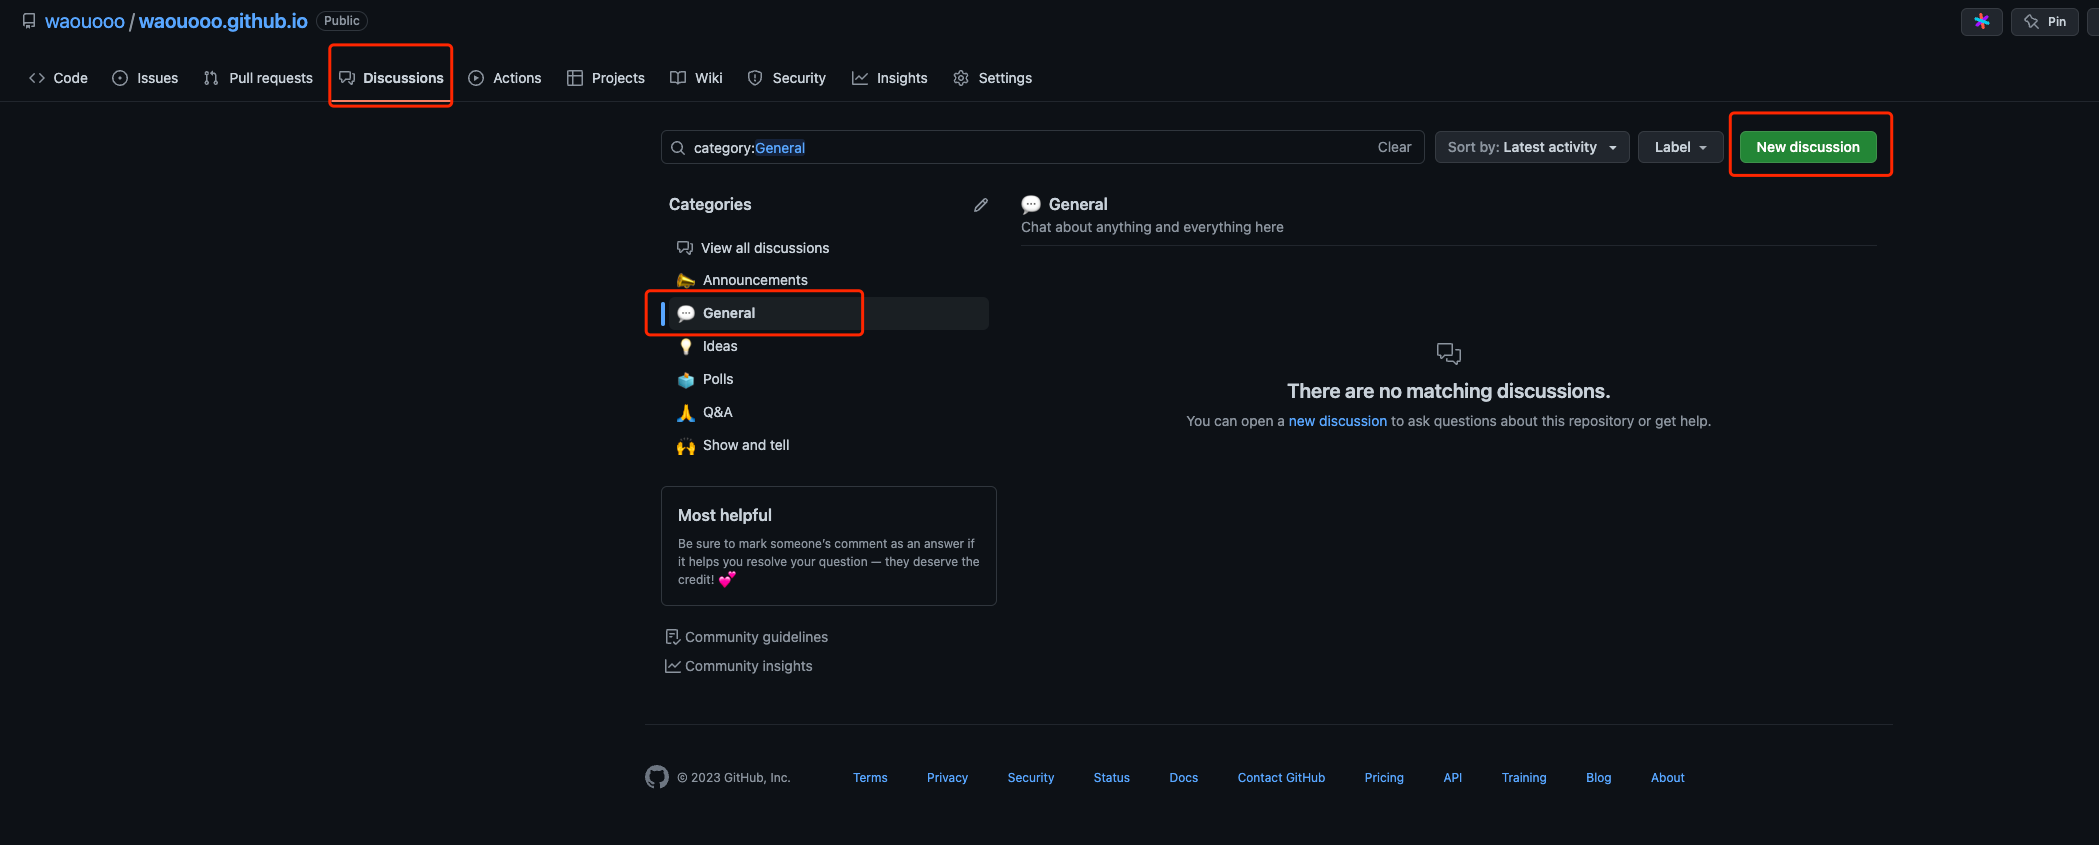
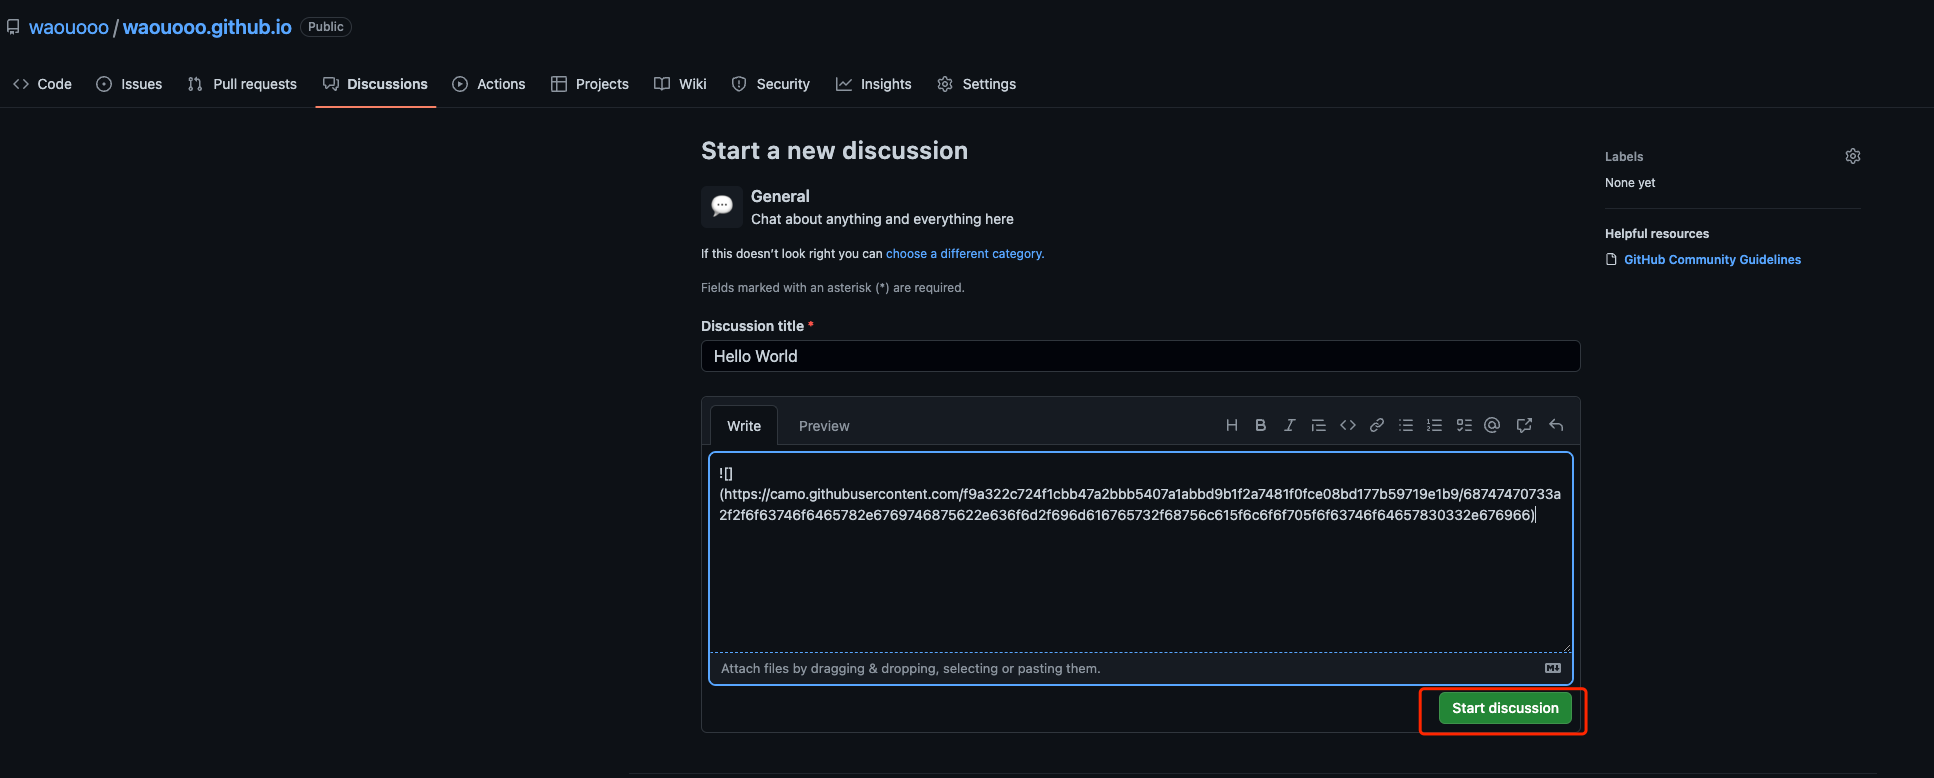
4) 创建一个discussions, 这里选择General作为未来托管评论的category
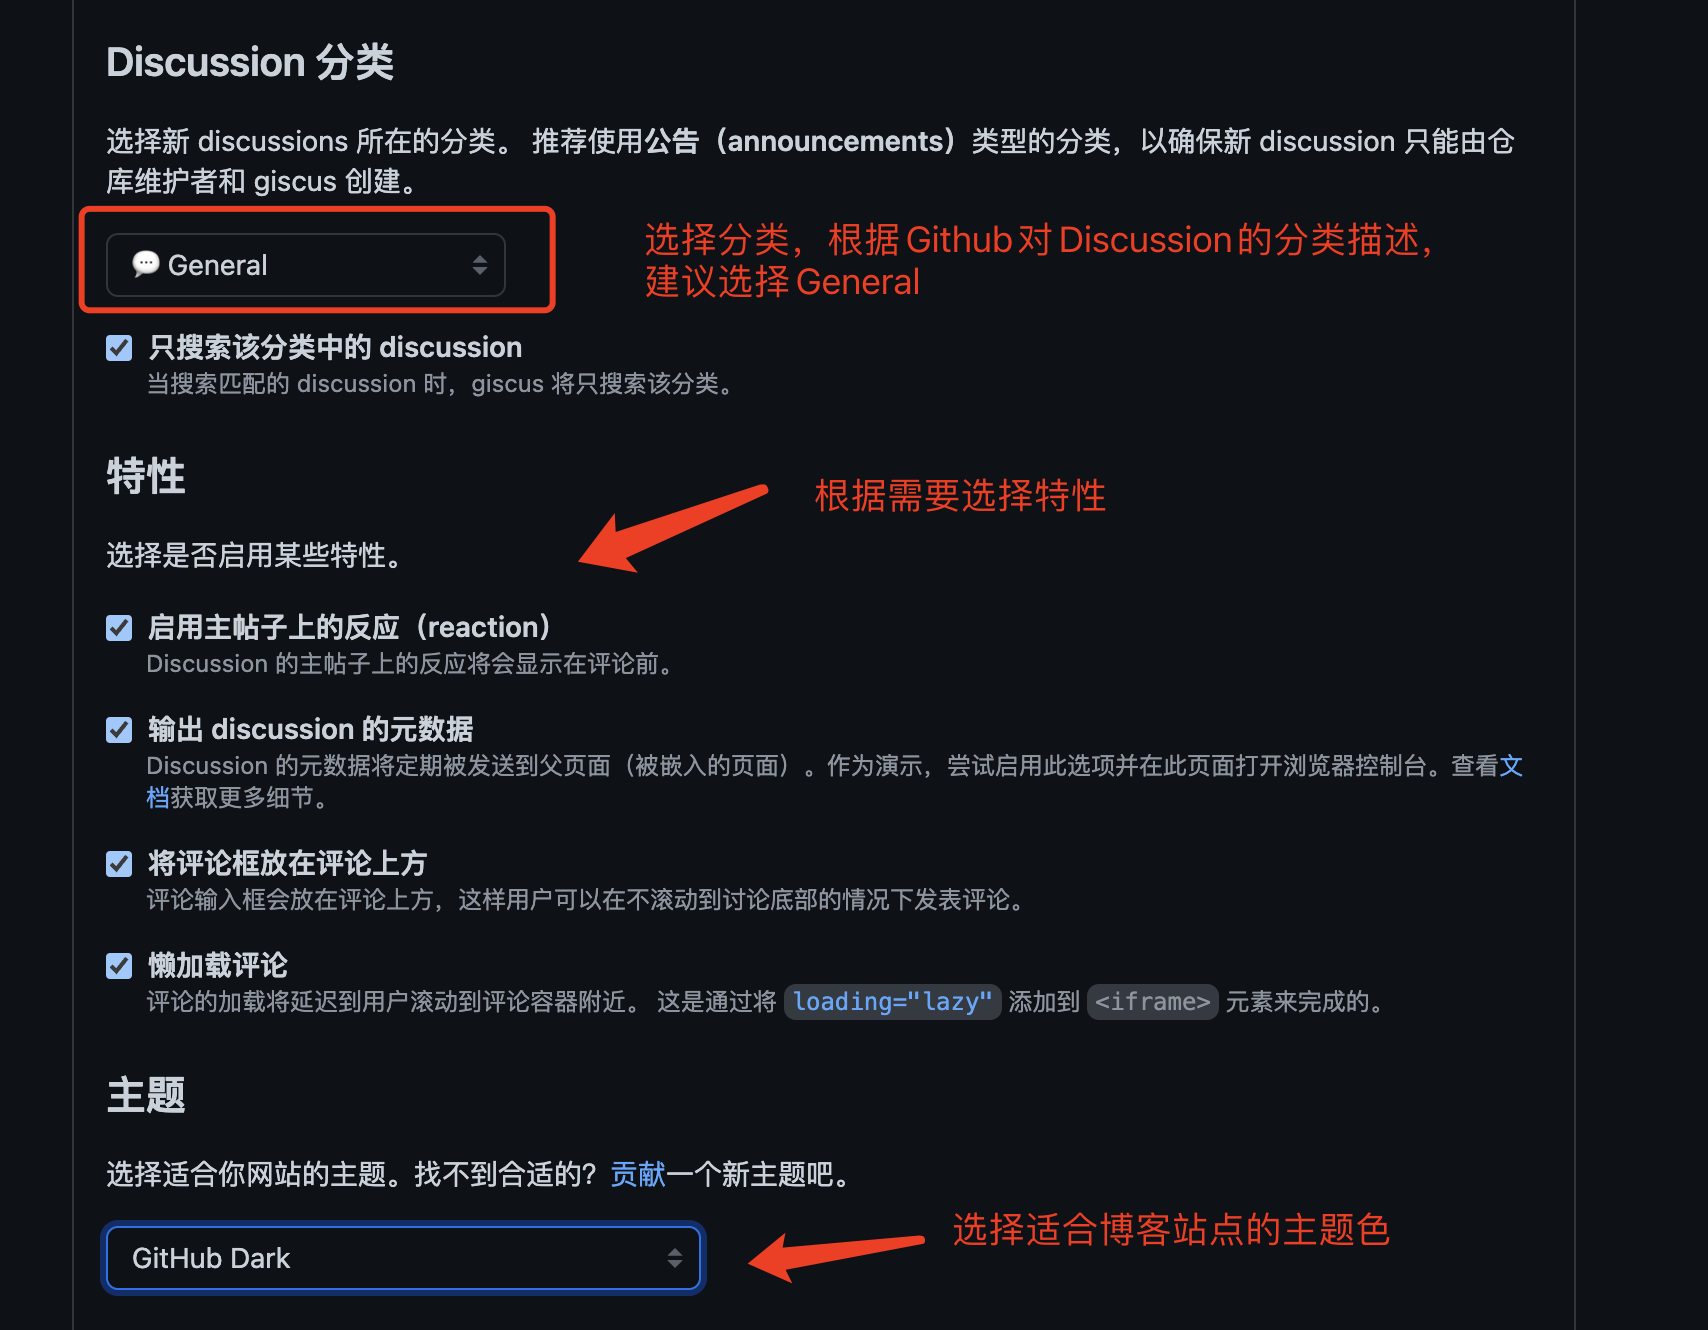
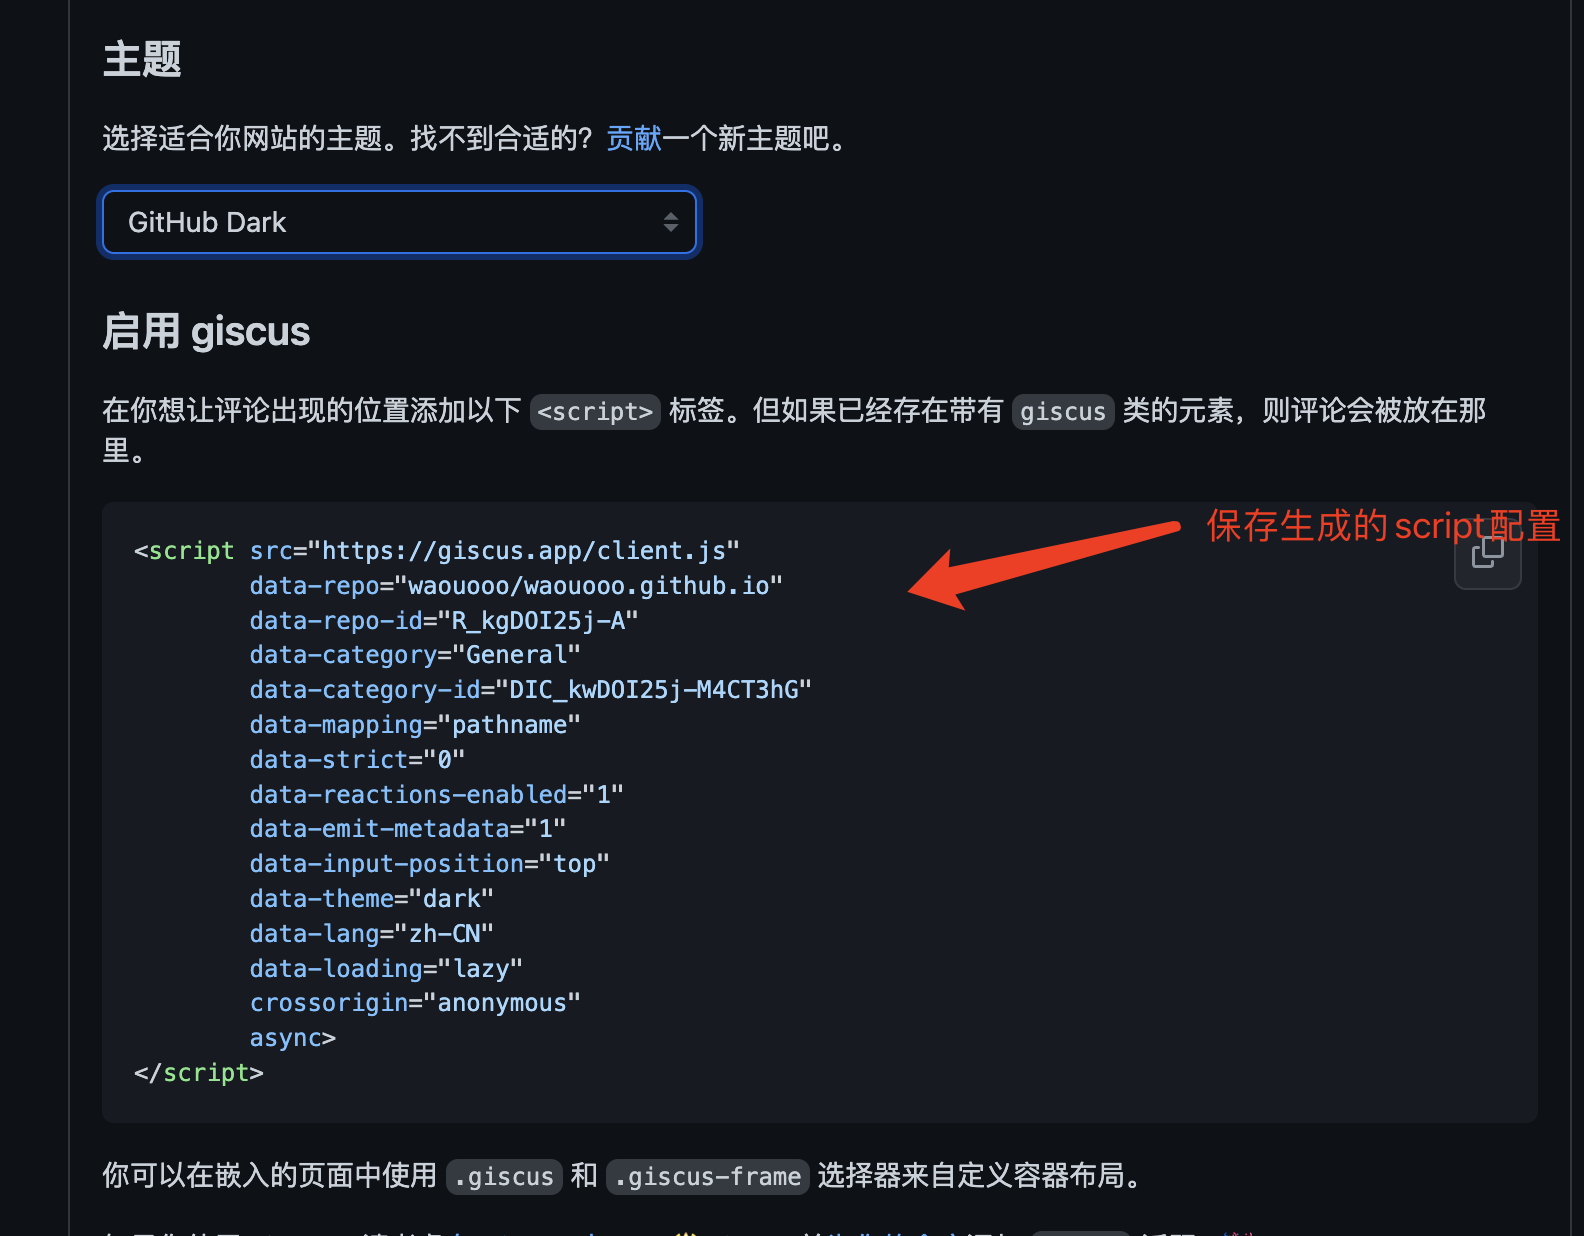
5) 通过giscus网站生成配置

3. 修改站点目录配置
- 在博客站点根目录中创建文件夹
# 创建目录
mkdir -pv layouts/partials
mkdir -pv layouts/_internal- 拷贝主题项目中
layouts/partials下的部分文件至占点根目录的layout/partials中,用于添加giscus评论系统的修改
# 拷贝需要的文件
cp themes/hugo-theme-relearn/layouts/partials/content-footer.html layouts/partials
cp themes/hugo-theme-relearn/layouts/partials/custom-comments.html layouts/partials
cp themes/hugo-theme-relearn/layouts/partials/footer.html layouts/partials
cp themes/hugo-theme-relearn/layouts/partials/menu-footer.html layouts/partials- 创建giscus.html文件
touch layout/_internal/giscus.html- 将以下内容拷贝至
layout/_internal/giscus.html
<div>
  {{ if site.Params.giscus }}
  <style>
    #comment {
      padding: 8rem 0 2rem;
    }

    #comment .vemoji {
        max-width: 1.5em;
        max-height: 1.5em;
    }
  </style>
    <div id="comment">
      <!-- 此处的配置可以直接拷贝2.5)通过giscus网站配置生成的script脚本,也可以将配置值抽取出来,参考下文的方式填入config.toml文件 -->
      <script src="https://giscus.app/client.js"
      data-repo="{{ .Site.Params.giscus.data_repo}}"
      data-repo-id="{{ .Site.Params.giscus.data_repo_id}}"
      data-category="{{ .Site.Params.giscus.data_category}}"
      data-category-id="{{ .Site.Params.giscus.data_category_id}}"
      data-mapping="{{ .Site.Params.giscus.data_mapping}}"
      data-reactions-enabled="{{ .Site.Params.giscus.data_reactions_enabled}}"
      data-emit-metadata="{{ .Site.Params.giscus.data_emit_metadata}}"
      data-input-position="{{ .Site.Params.giscus.data_input_position }}"
      data-theme="{{ .Site.Params.giscus.data_theme}}"
      data-lang="{{ .Site.Params.giscus.data_lang}}"
      crossorigin="{{ .Site.Params.giscus.crossorigin}}"
      data-term="{{ .Site.Params.giscus.data_term }}"
      async>
  </script>
    </div>
    <noscript>Please enable JavaScript to view the comments powered by giscus.</noscript>
  {{ end }}
</div>- 修改
layouts/partials/custom-comments.html文件,引入上面修改的giscus.html
<!-- import your comments system
{{ template "_internal/disqus.html" . }}
-->
{{ template "_internal/giscus.html" . }}- 删除
layouts/partials/footer.html中{{- partial "custom-comments.html" . }}(第3行左右) - 在
layouts/partials/content-footer.html最后追加{{- partial "custom-comments.html" . }}
{{- with .Params.LastModifierDisplayName }}
            <i class='fas fa-user'></i> {{ with $.Params.LastModifierEmail }}<a href="mailto:{{ . }}">{{ end }}{{ . }}{{ with $.Params.LastModifierEmail }}</a>{{ end }}
  {{- with $.Date }}
            <i class='fas fa-calendar'></i> {{ . | time.Format ":date_medium" }}
  {{- end }}
{{- end }}
{{- partial "custom-comments.html" . }}- 自定义
layouts/partials/menu-footer.html中的内容,也可不修改
	<style>
		#footer {
		  font-size: 13px;
		  height: 100px;
		  margin-left: auto;
		  margin-right: auto;
		  padding: 2rem 1rem;
		  text-align: center;
		  min-width: 230px;
		  max-width: 300px;
		}
		#footer p {
		  margin: 0;
		}
	  </style>
	  <p>Built with <a href="https://github.com/McShelby/hugo-theme-relearn" title="love"><i class="fas fa-heart"></i></a> by <a href="https://gohugo.io/">Hugo</a></p>
	  <script async="" src="../../js/buttons.js?1674688248"></script>
4. 修改config.toml文件
- 若
layout/_internal/giscus.html文件中giscus的script脚本参数通过配置提取,则添加以下giscus配置至config.toml 中,data_repo,data_repo_id,data_categorydata_category_id这四个参数为上文中开启discussions仓库的数据,data_category使用上文的General。其中的值与上文giscus官网配置得到的值一致
[params.giscus]
  data_repo="waouooo/waouooo.github.io"
  data_repo_id="*****"
  data_category="General"
  data_category_id="*****"
  data_mapping="pathname"
  data_reactions_enabled="1"
  data_emit_metadata="0"
  data_theme="dark"
  data_lang="zh-CN"
  data_input_position="top"
  data_term="1046"
crossorigin="anonymous"通过GitHub GraphQL API 查询repo_id 和category_id 的内容
{
  resource(url: "https://github.com/waouooo/waouooo.github.io") {
    ... on Repository {
      id
      name
      discussion(number: 1) {
        category {
          id
          name
        }
      }
    }
  }
}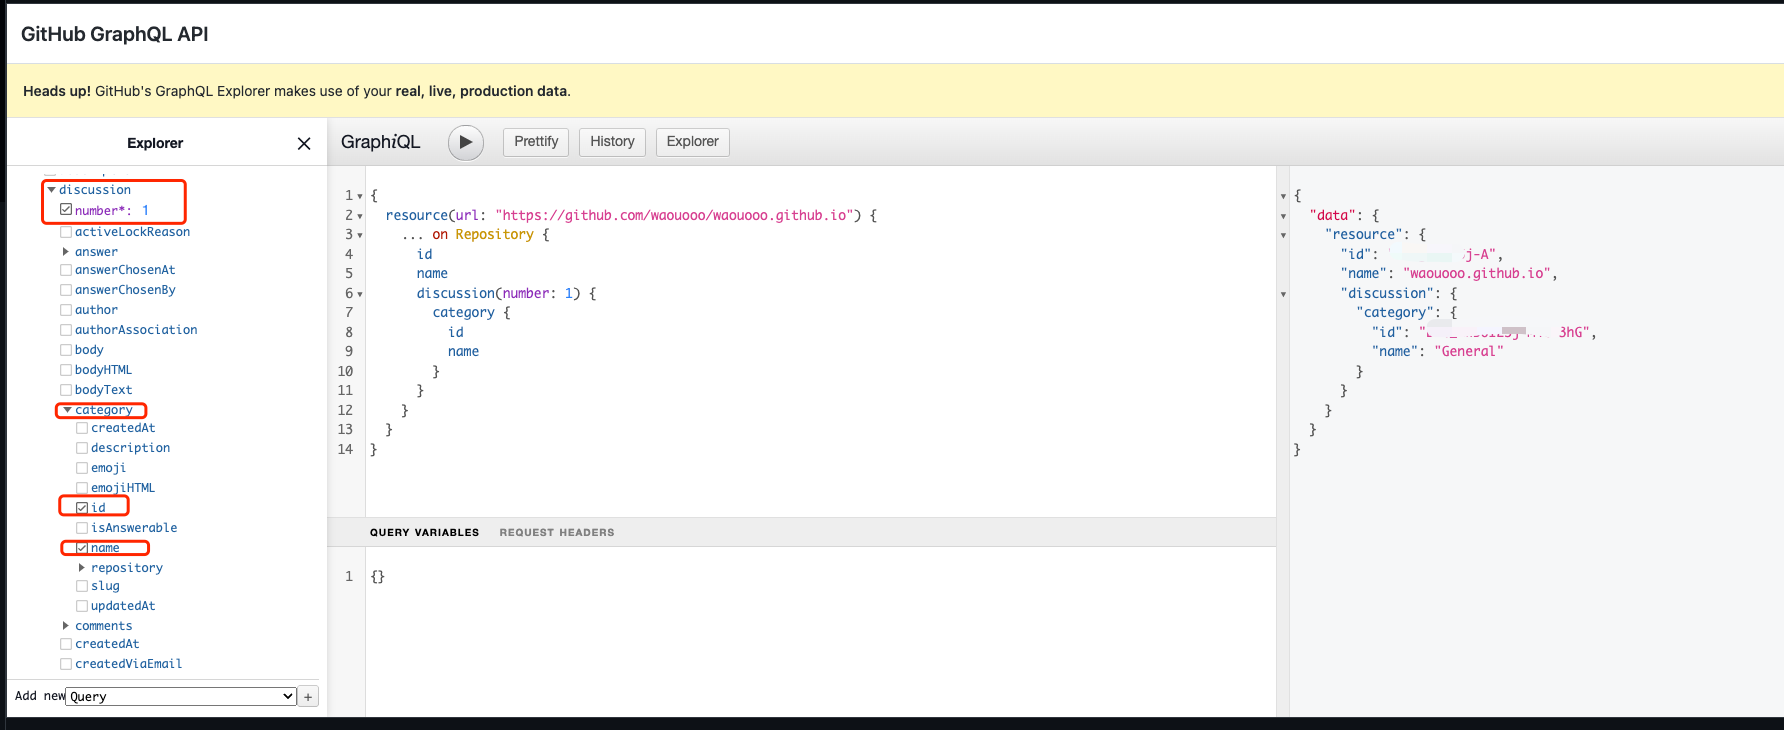
将查询到的结果回填至config.toml文件的**** 中
5. 重新生成静态页面,上传至仓库中
hugo -d dist
cd dist
git add .
git commit -m "add giscus"
git push
上传成功后等待编译部署完即可查看页面是否成功添加了giscus评论系统了