Hugo+Github Pages快速搭建个人博客一:基础建站
需求:创建一个个人博客
对程序员来说个人博客是一个非常常见的东西,可以在上面记录自己的学习积累,同时也可以通过互联网分享给大家。个人博客建站的方式有很多,本文不做横向比较,本着白嫖与图方便并兼顾可用性强的角度,选择使用Hugo + Github Pages + Giscus 进行建站。
工具简介:
Hugo 是一个golang编写的静态网站生成器,可以从markdown格式生成。
Github Pages 是Github提供的静态站点托管服务,可以通过仓库(repository)的形式托管静态网站,同类型的还有国内的Gitee Pages
Giscus 是一个站点评论系统,基于Github的Discussions功能
创建Github Pages
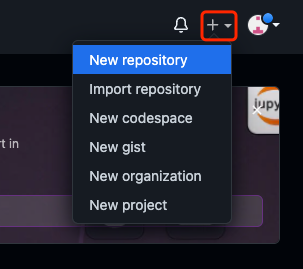
- 登录github 创建一个<username>.github.io的仓库
- 使用<username>.github.io 作为存储库名称。 将
username 替换为你的 GitHub 用户名。 例如,如果用户名为 waouooo,则存储库名称应为 waouooo.github.io。
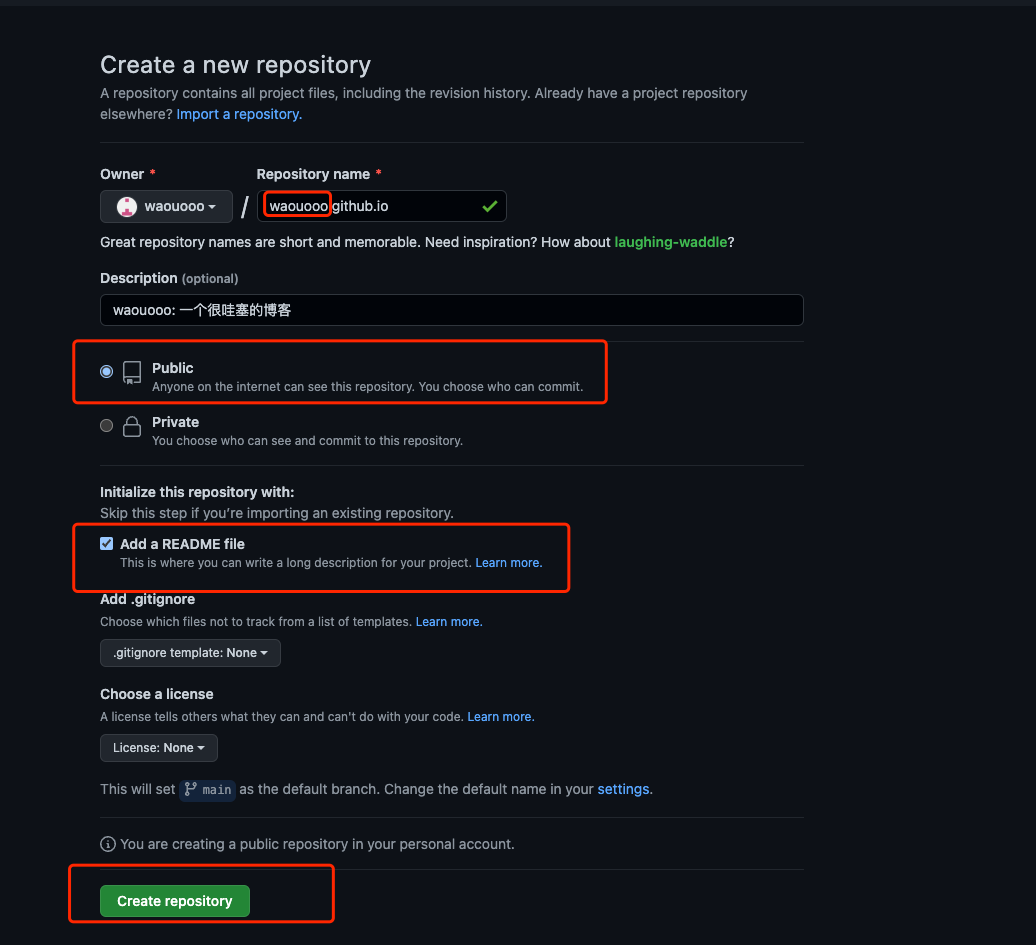 (ps: 为了保证Github Pages 的可见性,普通用户需要将仓库设置为public,若想使用private,也可以氪金)
 - 点击Settings配置Github Pages

- 查看Github Pages 配置
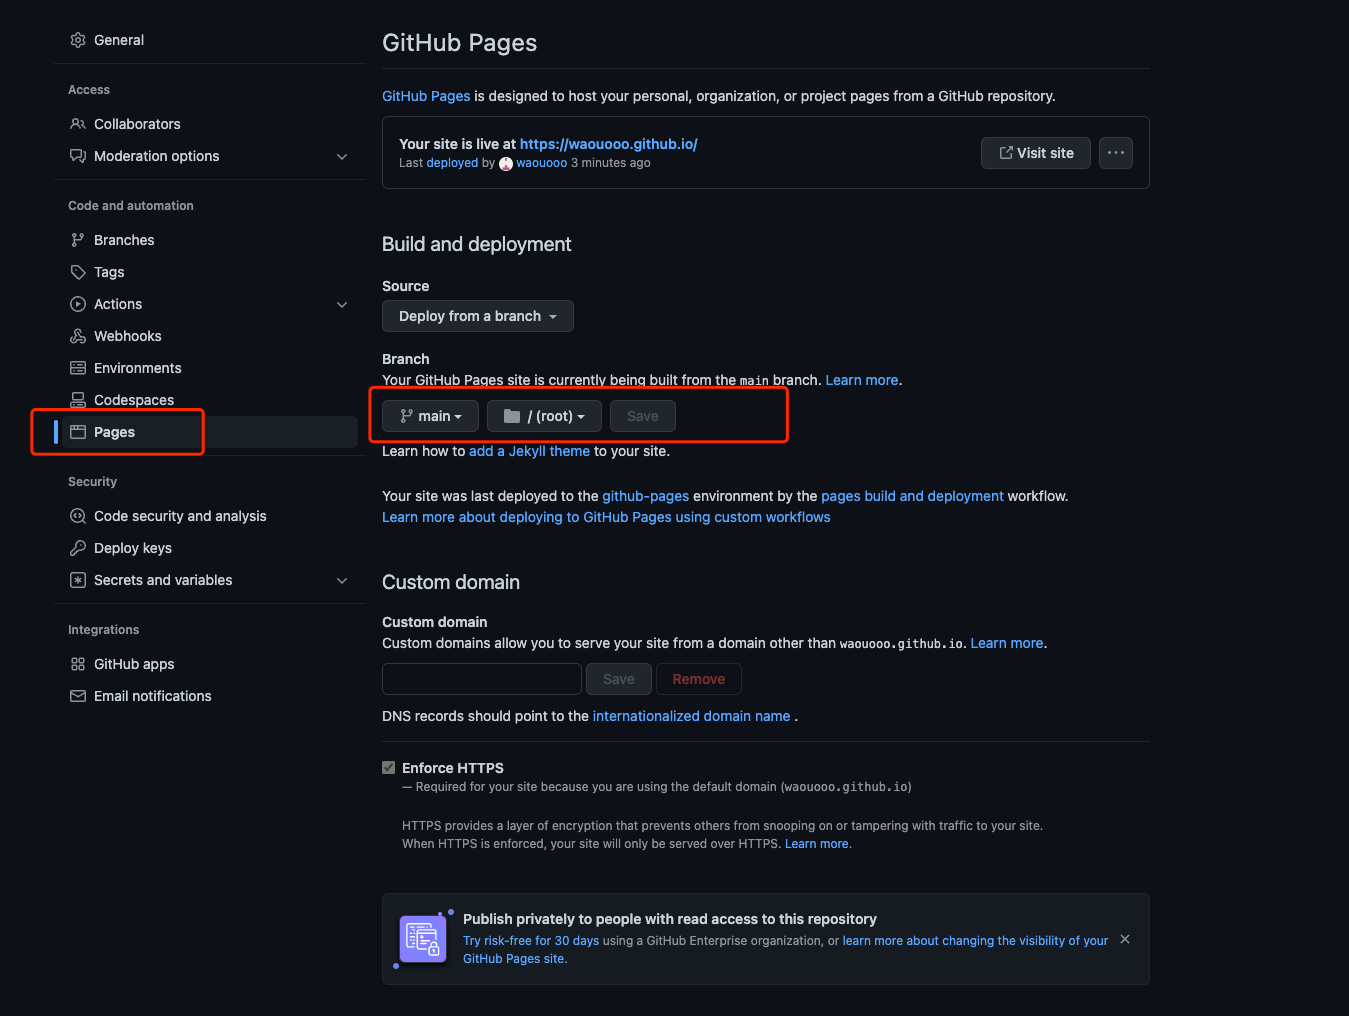
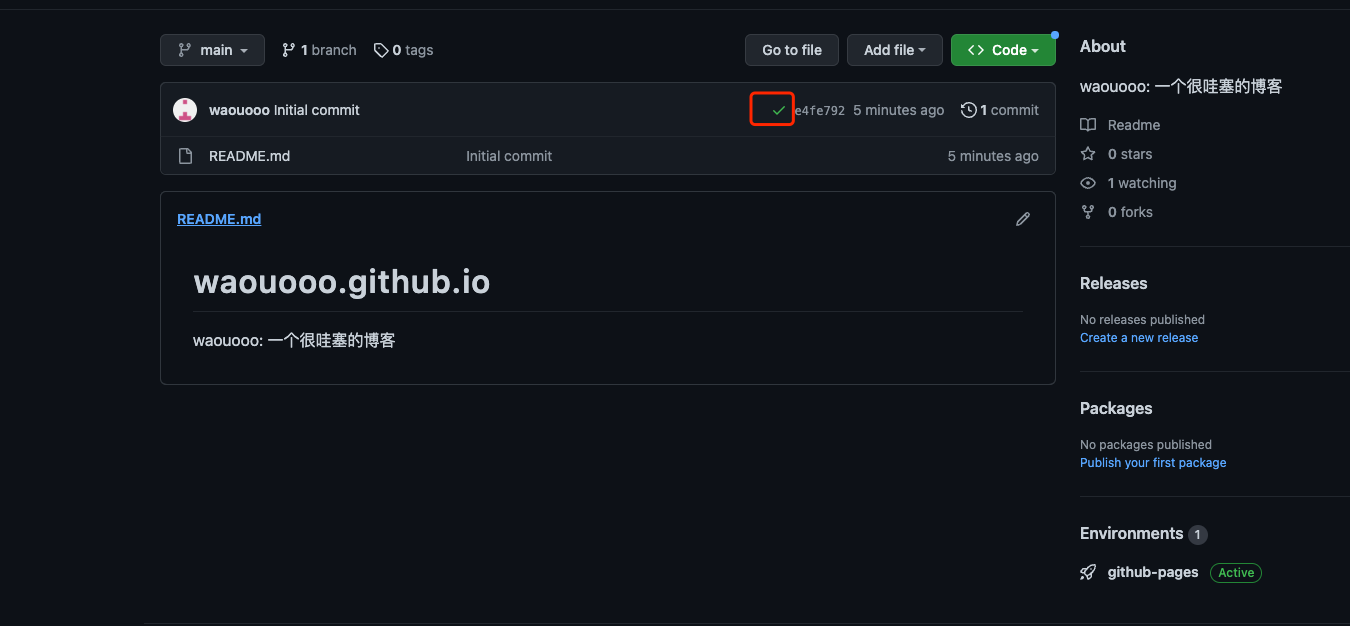
- 返回仓库主页查看部署状态:若出现绿色的勾勾✅则表示部署完成,可以通过访问https://waouooo.github.io 来查看,若是其他标志,也可以点击查看具体的工作流流程。
使用Hugo 初始化站点
- macOS安装hugo, 其他操作系统安装方式可以参考官方文档
- 安装完成后查看当前安装的版本
hugo version
# 输出: hugo v0.105.0+extended darwin/amd64 BuildDate=unknown
- 初始化站点
hugo new site waouooo
Congratulations! Your new Hugo site is created in /Users/waouooo/Workspace/waouooo.

Just a few more steps and you're ready to go:

1. Download a theme into the same-named folder.
   Choose a theme from https://themes.gohugo.io/ or
   create your own with the "hugo new theme <THEMENAME>" command.
2. Perhaps you want to add some content. You can add single files
   with "hugo new <SECTIONNAME>/<FILENAME>.<FORMAT>".
3. Start the built-in live server via "hugo server".

Visit https://gohugo.io/ for quickstart guide and full documentation.
- 进入站点目录并以git submodule模式添加主题,本站点使用主题为hugo-theme-relearn(官方文档), 其他主题可进入官网主题 选择
cd waouooo
# 使用git 初始化仓库
git init
# 输出: 已初始化空的 Git 仓库于 /Users/zhou/Workspace/waouooo/waouooo/.git/
git submodule add https://github.com/McShelby/hugo-theme-relearn.git themes/hugo-theme-relearn
- 从主题exampleSite目录中拷贝配置
cp themes/hugo-theme-relearn/exampleSite/config.toml .
- 修改配置文件baseURL与:themesdir
# this is a required setting for this theme to appear on https://themes.gohugo.io/
# change this to a value appropriate for you; if your site is served from a subdirectory
# set it like "https://example.com/mysite/"
# 修改此处✅
baseURL = "https://waouooo.github.io/"

# canonicalization will only be used for the sitemap.xml and index.xml files;
# if set to false, a site served from a subdirectory will generate wrong links
# inside of the above mentioned files; if you serve the page from the servers root
# you are free to set the value to false as recommended by the official Hugo documentation
canonifyURLs = true # true -> all relative URLs would instead be canonicalized using baseURL
# required value to serve this page from a webserver AND the file system;
# if you don't want to serve your page from the file system, you can also set this value
# to false
relativeURLs = true # true -> rewrite all relative URLs to be relative to the current content
# if you set uglyURLs to false, this theme will append 'index.html' to any branch bundle link
# so your page can be also served from the file system; if you don't want that,
# set disableExplicitIndexURLs=true in the [params] section
uglyURLs = false     # true -> basic/index.html -> basic.html

# the directory where Hugo reads the themes from; this is specific to your
# installation and most certainly needs be deleted or changed
# 修改此处✅
themesdir = "./themes"
# yeah, well, obviously a mandatory setting for your site, if you want to
# use this theme ;-)
theme = "hugo-theme-relearn"

# the main language of this site; also an automatic pirrrate translation is
# available in this showcase
languageCode = "en"
# make sure your defaultContentLanguage is the first one in the [Languages]
# array below, as the theme needs to make assumptions on it
defaultContentLanguage = "en"
# if you want to get rrrid o' ourrr pirrrates nonsense uncomment th' next line
# disableLanguages = ['pir']

# the site's title of this showcase; you should change this ;-)
title = "Hugo Relearn Documentation"

# We disable this for testing the exampleSite; you must do so too
# if you want to use the themes parameter disableGeneratorVersion=true;
# otherwise Hugo will create a generator tag on your home page
disableHugoGeneratorInject = true

[outputs]
  # add JSON to the home to support lunr search; This is a mandatory setting
  # for the search functionality
  # add PRINT to home, section and page to activate the feature to print whole
  # chapters
  home = ["HTML", "RSS", "PRINT", "SEARCH", "SEARCHPAGE"]
  section = ["HTML", "RSS", "PRINT"]
  page = ["HTML", "RSS", "PRINT"]

[markup]
  [markup.highlight]
    # if `guessSyntax = true`, there will be no unstyled code even if no language
    # was given BUT Mermaid and Math codefences will not work anymore! So this is a
    # mandatory setting for your site if you want to use Mermaid or Math codefences
    guessSyntax = false

    # here in this showcase we use our own modified chroma syntax highlightning style
    # which is imported in theme-relearn-light.css / theme-relearn-dark.css;
    # if you want to use a predefined style instead:
    # - remove the following `noClasses`
    # - set the following `style` to a predefined style name
    # - remove the `@import` of the self-defined chroma stylesheet from your CSS files
    #   (here eg.: theme-relearn-light.css / theme-relearn-dark.css)
    noClasses = false
    # style = "tango"

  [markup.goldmark.renderer]
    # activated for this showcase to use HTML and JavaScript; decide on your own needs;
    # if in doubt, remove this line
    unsafe = true

# allows `hugo server` to display this showcase in IE11; this is used for testing, as we
# are still supporting IE11 - although with degraded experience; if you don't care about
# `hugo server` or browsers of ancient times, fell free to remove this whole block
[server]
  [[server.headers]]
    for = "**.html"
    [server.headers.values]
       X-UA-Compatible = "IE=edge"

# showcase of the menu shortcuts; you can use relative URLs linking
# to your content or use fully-quallified URLs to link outside of
# your project
[Languages]
  [Languages.en]
    title = "Hugo Relearn Theme"
    weight = 1
    languageName = "English"
    landingPageName = "<i class='fas fa-home'></i> Home"

  [[Languages.en.menu.shortcuts]]
    name = "<i class='fab fa-fw fa-github'></i> GitHub repo"
    identifier = "ds"
    url = "https://github.com/McShelby/hugo-theme-relearn"
    weight = 10

  [[Languages.en.menu.shortcuts]]
    name = "<i class='fas fa-fw fa-camera'></i> Showcases"
    url = "more/showcase/"
    weight = 11

  [[Languages.en.menu.shortcuts]]
    name = "<i class='fas fa-fw fa-bookmark'></i> Hugo Documentation"
    identifier = "hugodoc"
    url = "https://gohugo.io/"
    weight = 20

  [[Languages.en.menu.shortcuts]]
    name = "<i class='fas fa-fw fa-bullhorn'></i> Credits"
    url = "more/credits/"
    weight = 30

  [[Languages.en.menu.shortcuts]]
    name = "<i class='fas fa-fw fa-tags'></i> Tags"
    url = "tags/"
    weight = 40

  # this is ourrr way t' showcase th' multilang settings by
  # doing autotrrranlat'n of th' english content; we are
  # lazy and don't supporrt furrrther trrranslations; arrr,
  # don't take it t' serrrious, fello'; it's prrretty hacky and:
  # NOT MEANT FER PRRRODUCTION! ARRR!

  [Languages.pir]
    title = "Cap'n Hugo Relearrrn Theme"
    weight = 2
    languageName = "Arrr! ☠ Pirrrates ☠"
    landingPageName = "<i class='fas fa-home'></i> Arrr! Home"

  [[Languages.pir.menu.shortcuts]]
    name = "<i class='fab fa-fw fa-github'></i> GitHub repo"
    identifier = "ds"
    url = "https://github.com/McShelby/hugo-theme-relearn"
    weight = 10

  [[Languages.pir.menu.shortcuts]]
    name = "<i class='fas fa-fw fa-camera'></i> Showcases"
    url = "more/showcase/"
    weight = 11

  [[Languages.pir.menu.shortcuts]]
    name = "<i class='fas fa-fw fa-bookmark'></i> Cap'n Hugo Documentat'n"
    identifier = "hugodoc"
    url = "https://gohugo.io/"
    weight = 20

  [[Languages.pir.menu.shortcuts]]
    name = "<i class='fas fa-fw fa-bullhorn'></i> Crrredits"
    url = "more/credits/"
    weight = 30

  [[Languages.pir.menu.shortcuts]]
    name = "<i class='fas fa-fw fa-tags'></i> Arrr! Tags"
    url = "tags/"
    weight = 40

# mounts are only needed in this showcase to access the publicly available screenshots;
# remove this section if you don't need further mounts
[module]
  [[module.mounts]]
    source = 'archetypes'
    target = 'archetypes'
  [[module.mounts]]
    source = 'assets'
    target = 'assets'
  [[module.mounts]]
    source = 'content'
    target = 'content'
  [[module.mounts]]
    source = 'data'
    target = 'data'
  [[module.mounts]]
    source = 'i18n'
    target = 'i18n'
  [[module.mounts]]
    source = '../images'
    target = 'content/images'
  [[module.mounts]]
    source = 'layouts'
    target = 'layouts'
  [[module.mounts]]
    source = 'static'
    target = 'static'

# settings specific to this theme's features; choose to your likings and
# consult this documentation for explaination
# 修改此处✅ 按需修改
[params]
  editURL = "https://github.com/waouooo//edit/main/exampleSite/content/"
  description = "waouooo: 一个很哇塞的博客"
  author = "waouooo"
  showVisitedLinks = true
  collapsibleMenu = true
  disableBreadcrumb = false
  disableInlineCopyToClipBoard = true
  disableNextPrev = false
  disableLandingPageButton = true
  titleSeparator = "::"
  themeVariant = [ "relearn-light", "relearn-dark", "learn", "neon", "blue", "green", "red" ]
  disableSeoHiddenPages = true
  # this is for the stylesheet generator to allow for interactivity in Mermaid
  # graphs; you usually will not need it and you should remove this for
  # security reasons
  mermaidInitialize = "{ \"securityLevel\": \"loose\" }"
  additionalContentLanguage = [ "en" ]
- 添加主页文章内容
创建文章draft默认为true,修改为false可以展示出来
hugo new _index.md
# 输出:Content "/Users/waouooo/Workspace/waouooo/content/_index.md" created
vim /Users/waouooo/Workspace/waouooo/content/_index.md

---
title: "waouooo"
date: 2023-01-28T23:30:32+08:00
draft: false
---

### waouooo::一个很哇塞的博客
- 启动博客并访问地址查看
hugo serve
port 1313 already in use, attempting to use an available port
Start building sites …
hugo v0.105.0+extended darwin/amd64 BuildDate=unknown

                   | EN  | PIR
-------------------+-----+------
  Pages            |  10 |  10
  Paginator pages  |   0 |   0
  Non-page files   |   0 |   0
  Static files     | 191 | 191
  Processed images |   0 |   0
  Aliases          |   1 |   0
  Sitemaps         |   2 |   1
  Cleaned          |   0 |   0

Built in 177 ms
Watching for changes in /Users/waouooo/Workspace/waouooo/{archetypes,content,data,layouts,static,themes}
Watching for config changes in /Users/waouooo/Workspace/waouooo/config.toml, /Users/waouooo/Workspace/waouooo/themes/hugo-theme-relearn/config.toml
Environment: "development"
Serving pages from memory
Running in Fast Render Mode. For full rebuilds on change: hugo server --disableFastRender
Web Server is available at http://localhost:64363/ (bind address 127.0.0.1)
Press Ctrl+C to stop
- 添加章节或者文章
详细内容可参考relearn官网配置
# 添加章节
hugo new --kind chapter basics/_index.md

# 创建文章内容
hugo new basics/first-content.md
hugo new basics/second-content/_index.md
- 以git submodule形式添加github pages托管的仓库, (使用ssh协议方便推送)
git submodule add git@github.com:waouooo/waouooo.github.io.git dist
- 生成静态文件
hugo 命令默认将静态文件生成至public目录当中,我们可以通过-d指定生成的目录
- 推送到github, 等待部署工作流执行完成查看页面
cd dist
git add .
git commit -m "add hugo static pages"
参考链接
1. GitHub Pages 快速入门
2. Hugo Quick Start
Hugo+Github Pages快速搭建个人博客二: 添加giscus评论系统
hugo-theme-relearn 主题添加giscus评论系统
通过上文我们已经实现了博客最重要的发布与展示功能,而作为一个技术博客,如果有一个评论系统供读者进行交流是再好不过了。经过对各个评论系统的横向比较,最终选择的giscus作为评论系统的引擎,那么下面就开始将giscus添加至系统中。
1. 安装giscus
点击https://github.com/apps/giscus访问github中的giscus app安装页面,点击install
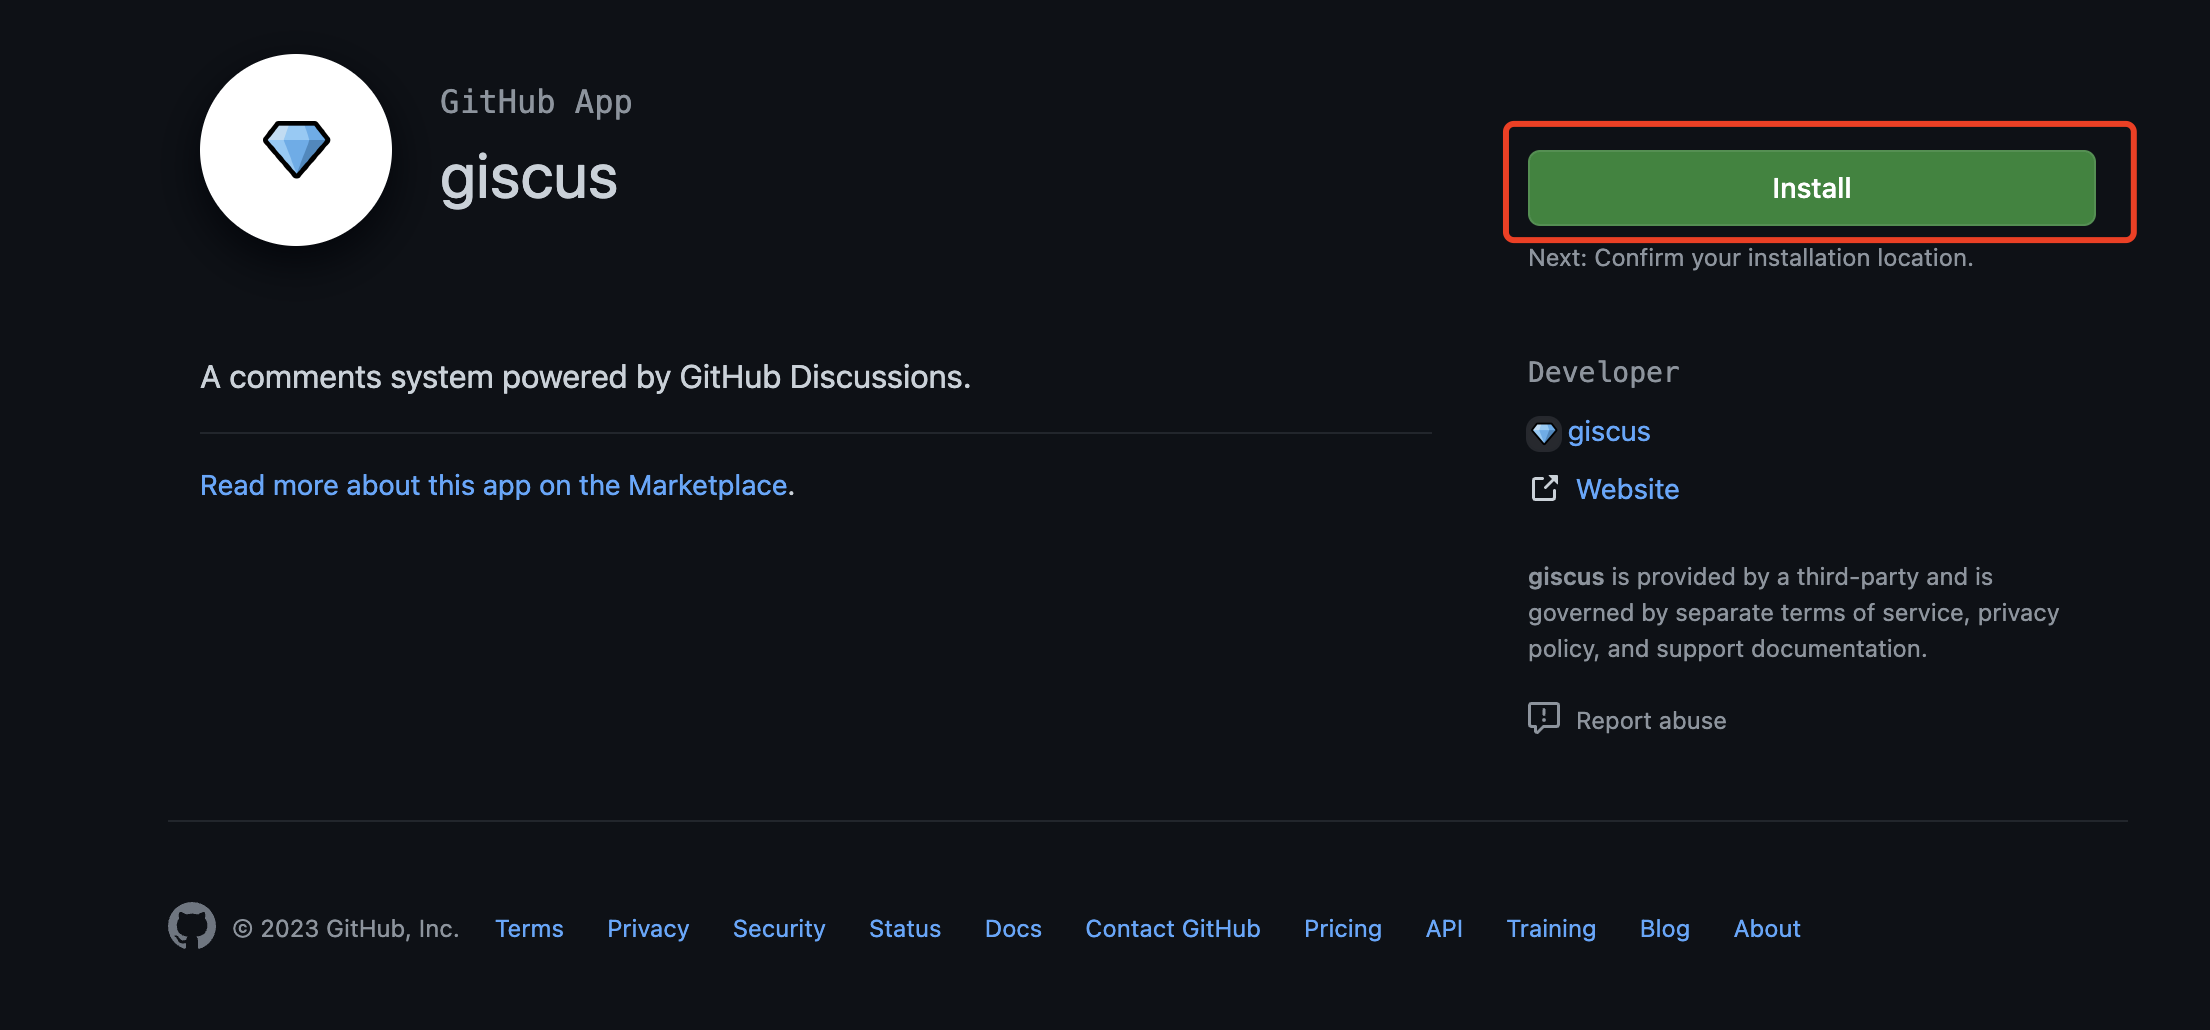
选择指定仓库进行安装:
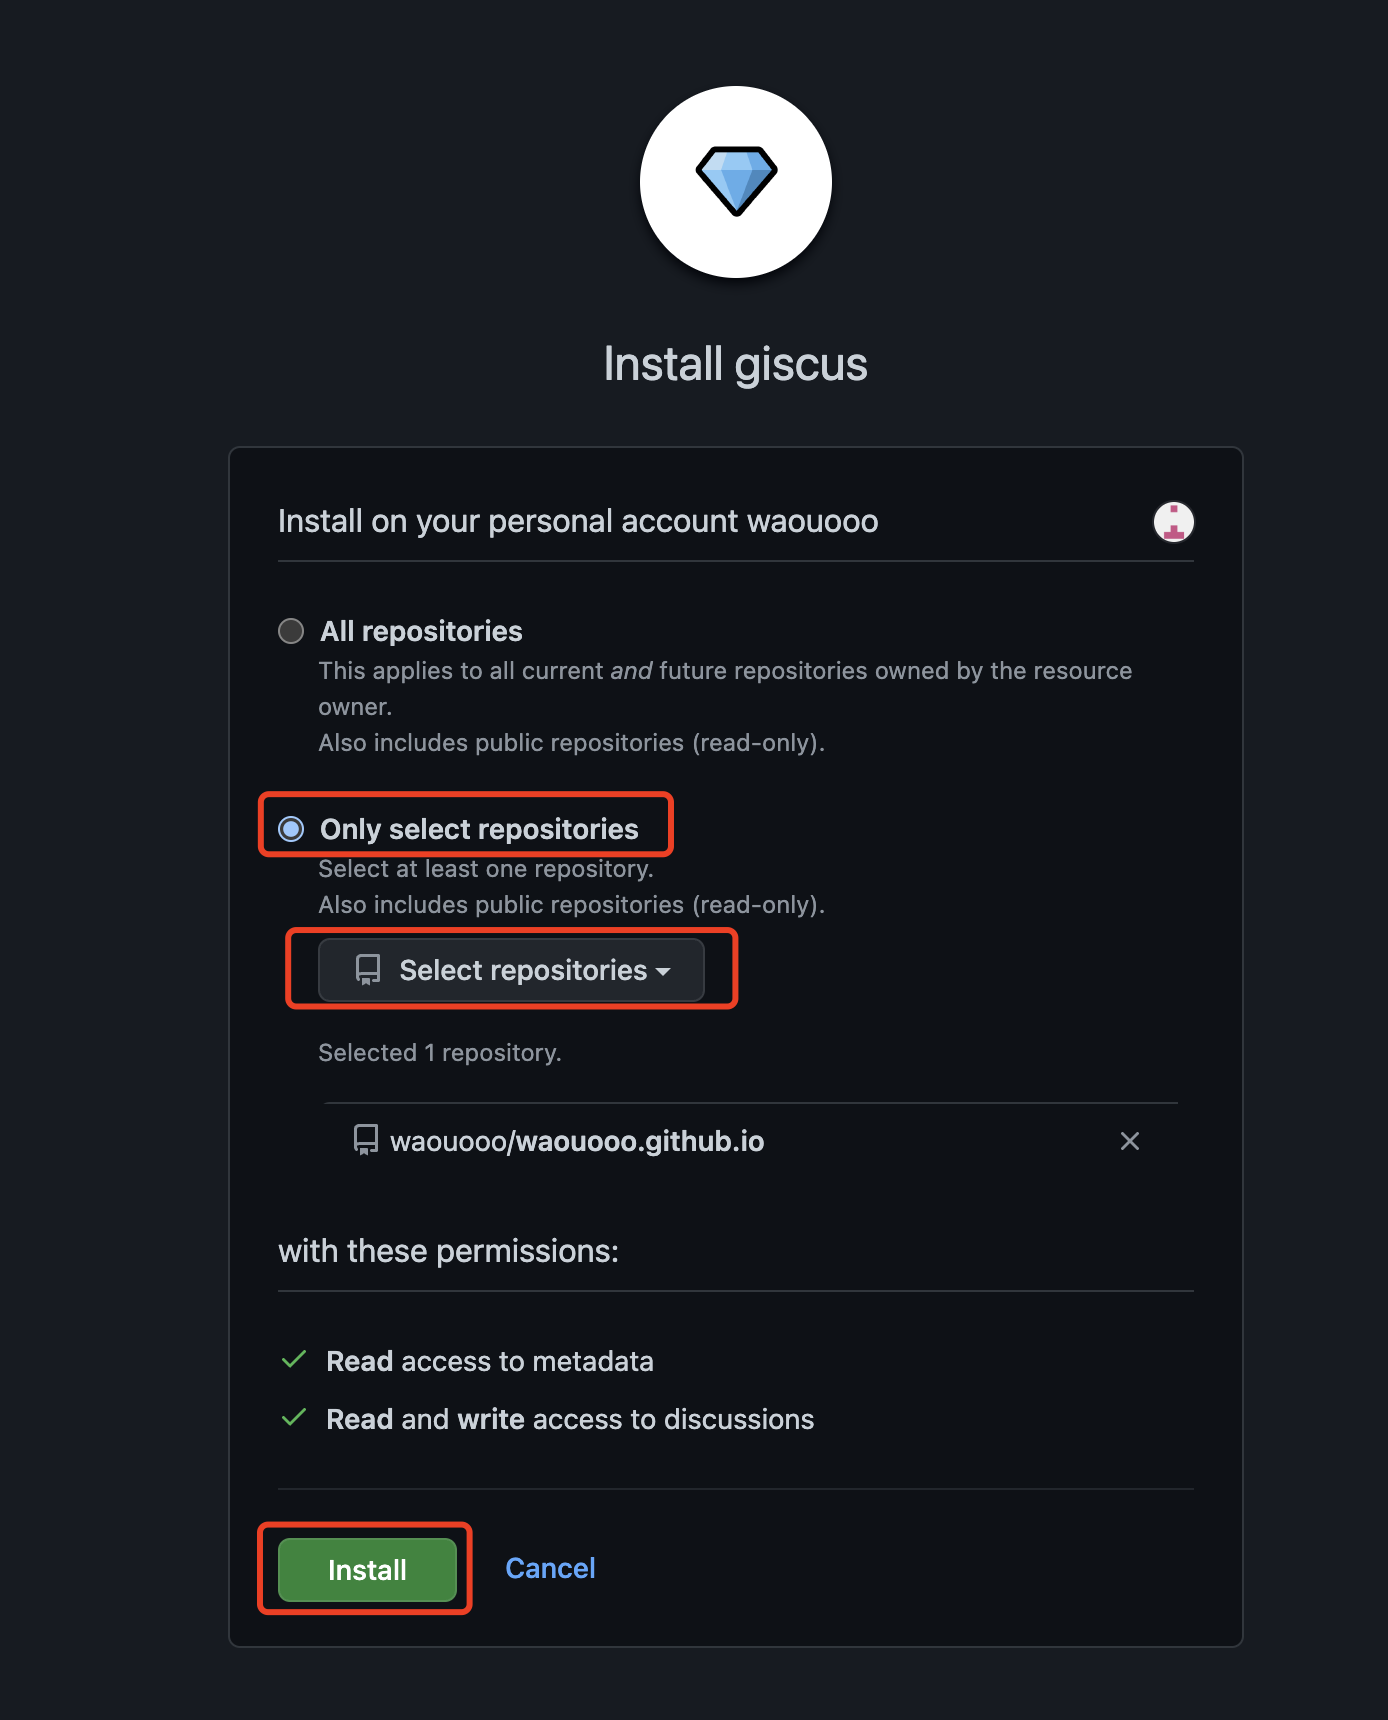
验证github账号密码

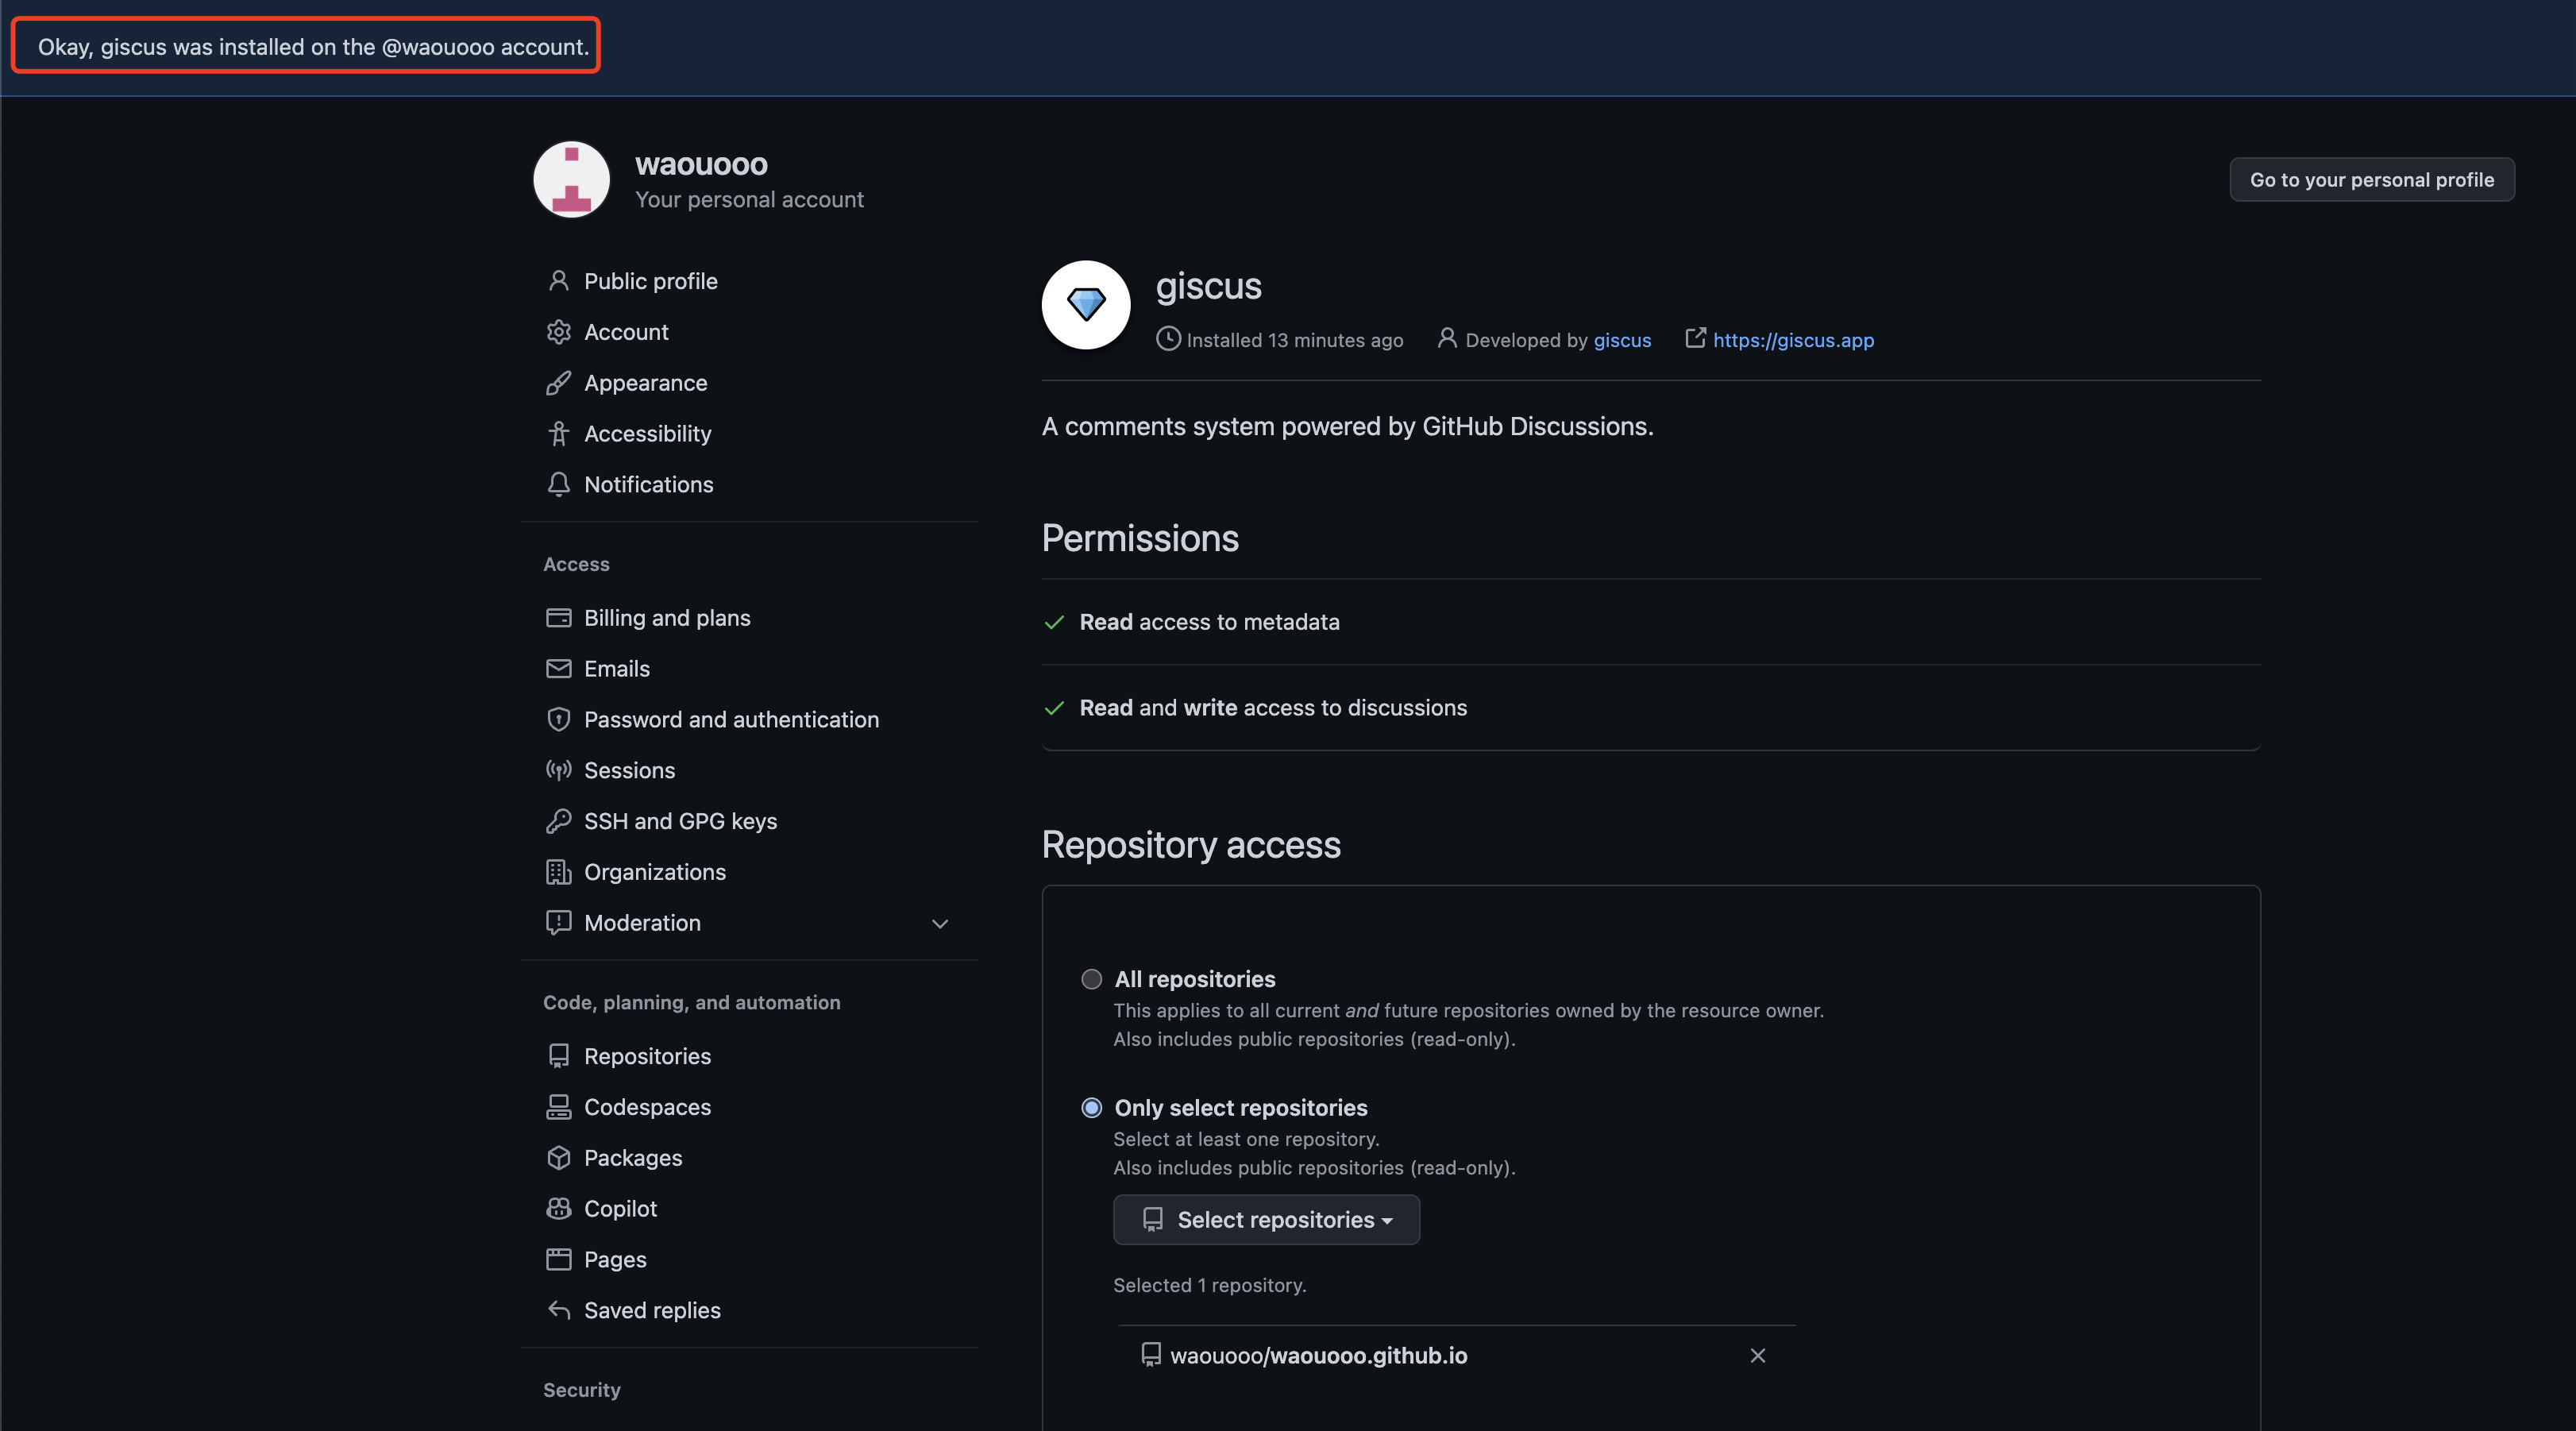 至此 waouooo.github.io仓库已安装上giscus
2. 打开Github仓库的Discussions功能
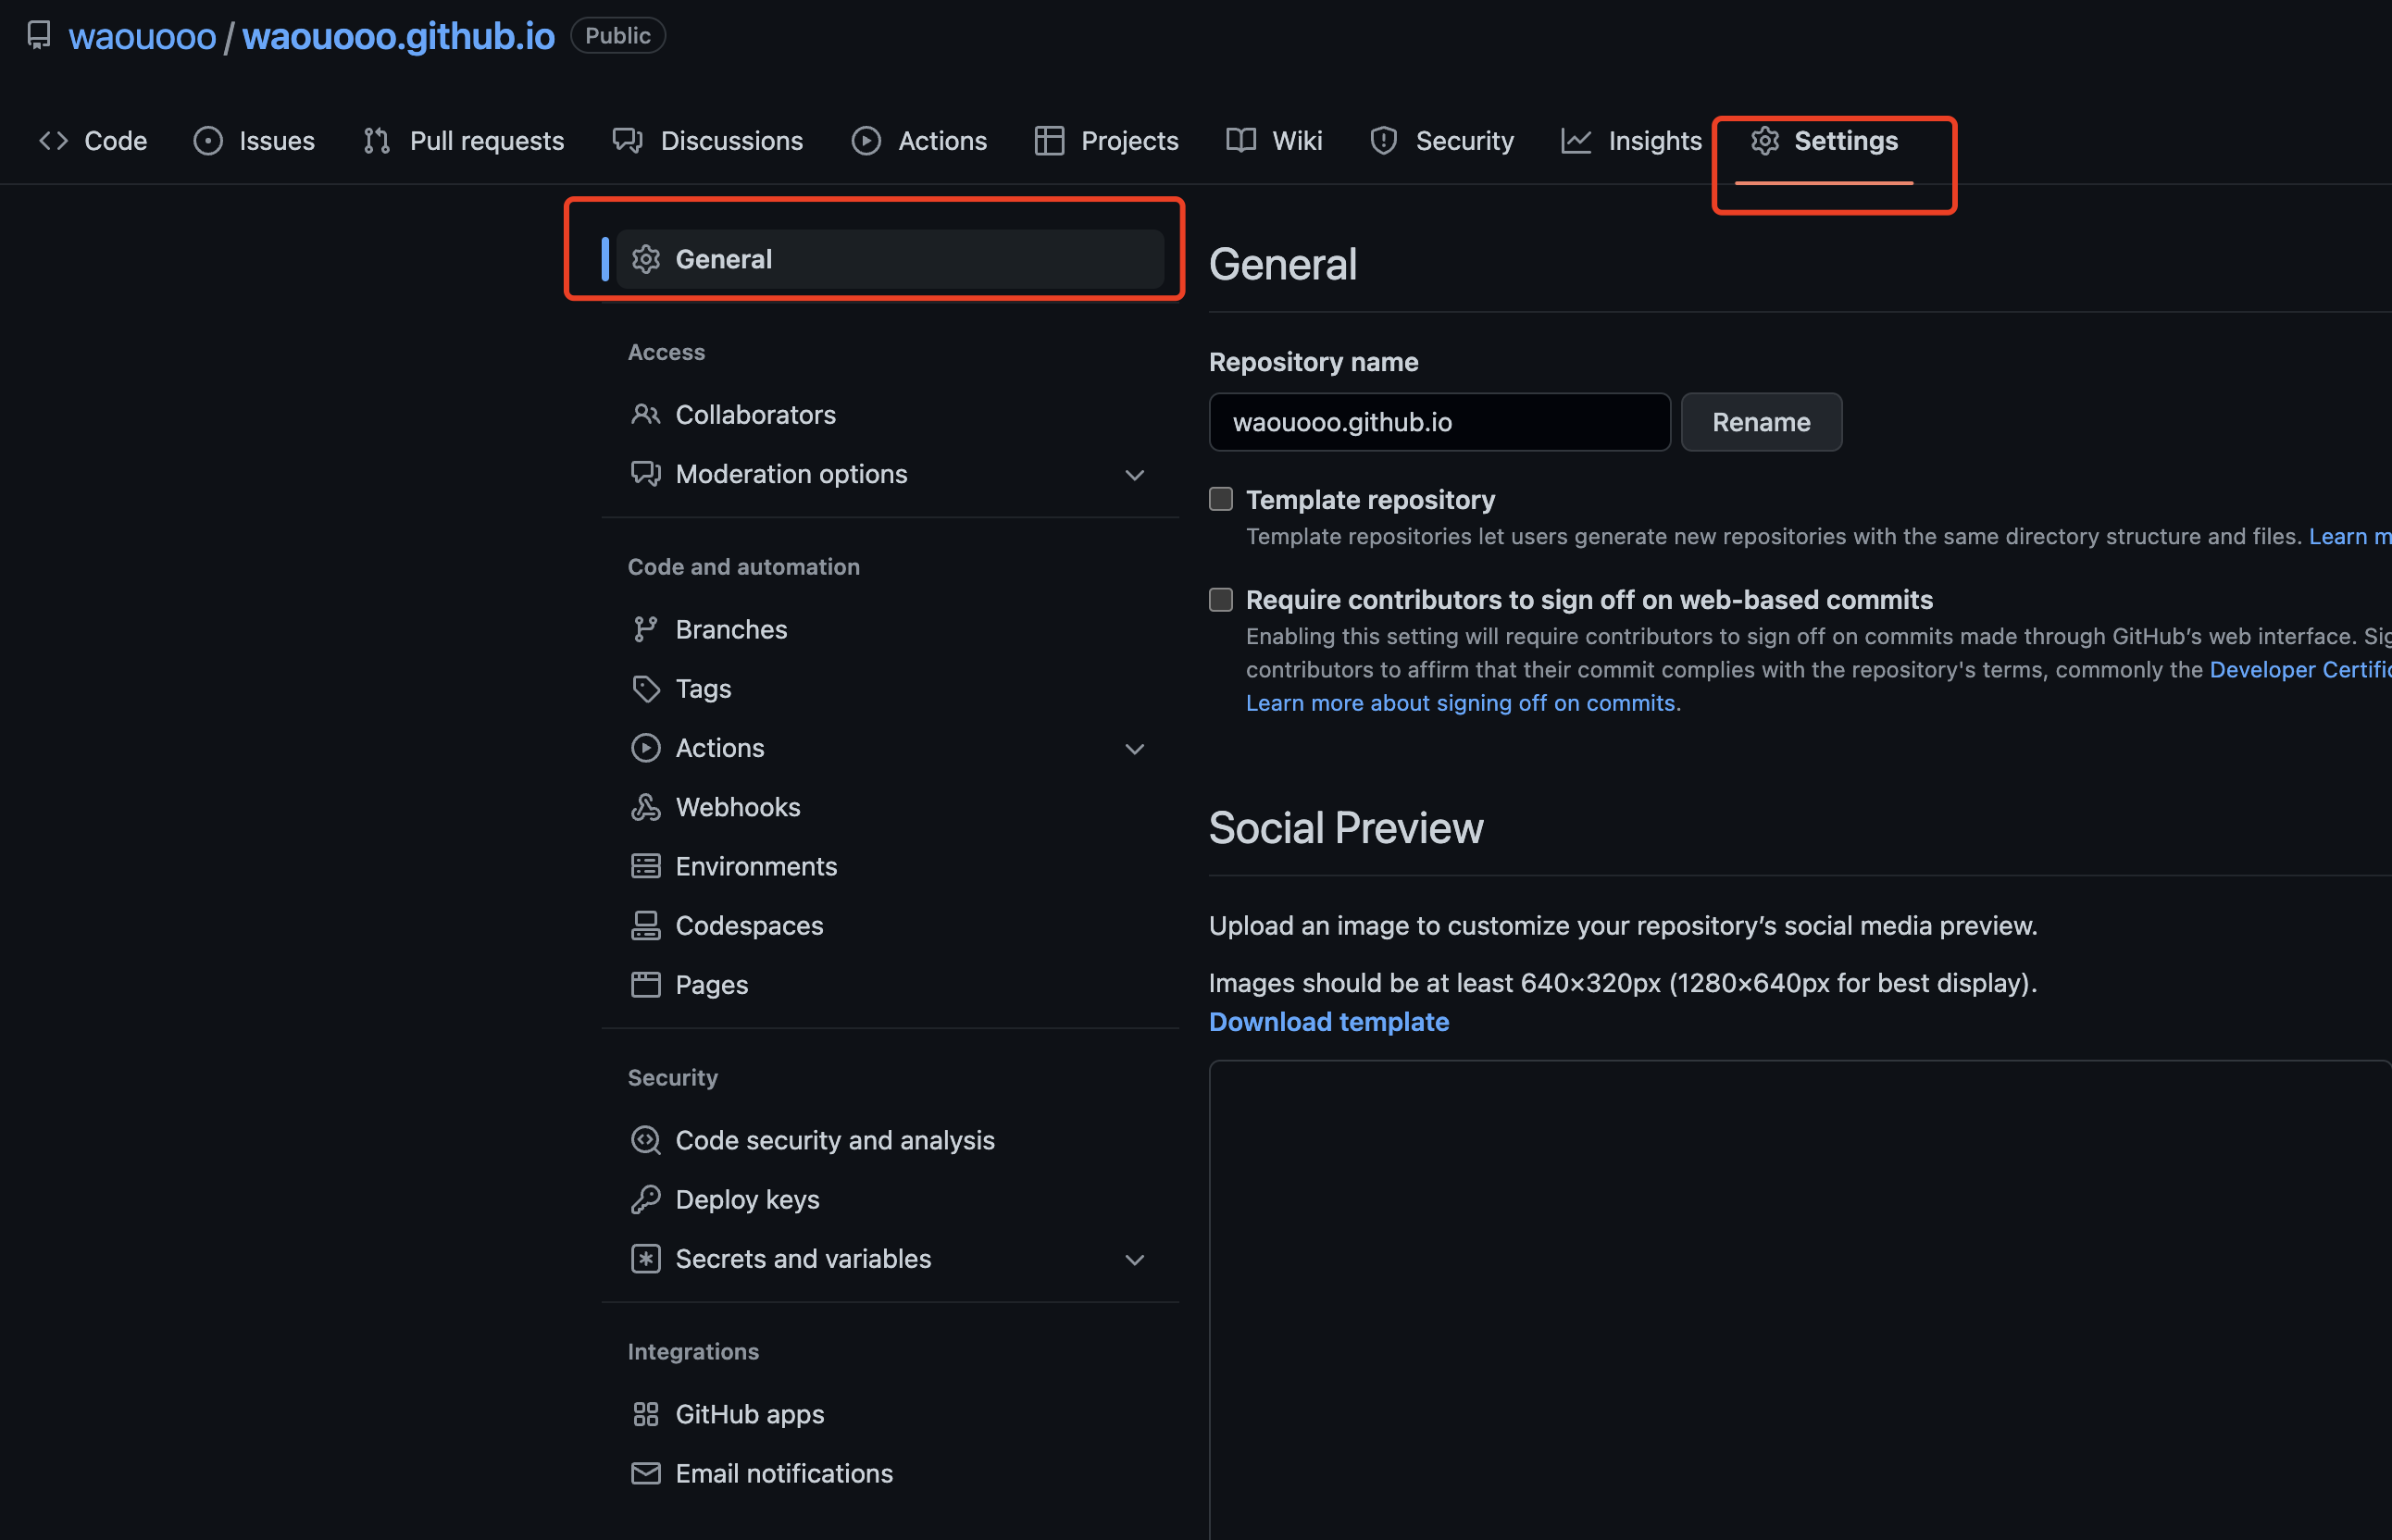
1) giscus是由 GitHub Discussions 驱动的评论系统,因此需要在github上有仓库开启Discussions功能对评论进行托管,我们这里就直接选择博客站点仓库开启Discussions:

2) 在settings的General栏往下拉,找到Features
3) 勾选✅上Discussions
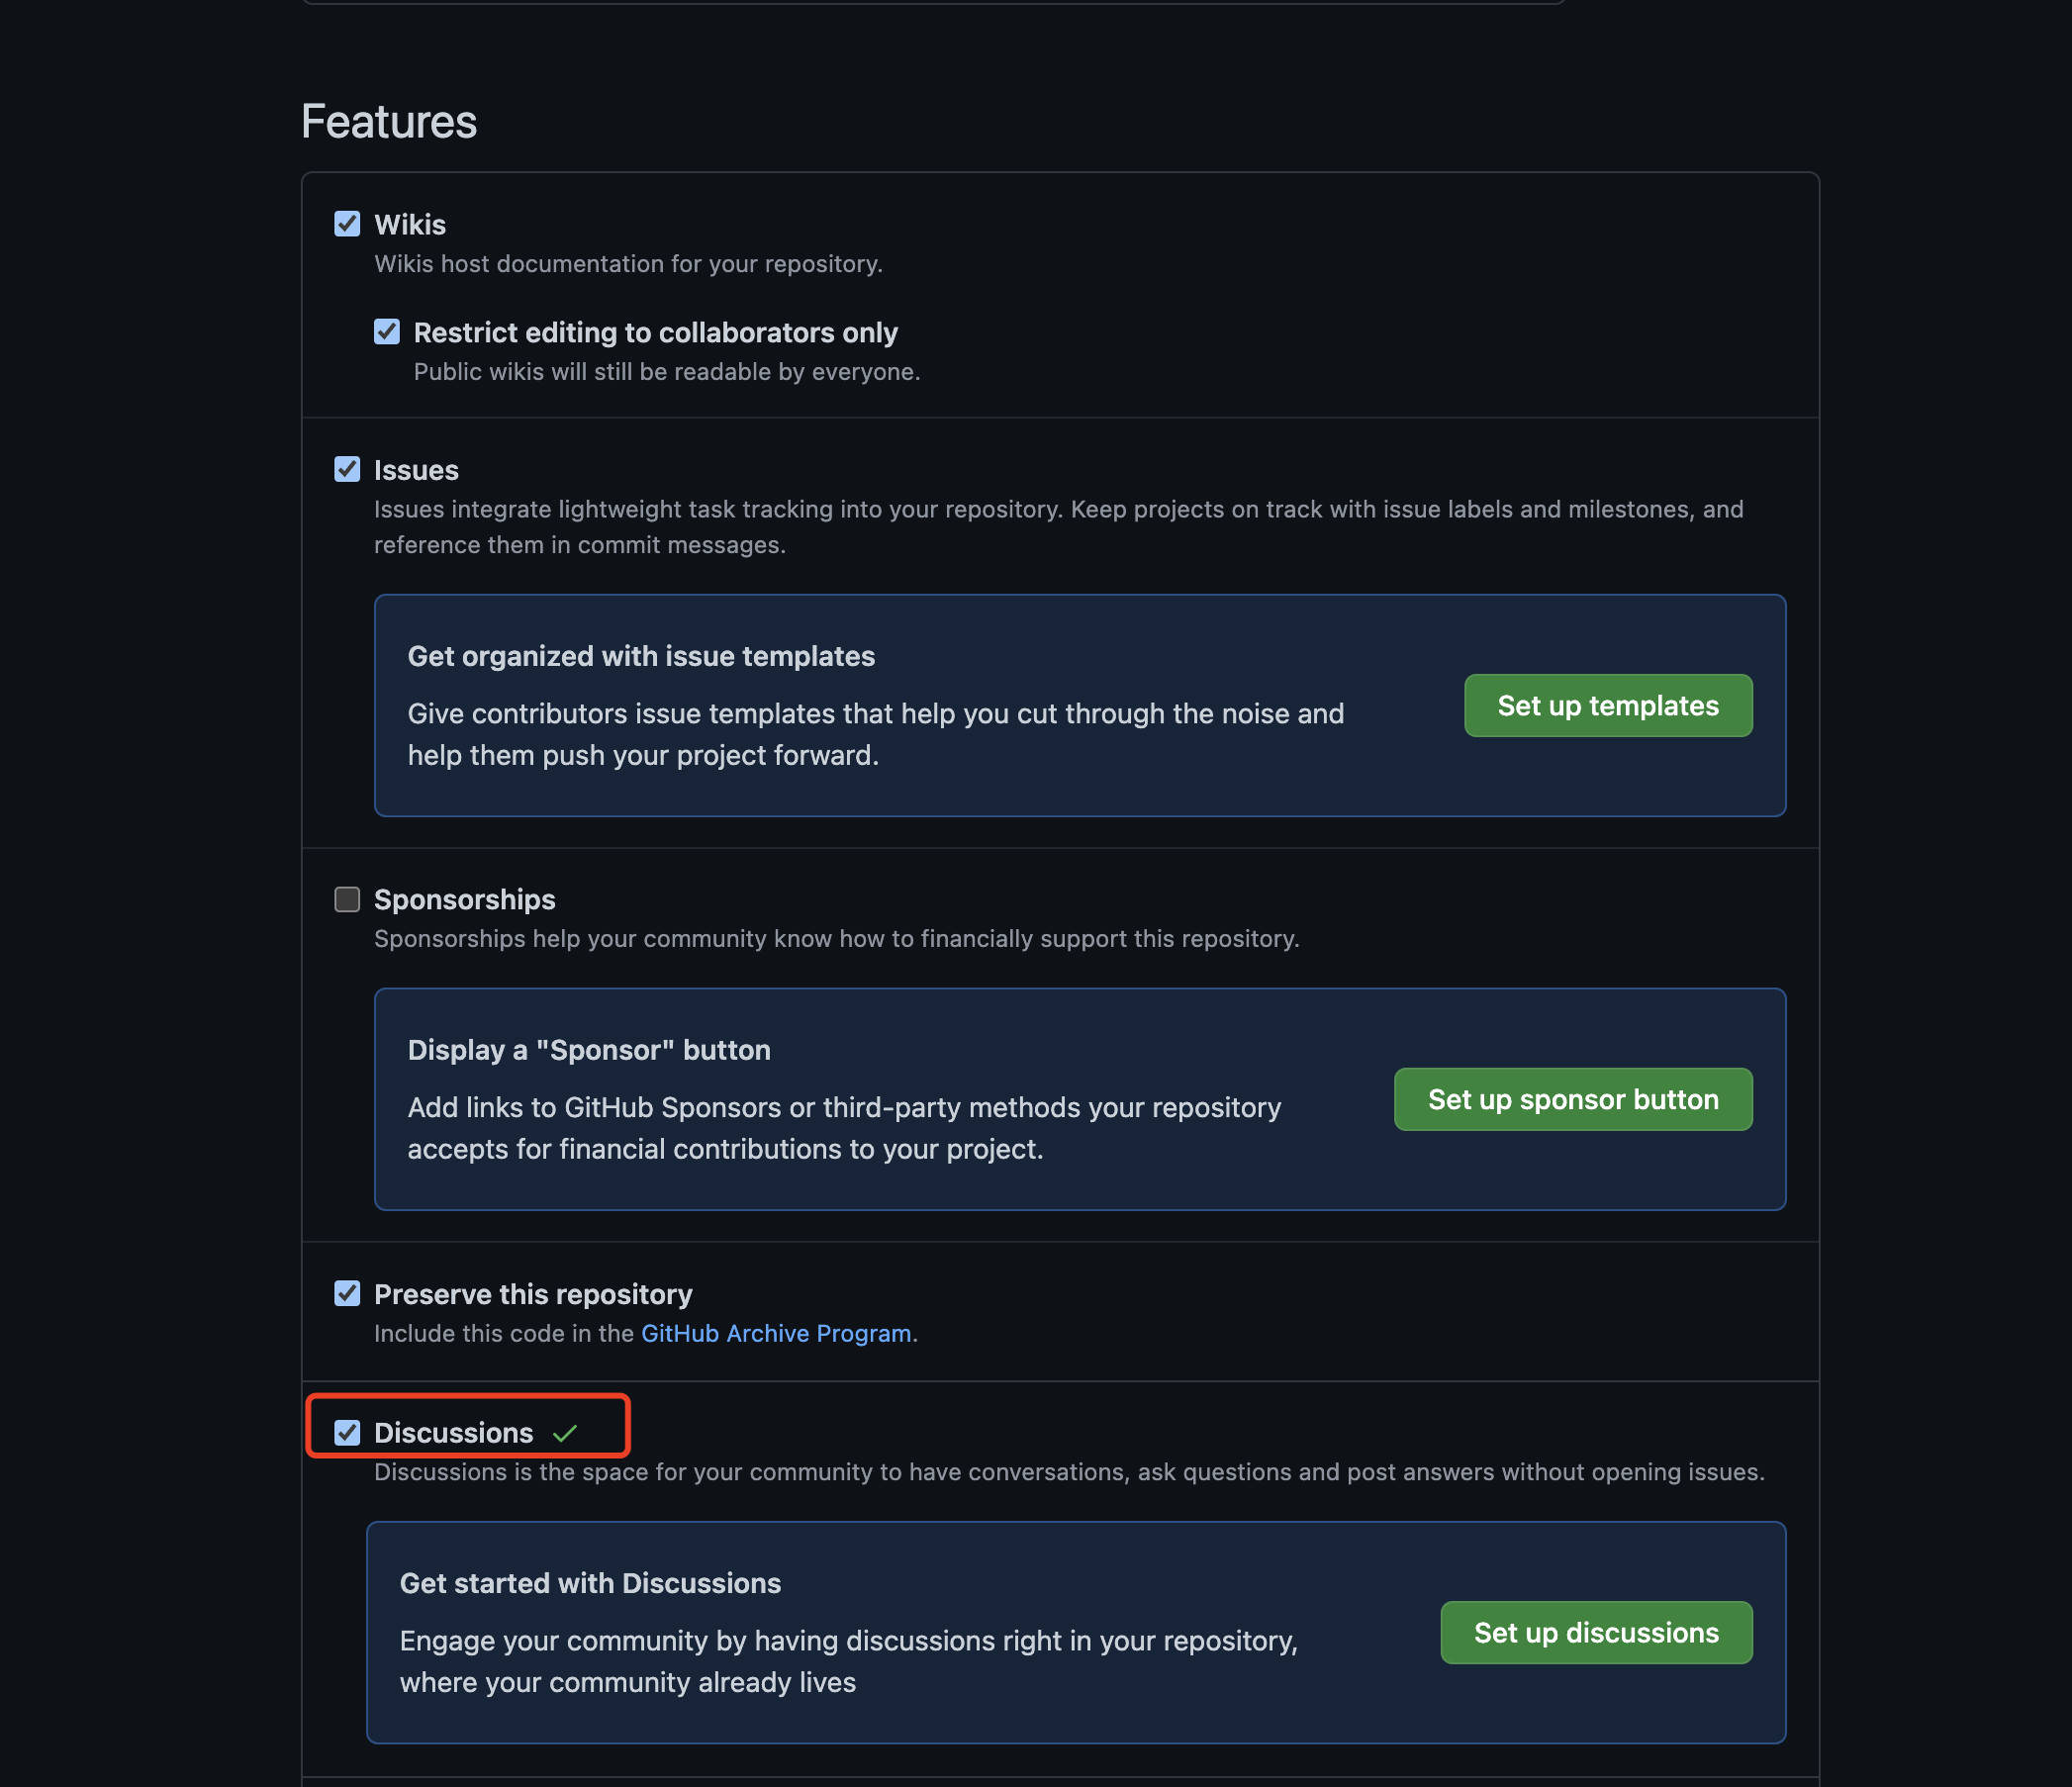
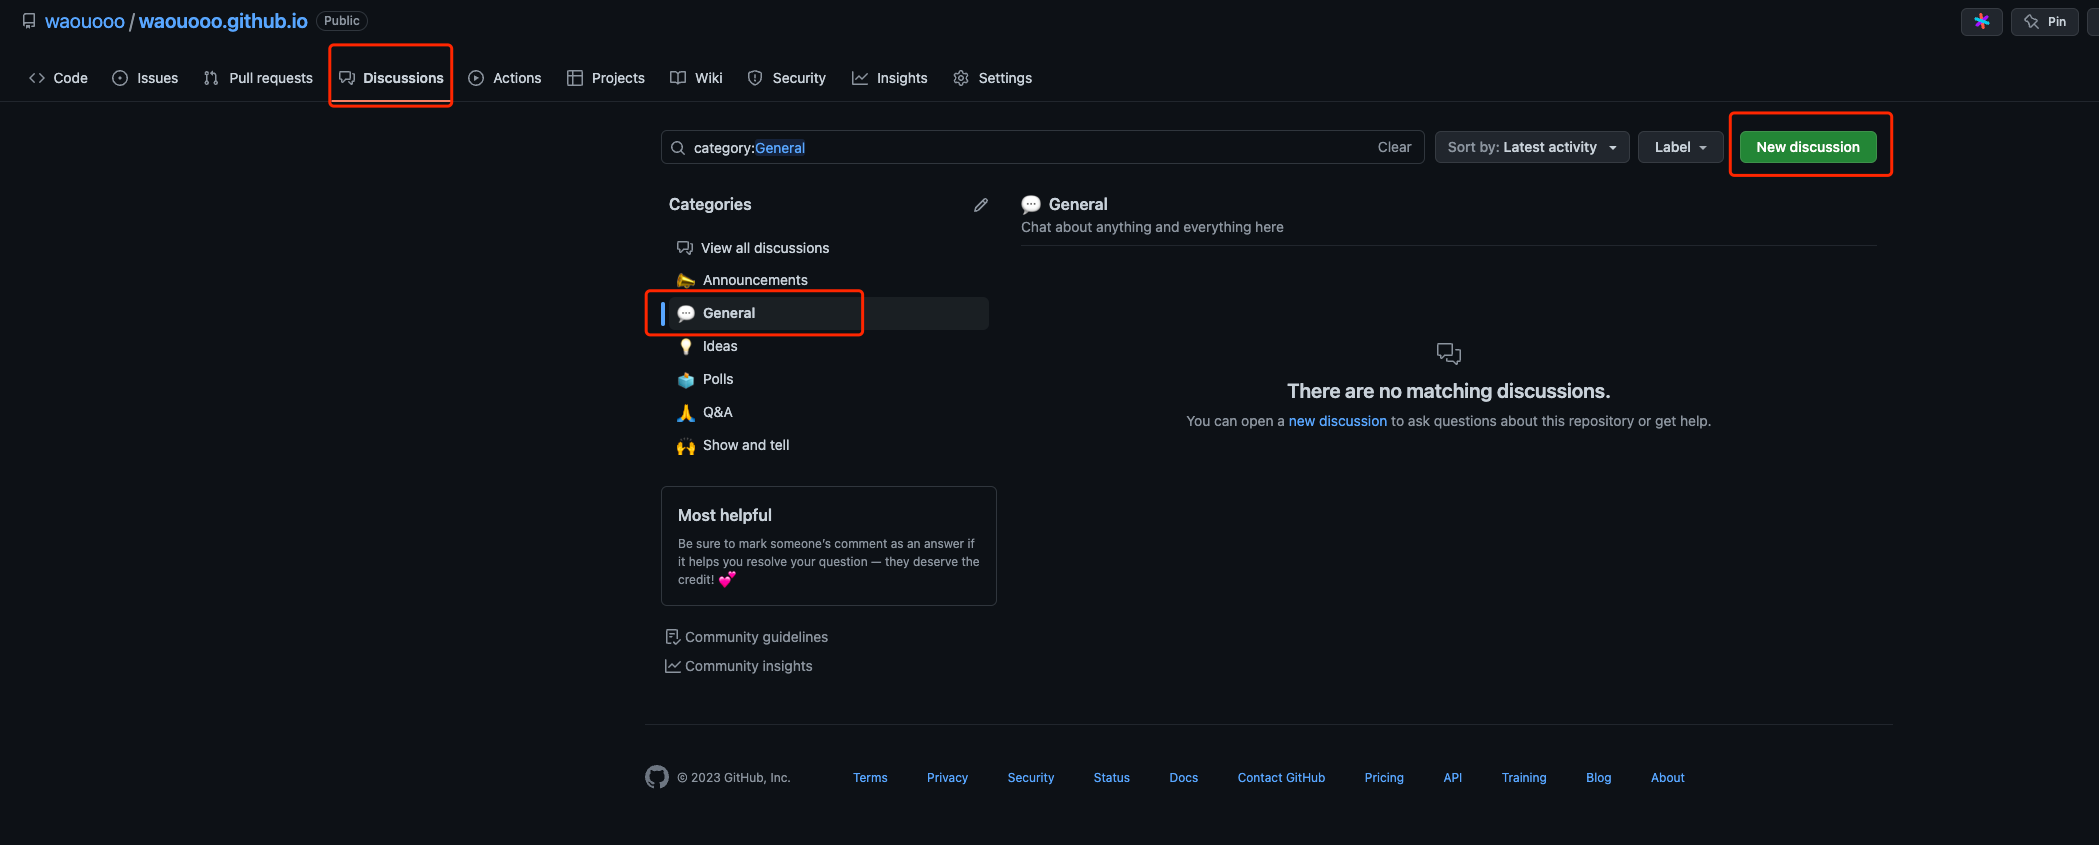
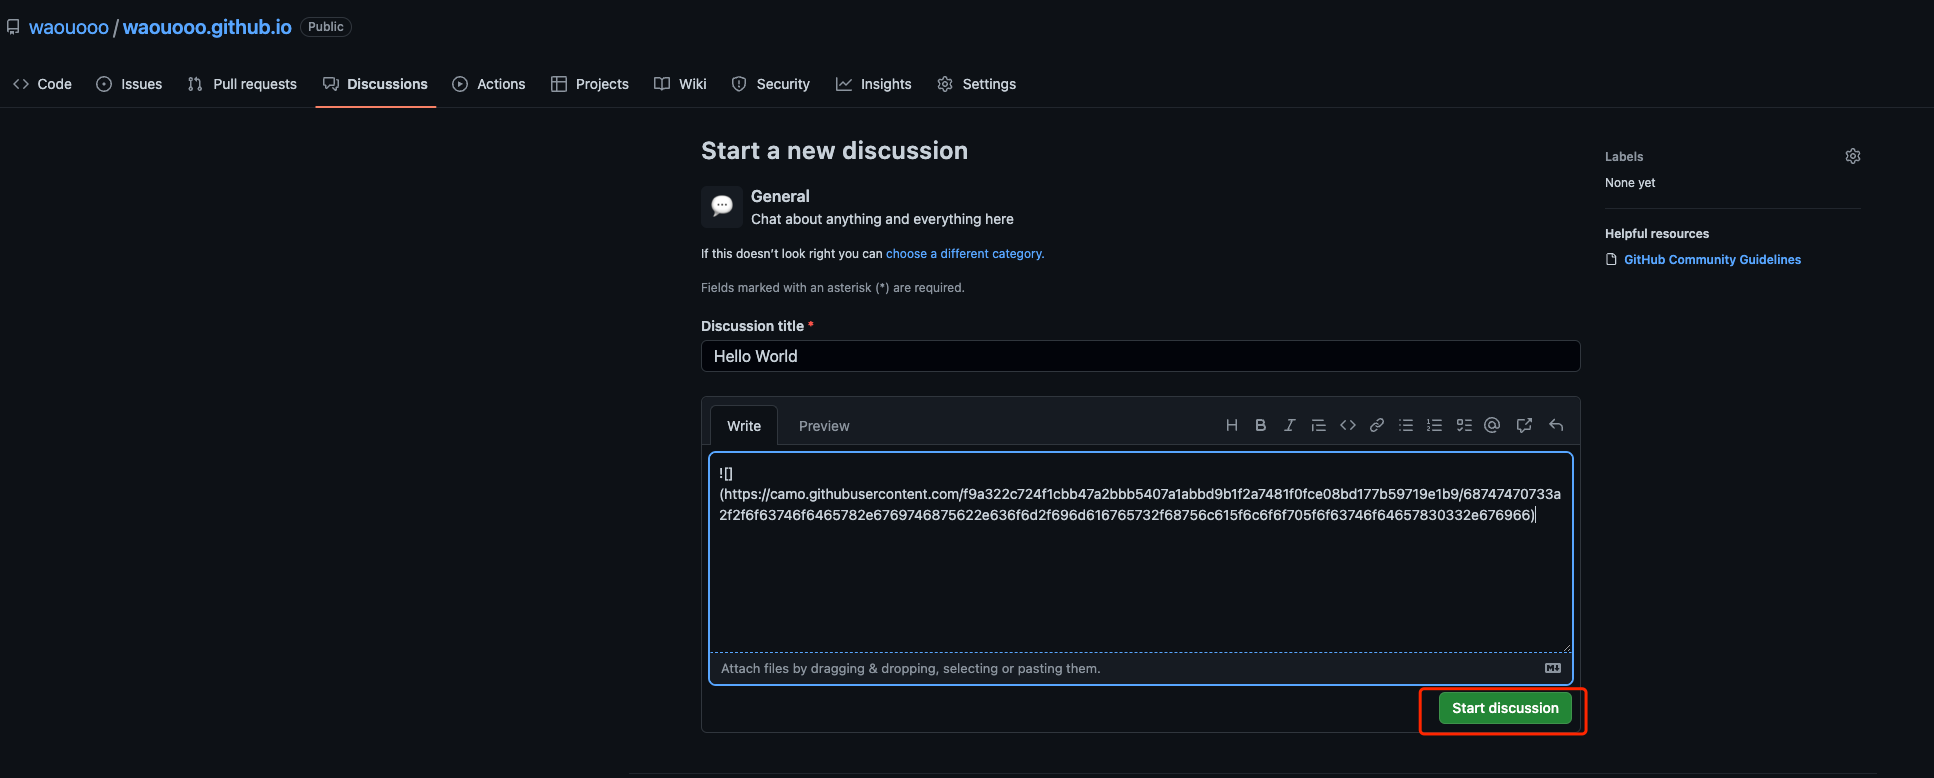
4) 创建一个discussions, 这里选择General作为未来托管评论的category

3. 修改站点目录配置
- 在博客站点根目录中创建文件夹
# 创建目录
mkdir -pv layouts/partials
mkdir -pv layouts/_internal
- 拷贝主题项目中
layouts/partials下的部分文件至占点根目录的layout/partials中,用于添加giscus评论系统的修改
# 拷贝需要的文件
cp themes/hugo-theme-relearn/layouts/partials/content-footer.html layouts/partials
cp themes/hugo-theme-relearn/layouts/partials/custom-comments.html layouts/partials
cp themes/hugo-theme-relearn/layouts/partials/footer.html layouts/partials
cp themes/hugo-theme-relearn/layouts/partials/menu-footer.html layouts/partials
- 创建giscus.html文件
touch layout/_internal/giscus.html
- 将以下内容拷贝至
layout/_internal/giscus.html
<div>
{{ if site.Params.giscus }}
<style>
#comment {
padding: 8rem 0 2rem;
}
#comment .vemoji {
max-width: 1.5em;
max-height: 1.5em;
}
</style>
<div id="comment">
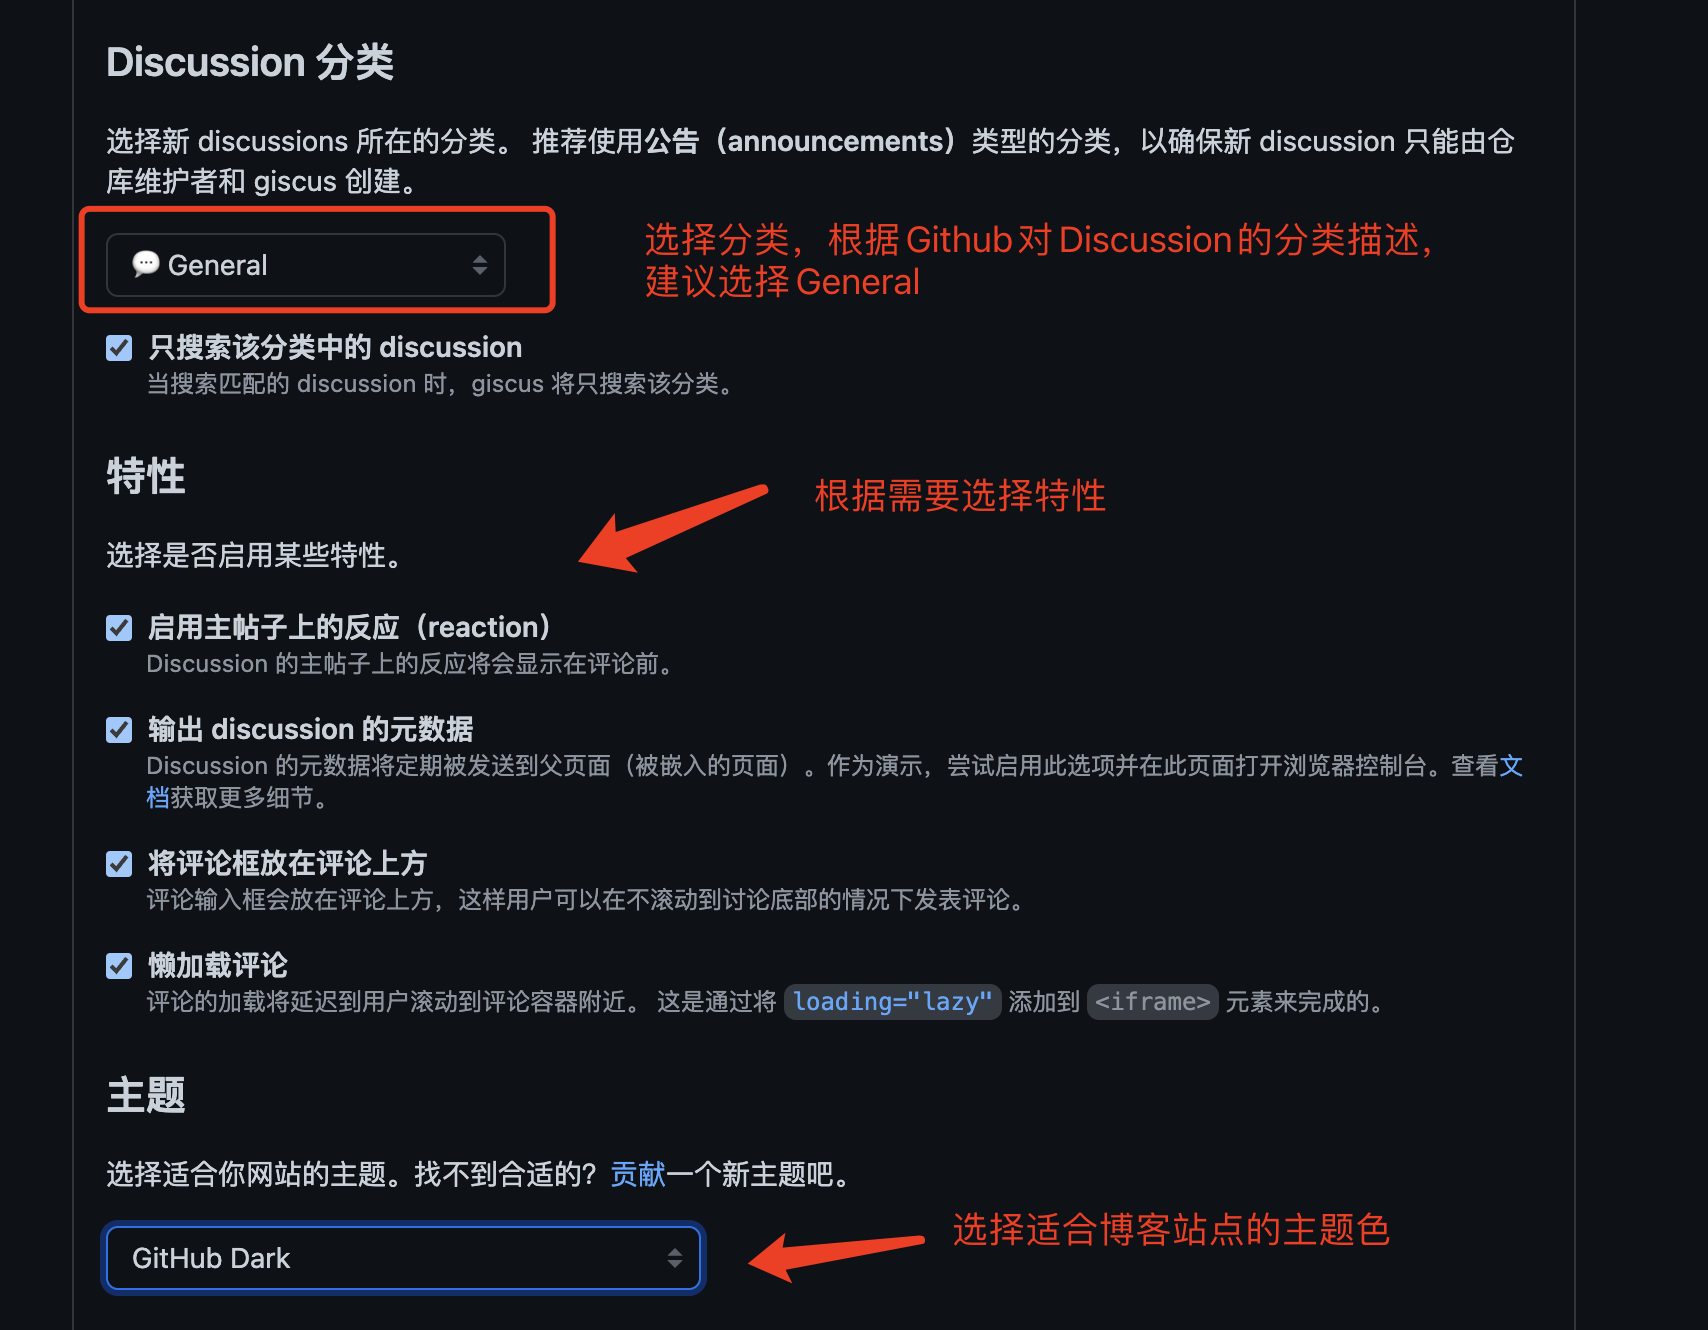
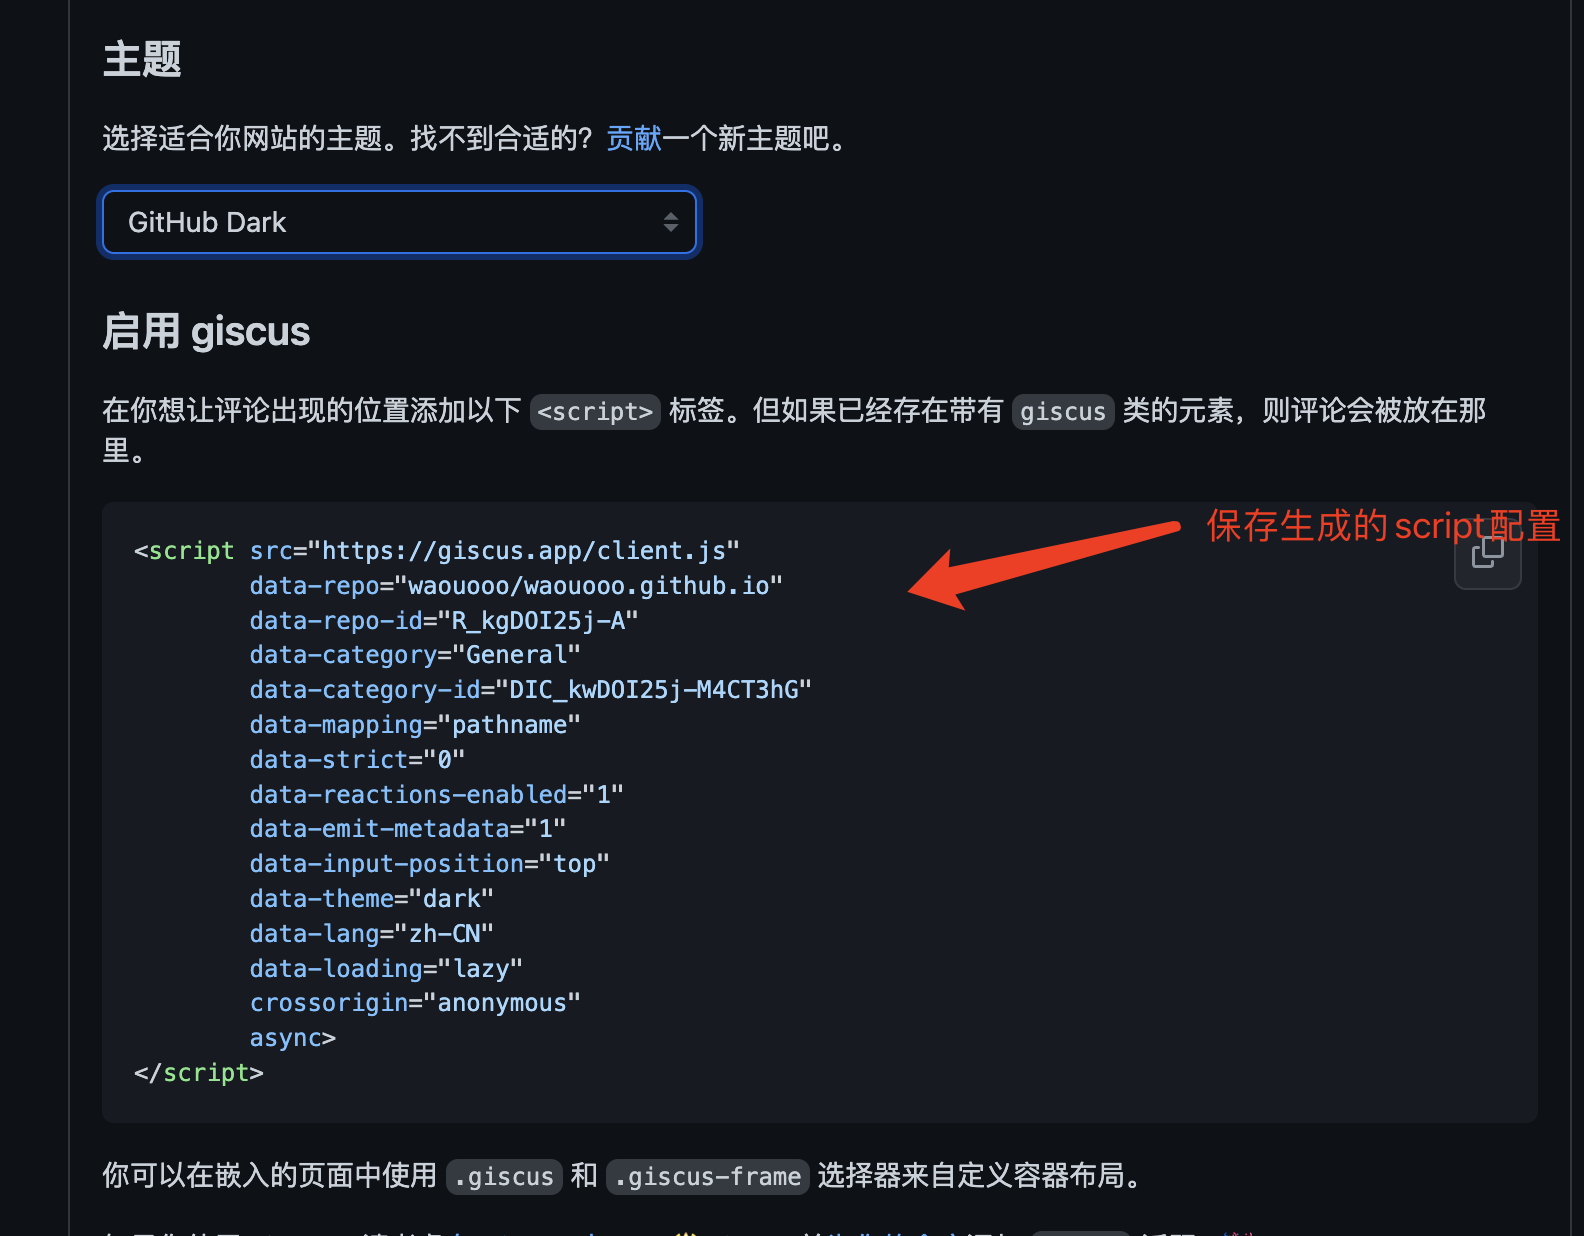
<!-- 此处的配置可以直接拷贝2.5)通过giscus网站配置生成的script脚本,也可以将配置值抽取出来,参考下文的方式填入config.toml文件 -->
<script src="https://giscus.app/client.js"
data-repo="{{ .Site.Params.giscus.data_repo}}"
data-repo-id="{{ .Site.Params.giscus.data_repo_id}}"
data-category="{{ .Site.Params.giscus.data_category}}"
data-category-id="{{ .Site.Params.giscus.data_category_id}}"
data-mapping="{{ .Site.Params.giscus.data_mapping}}"
data-reactions-enabled="{{ .Site.Params.giscus.data_reactions_enabled}}"
data-emit-metadata="{{ .Site.Params.giscus.data_emit_metadata}}"
data-input-position="{{ .Site.Params.giscus.data_input_position }}"
data-theme="{{ .Site.Params.giscus.data_theme}}"
data-lang="{{ .Site.Params.giscus.data_lang}}"
crossorigin="{{ .Site.Params.giscus.crossorigin}}"
data-term="{{ .Site.Params.giscus.data_term }}"
async>
</script>
</div>
<noscript>Please enable JavaScript to view the comments powered by giscus.</noscript>
{{ end }}
</div>
- 修改
layouts/partials/custom-comments.html文件,引入上面修改的giscus.html
<!-- import your comments system
{{ template "_internal/disqus.html" . }}
-->
{{ template "_internal/giscus.html" . }}
- 删除
layouts/partials/footer.html中 {{- partial "custom-comments.html" . }} (第3行左右) - 在
layouts/partials/content-footer.html最后追加{{- partial "custom-comments.html" . }}
{{- with .Params.LastModifierDisplayName }}
            <i class='fas fa-user'></i> {{ with $.Params.LastModifierEmail }}<a href="mailto:{{ . }}">{{ end }}{{ . }}{{ with $.Params.LastModifierEmail }}</a>{{ end }}
  {{- with $.Date }}
            <i class='fas fa-calendar'></i> {{ . | time.Format ":date_medium" }}
  {{- end }}
{{- end }}
{{- partial "custom-comments.html" . }}
- 自定义
layouts/partials/menu-footer.html中的内容,也可不修改
	<style>
		#footer {
		  font-size: 13px;
		  height: 100px;
		  margin-left: auto;
		  margin-right: auto;
		  padding: 2rem 1rem;
		  text-align: center;
		  min-width: 230px;
		  max-width: 300px;
		}
		#footer p {
		  margin: 0;
		}
	  </style>
	  <p>Built with <a href="https://github.com/McShelby/hugo-theme-relearn" title="love"><i class="fas fa-heart"></i></a> by <a href="https://gohugo.io/">Hugo</a></p>
	  <script async="" src="../../js/buttons.js?1674688248"></script>
4. 修改config.toml文件
- 若
layout/_internal/giscus.html文件中giscus的script脚本参数通过配置提取,则添加以下giscus配置至config.toml 中, data_repo, data_repo_id, data_category data_category_id 这四个参数为上文中开启discussions仓库的数据, data_category使用上文的General。其中的值与上文giscus官网配置得到的值一致
[params.giscus]
  data_repo="waouooo/waouooo.github.io"
  data_repo_id="*****"
  data_category="General"
  data_category_id="*****"
  data_mapping="pathname"
  data_reactions_enabled="1"
  data_emit_metadata="0"
  data_theme="dark"
  data_lang="zh-CN"
  data_input_position="top"
  data_term="1046"
  crossorigin="anonymous"
通过GitHub GraphQL API 查询repo_id 和category_id 的内容
{
  resource(url: "https://github.com/waouooo/waouooo.github.io") {
    ... on Repository {
      id
      name
      discussion(number: 1) {
        category {
          id
          name
        }
      }
    }
  }
}
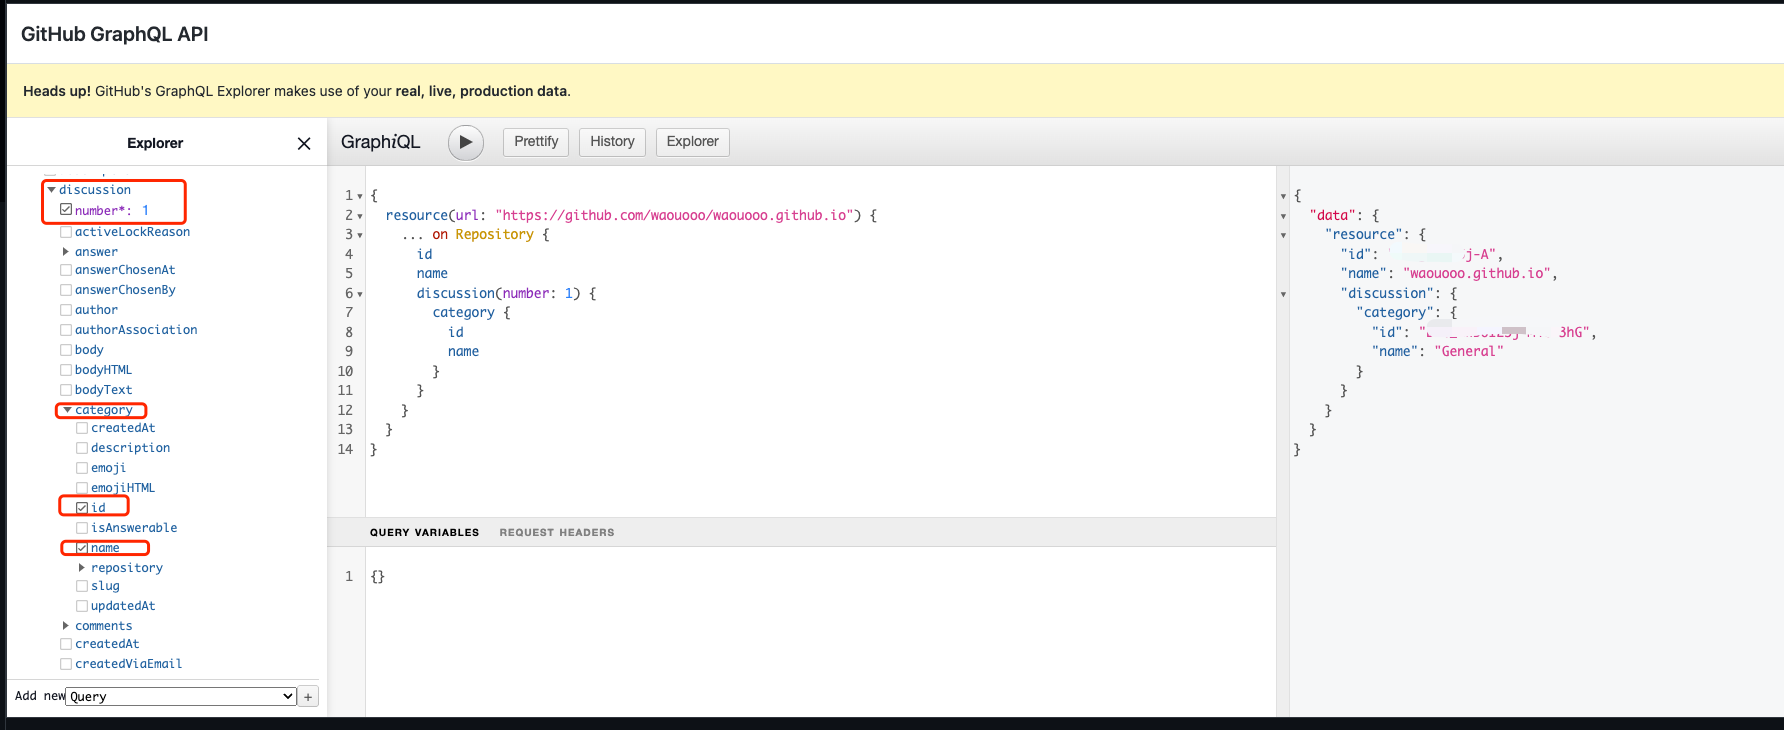
将查询到的结果回填至config.toml文件的**** 中
5. 重新生成静态页面,上传至仓库中
hugo -d dist
cd dist
git add .
git commit -m "add giscus"
git push
上传成功后等待编译部署完即可查看页面是否成功添加了giscus评论系统了
参考链接
Giscus: The New Commenting Engine for My Website
Hugo Plugin Giscus Support
Hugo+Github Pages快速搭建个人博客三:Github Actions自动部署
前言
通过之前的文章,我们已经把博客站点部署完成,并且添加了giscus评论系统,但是每次发布文章都需要手动执行hugo命令生成站点静态文件,并把文件推送到仓库当中等待部署才能发布。为了简化我们的发布流程,本文将介绍使用Github Actions 来自动构建hugo静态文件,并推送至启用github pages的仓库当中。
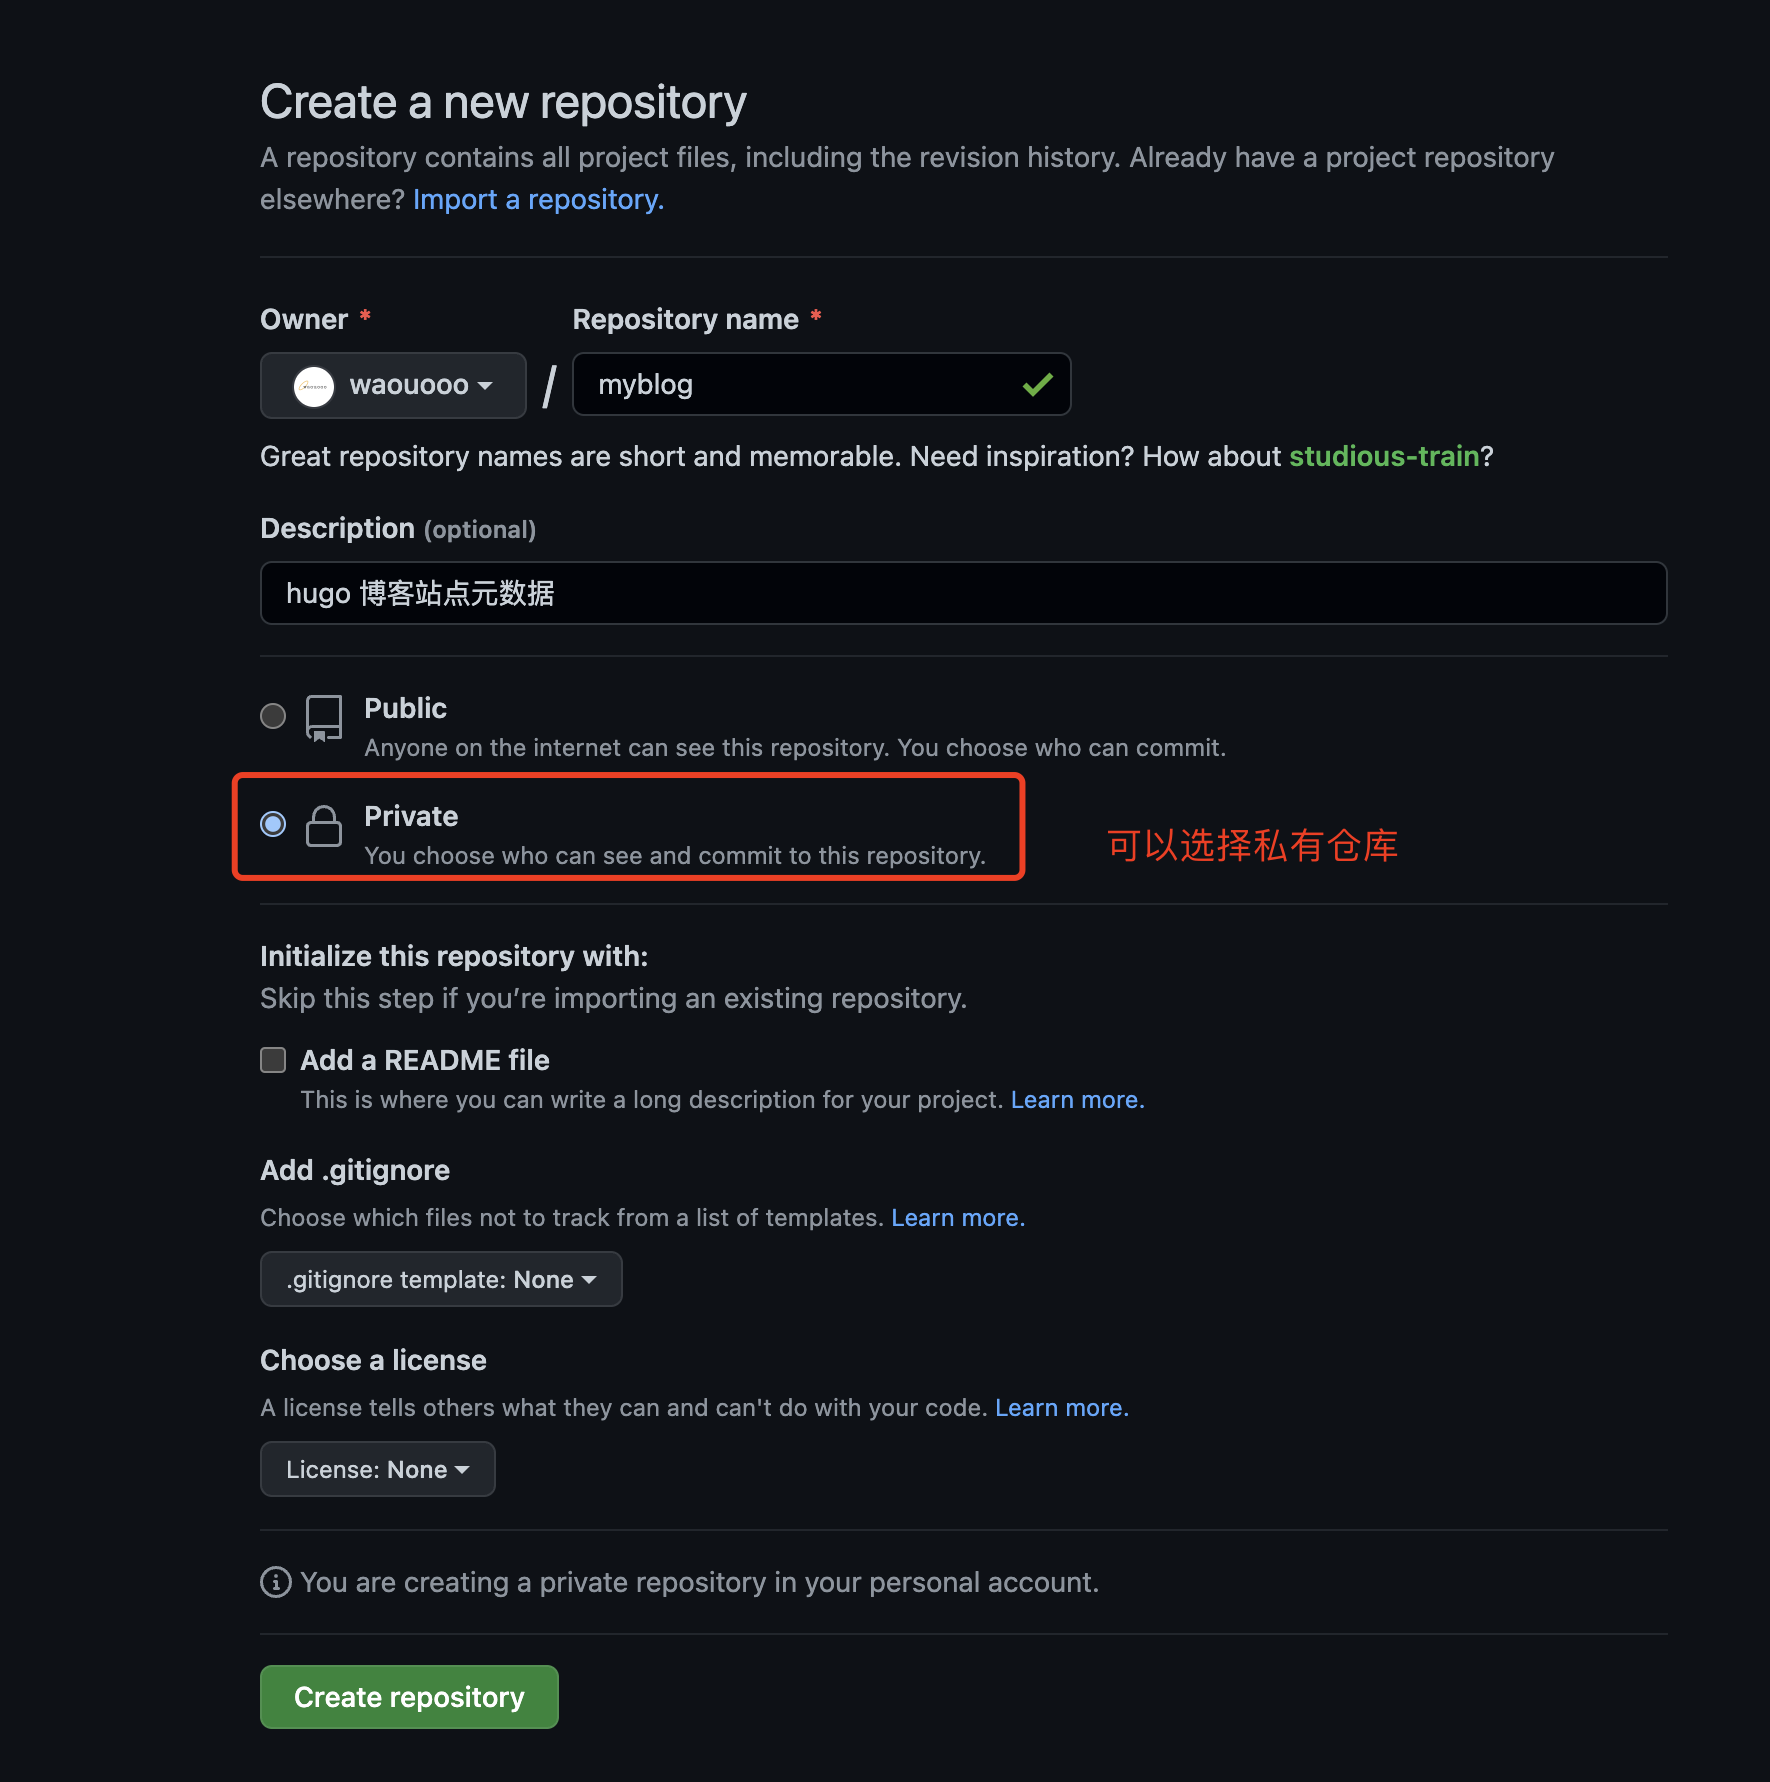
1. 创建站点文章仓库
在第一篇中我们只在github上创建了waouooo.github.io仓库,用于保存站点的静态文件,并开启Github Pages。但是我们在使用hugo new site waouooo创建站点文件夹时也对站点文件夹做了git init 操作,因此我们也可以将站点的内容保存至github中。点此创建
2. 关联远程仓库至本地hugo 站点元数据git仓库,并推送
仓库创建完成之后github页面会展示以下内容:
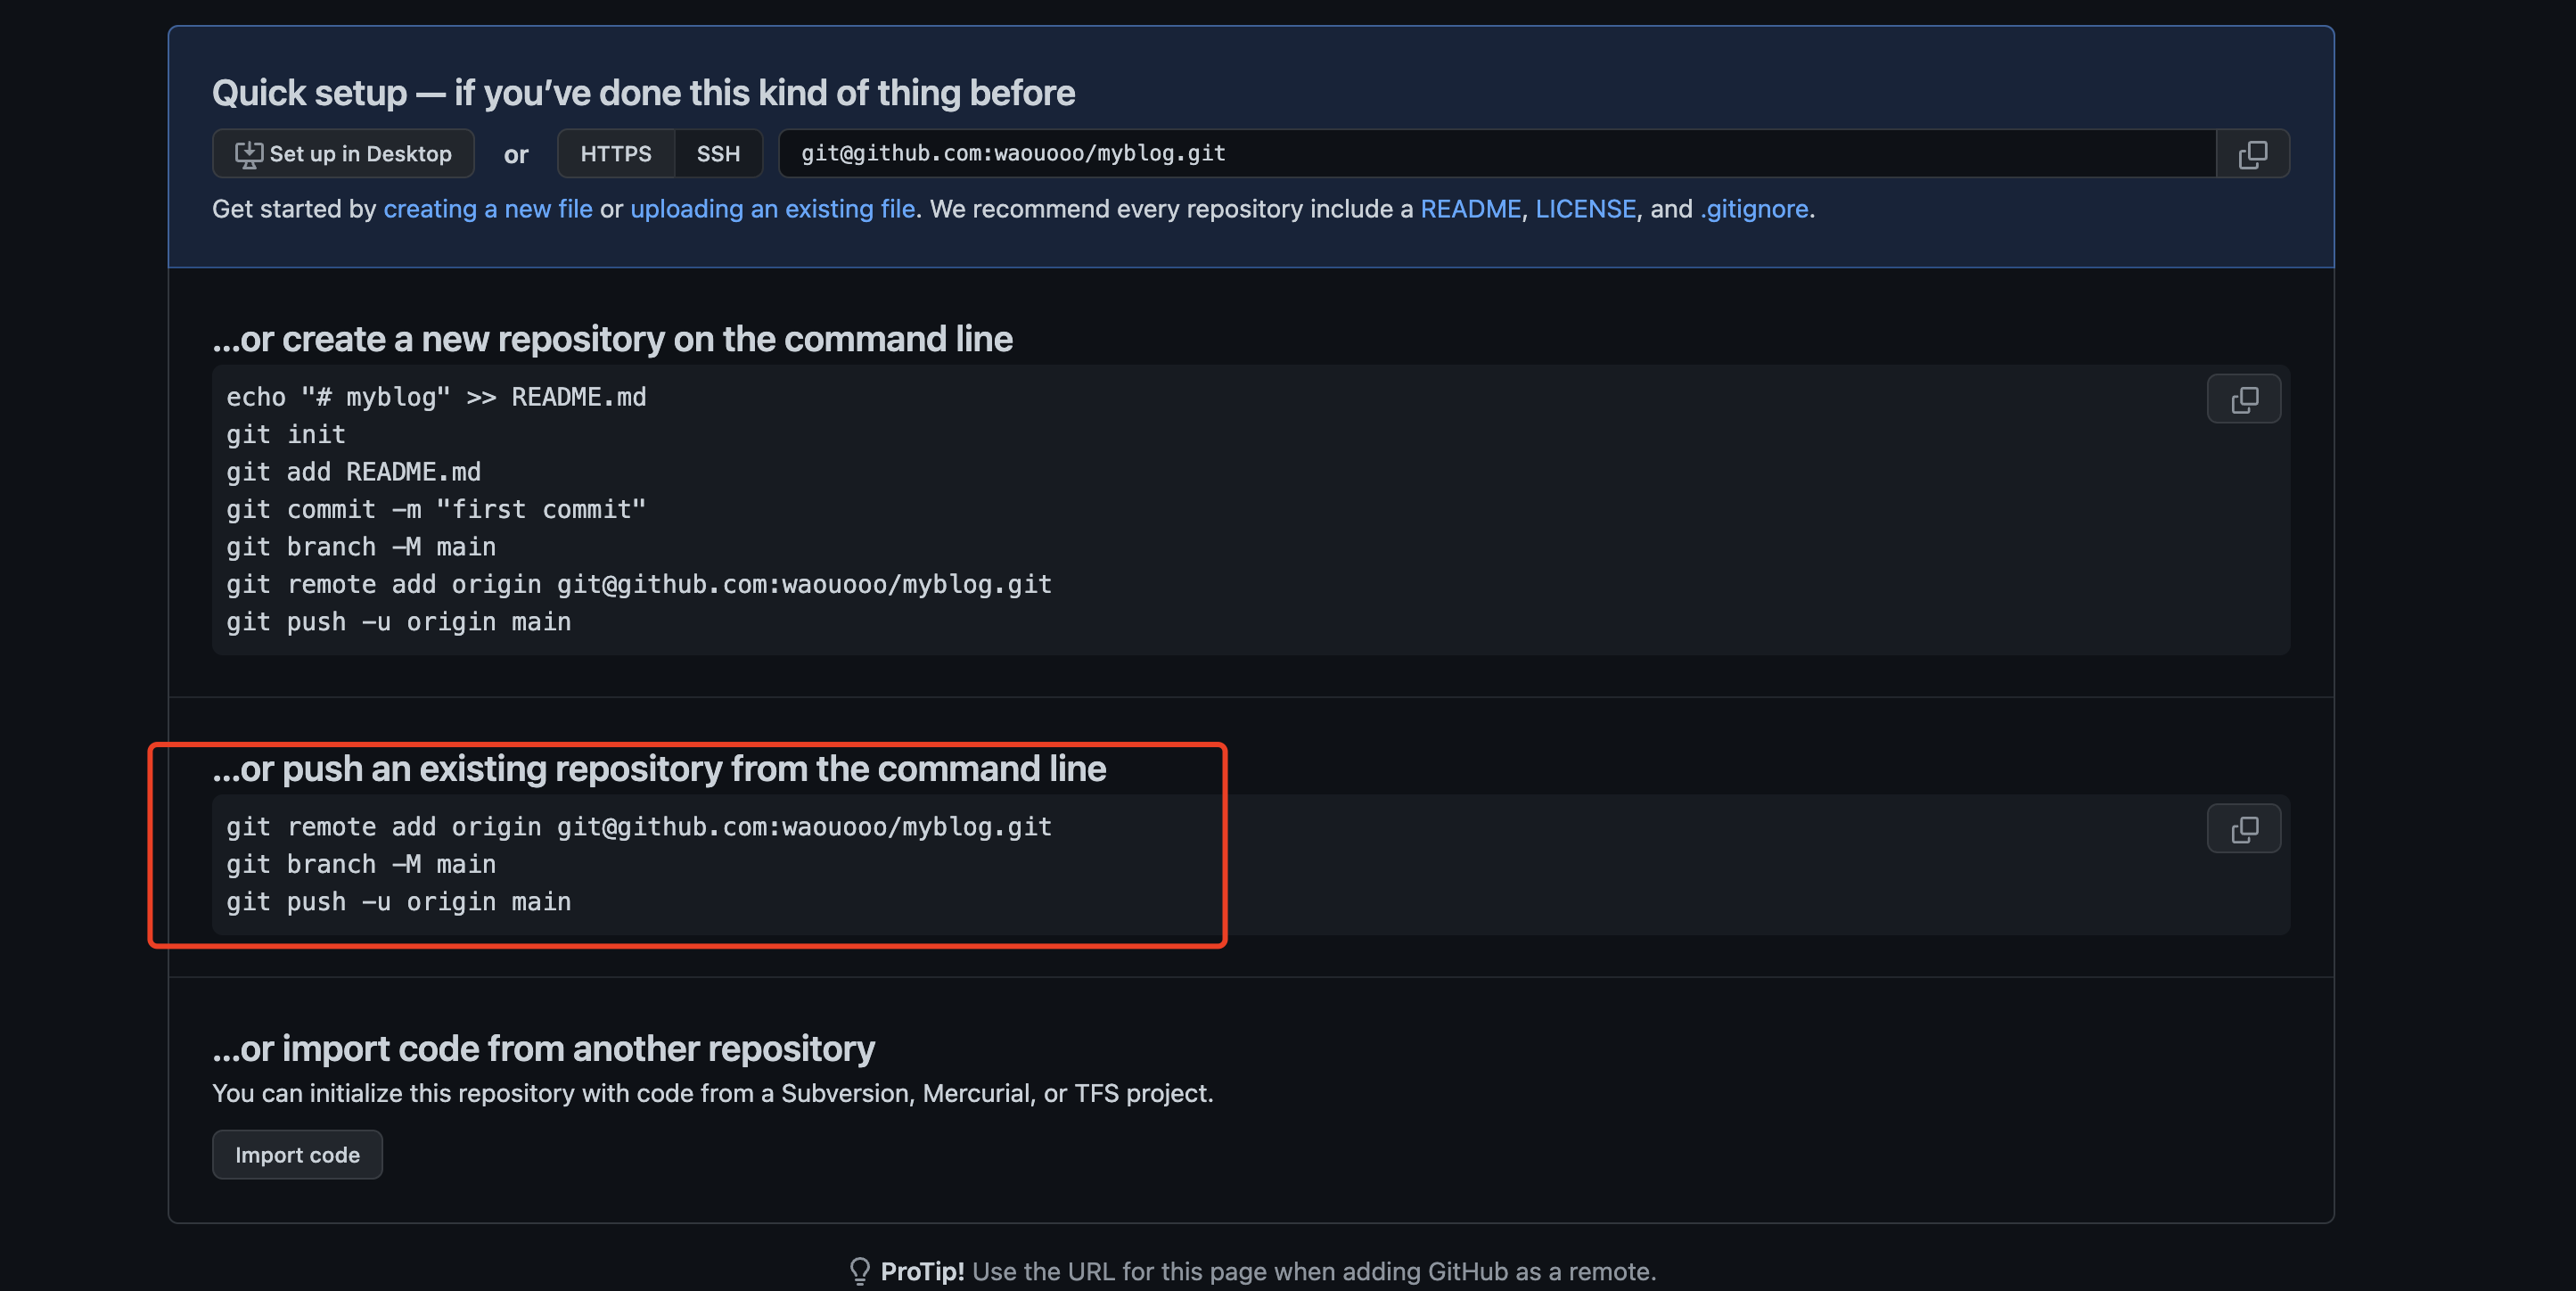 因为我们本地已经有仓库,只需要执行以下内容即可:
git remote add origin git@github.com:waouooo/myblog.git
git push -u origin master
3. 生成sshkey 用于Github Actions推送hugo生成的静态文件至托管仓库
-C 参数指定github用户的邮箱
ssh-keygen -t rsa -C waouooo@163.com
# 以下内容为输出
Generating public/private rsa key pair.
# 此处输入保存新ssh key的文件路径,不要回车,否则使用默认文件名,会被覆盖。其他地方可一路回车
Enter file in which to save the key (/Users/waouooo/.ssh/id_rsa): id_rsa_deploy_key
Enter passphrase (empty for no passphrase):
Enter same passphrase again:
Your identification has been saved in id_rsa_deploy_key
Your public key has been saved in id_rsa_deploy_key.pub
The key fingerprint is:
SHA256:iKKuSQt+jFiZc3UbeSDY………………tYrvgO+FRI7tSE waouooo@163.com
The key's randomart image is:
+---[RSA 3072]----+
|     o           |
|    . o .        |
|     + . oE o    |
|    o.o.= .= o   |
|  .+.o. S=+.o.   |
| .=.o . . =o+..  |
|+o o     o O.  . |
|*o.o      +.+ .  |
|++.       .oo+   |
+----[SHA256]-----+
以上执行完成之后会在当前目录生成 id_rsa_deploy_key, id_rsa_deploy_key.pub两个文件
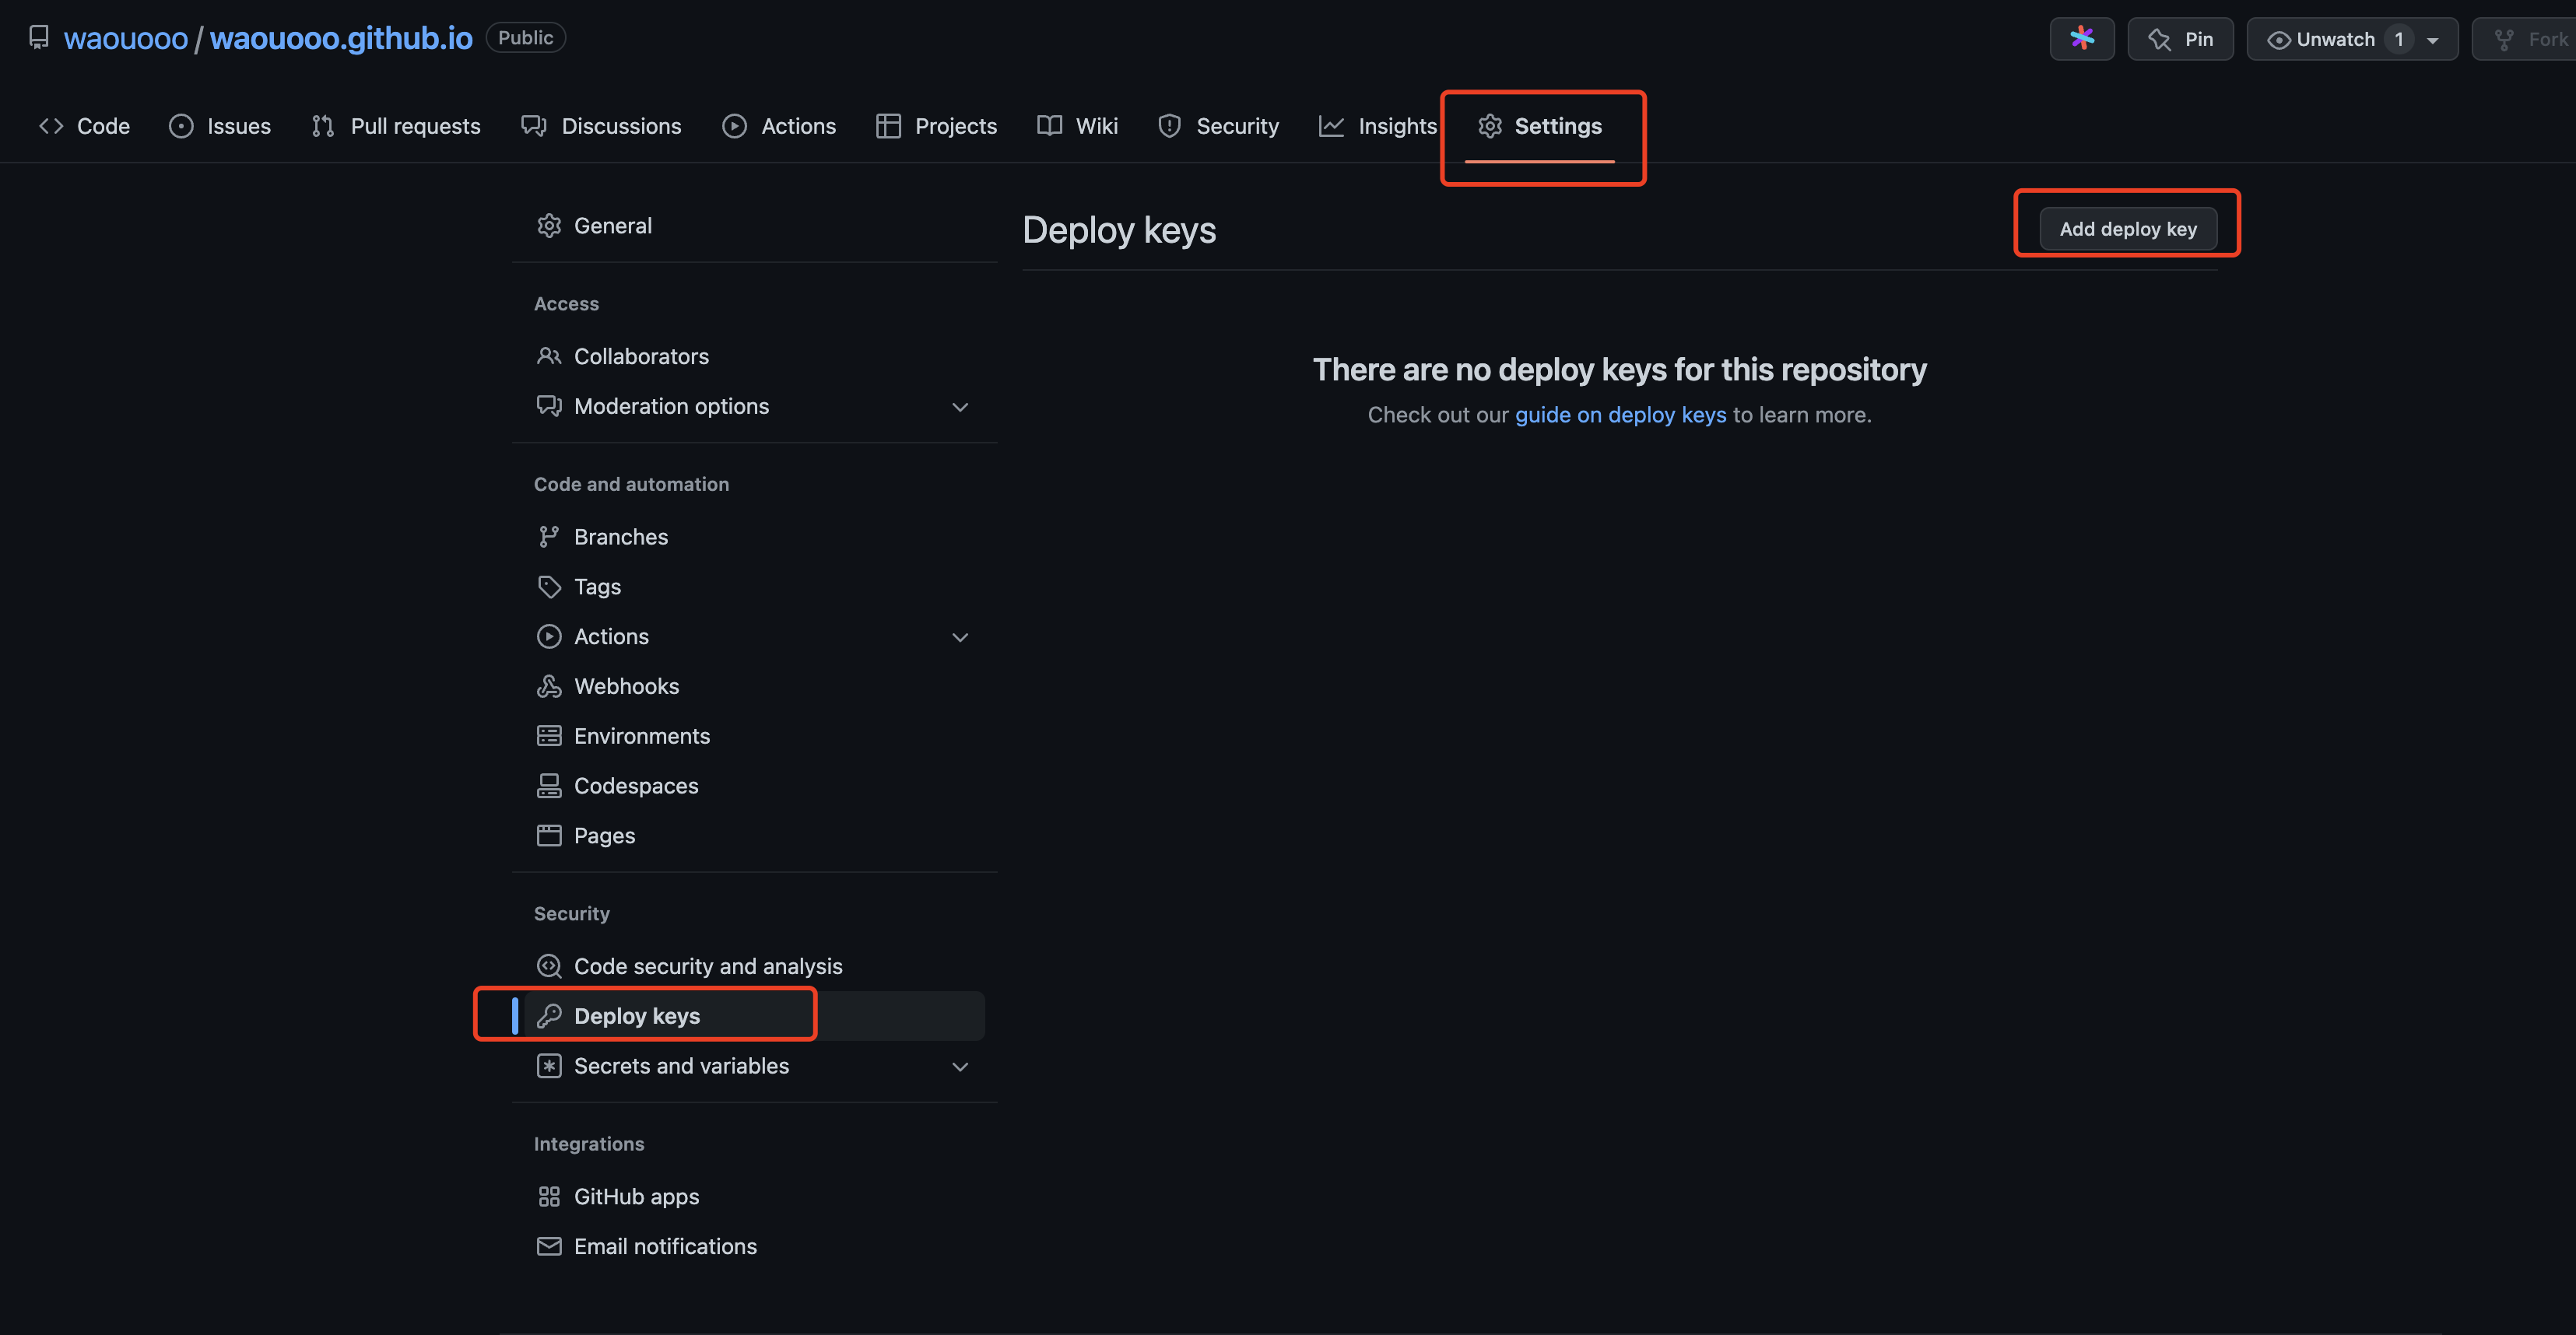
4. 将生成的公钥: id_rsa_deploy_key.pub 保存至需要部署的waouooo.github.io项目中
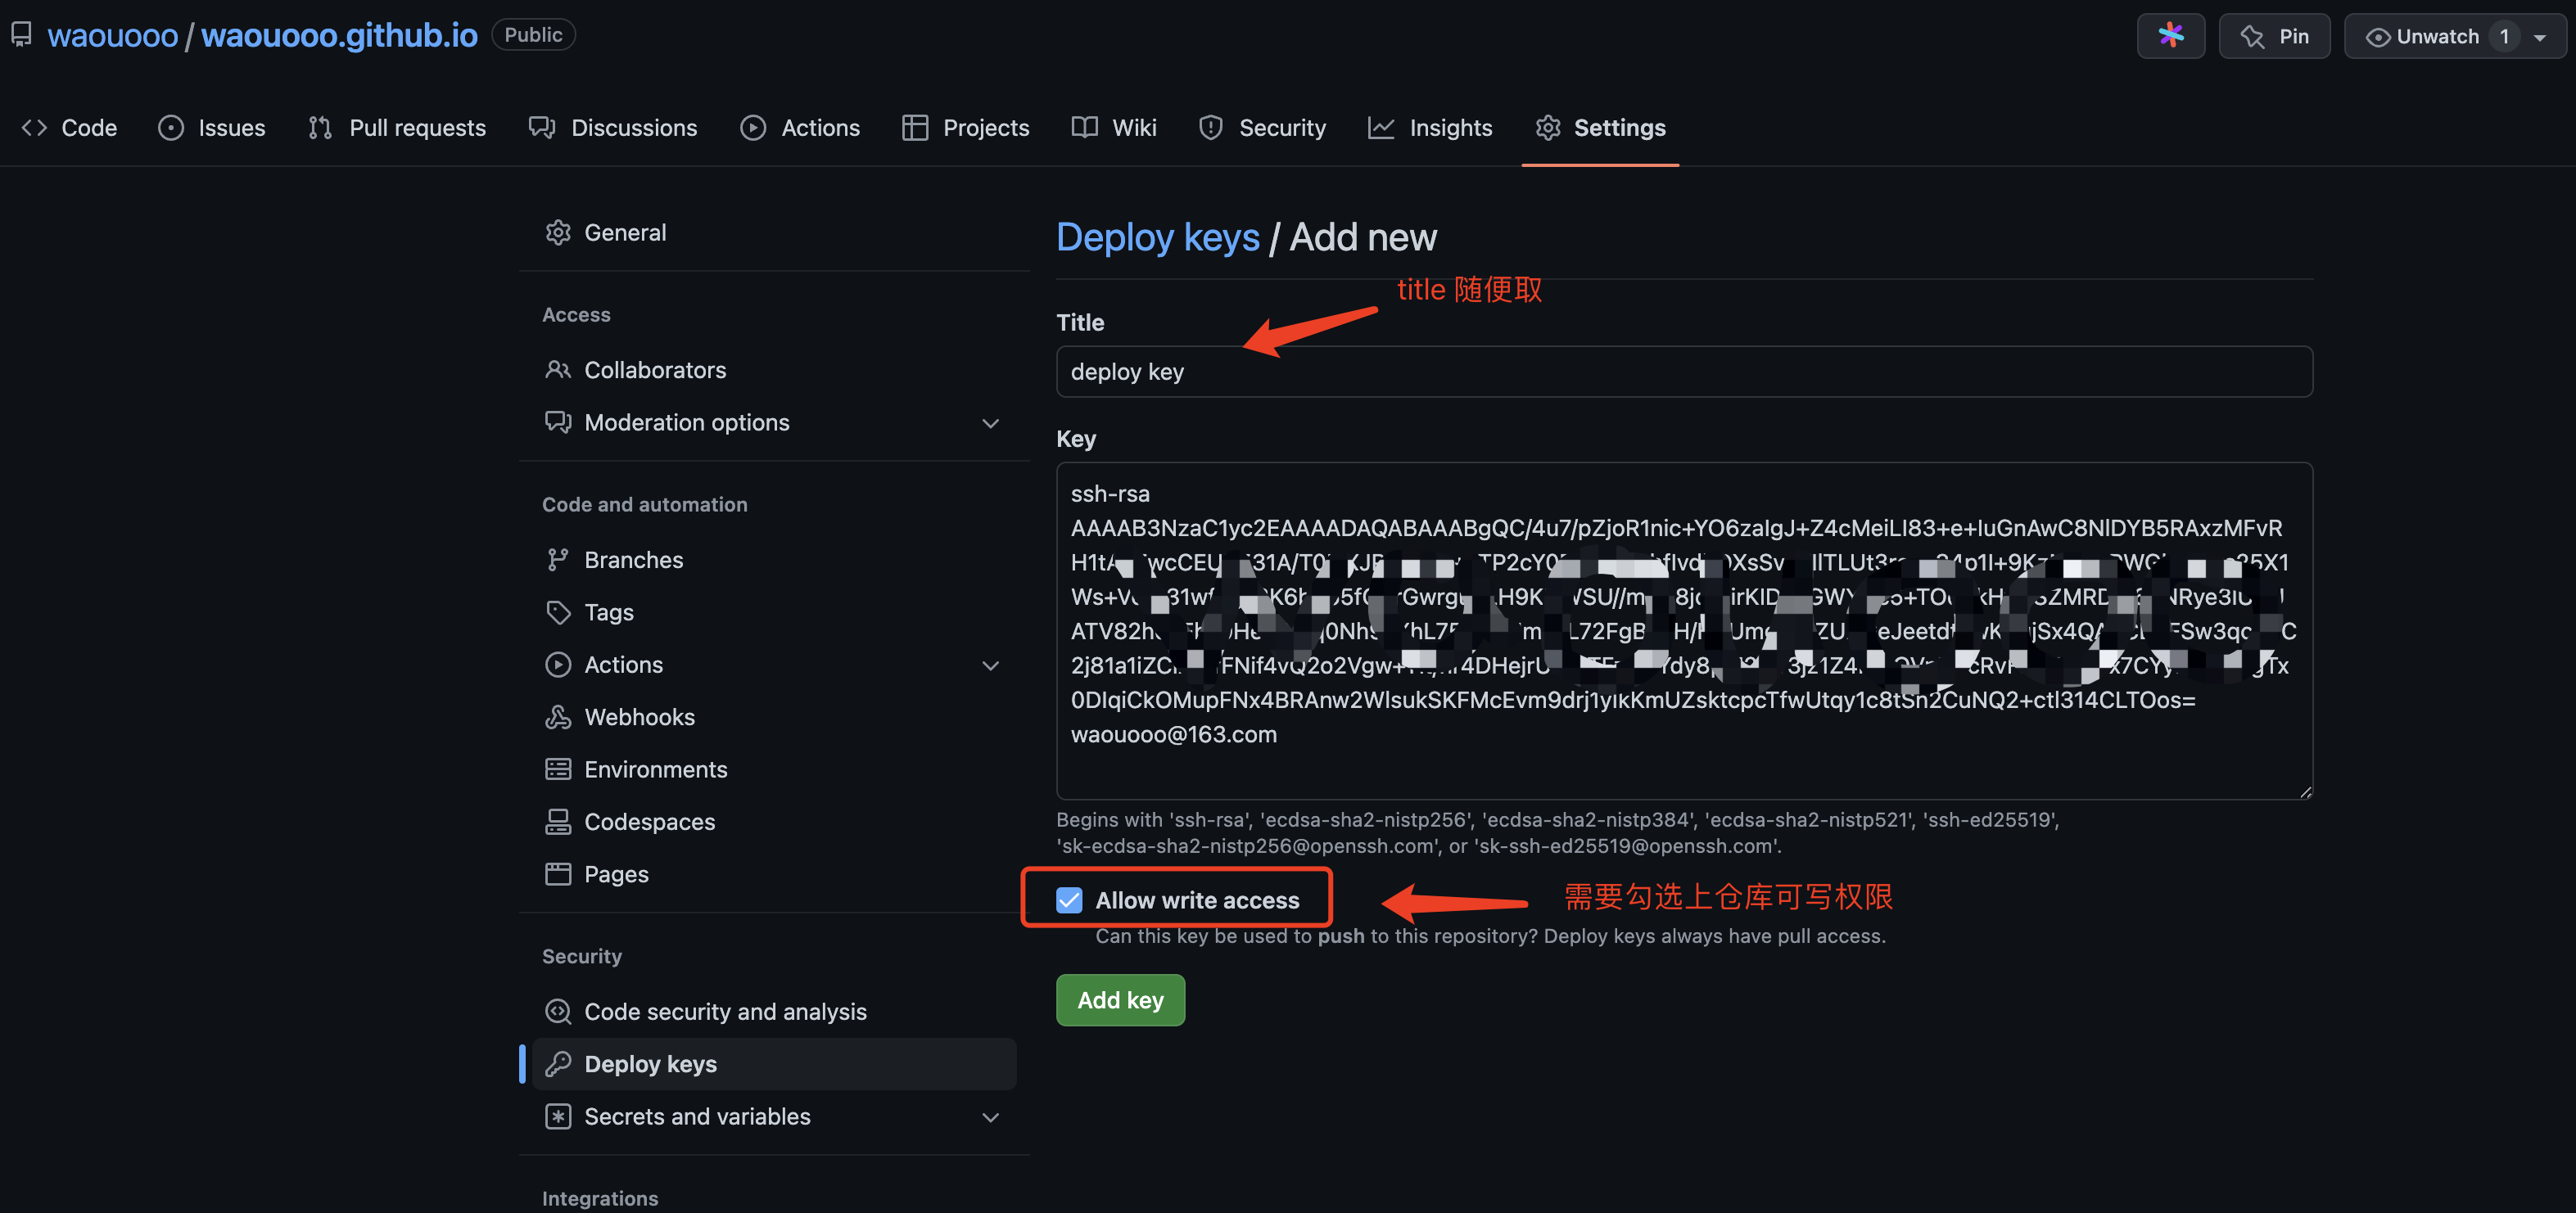
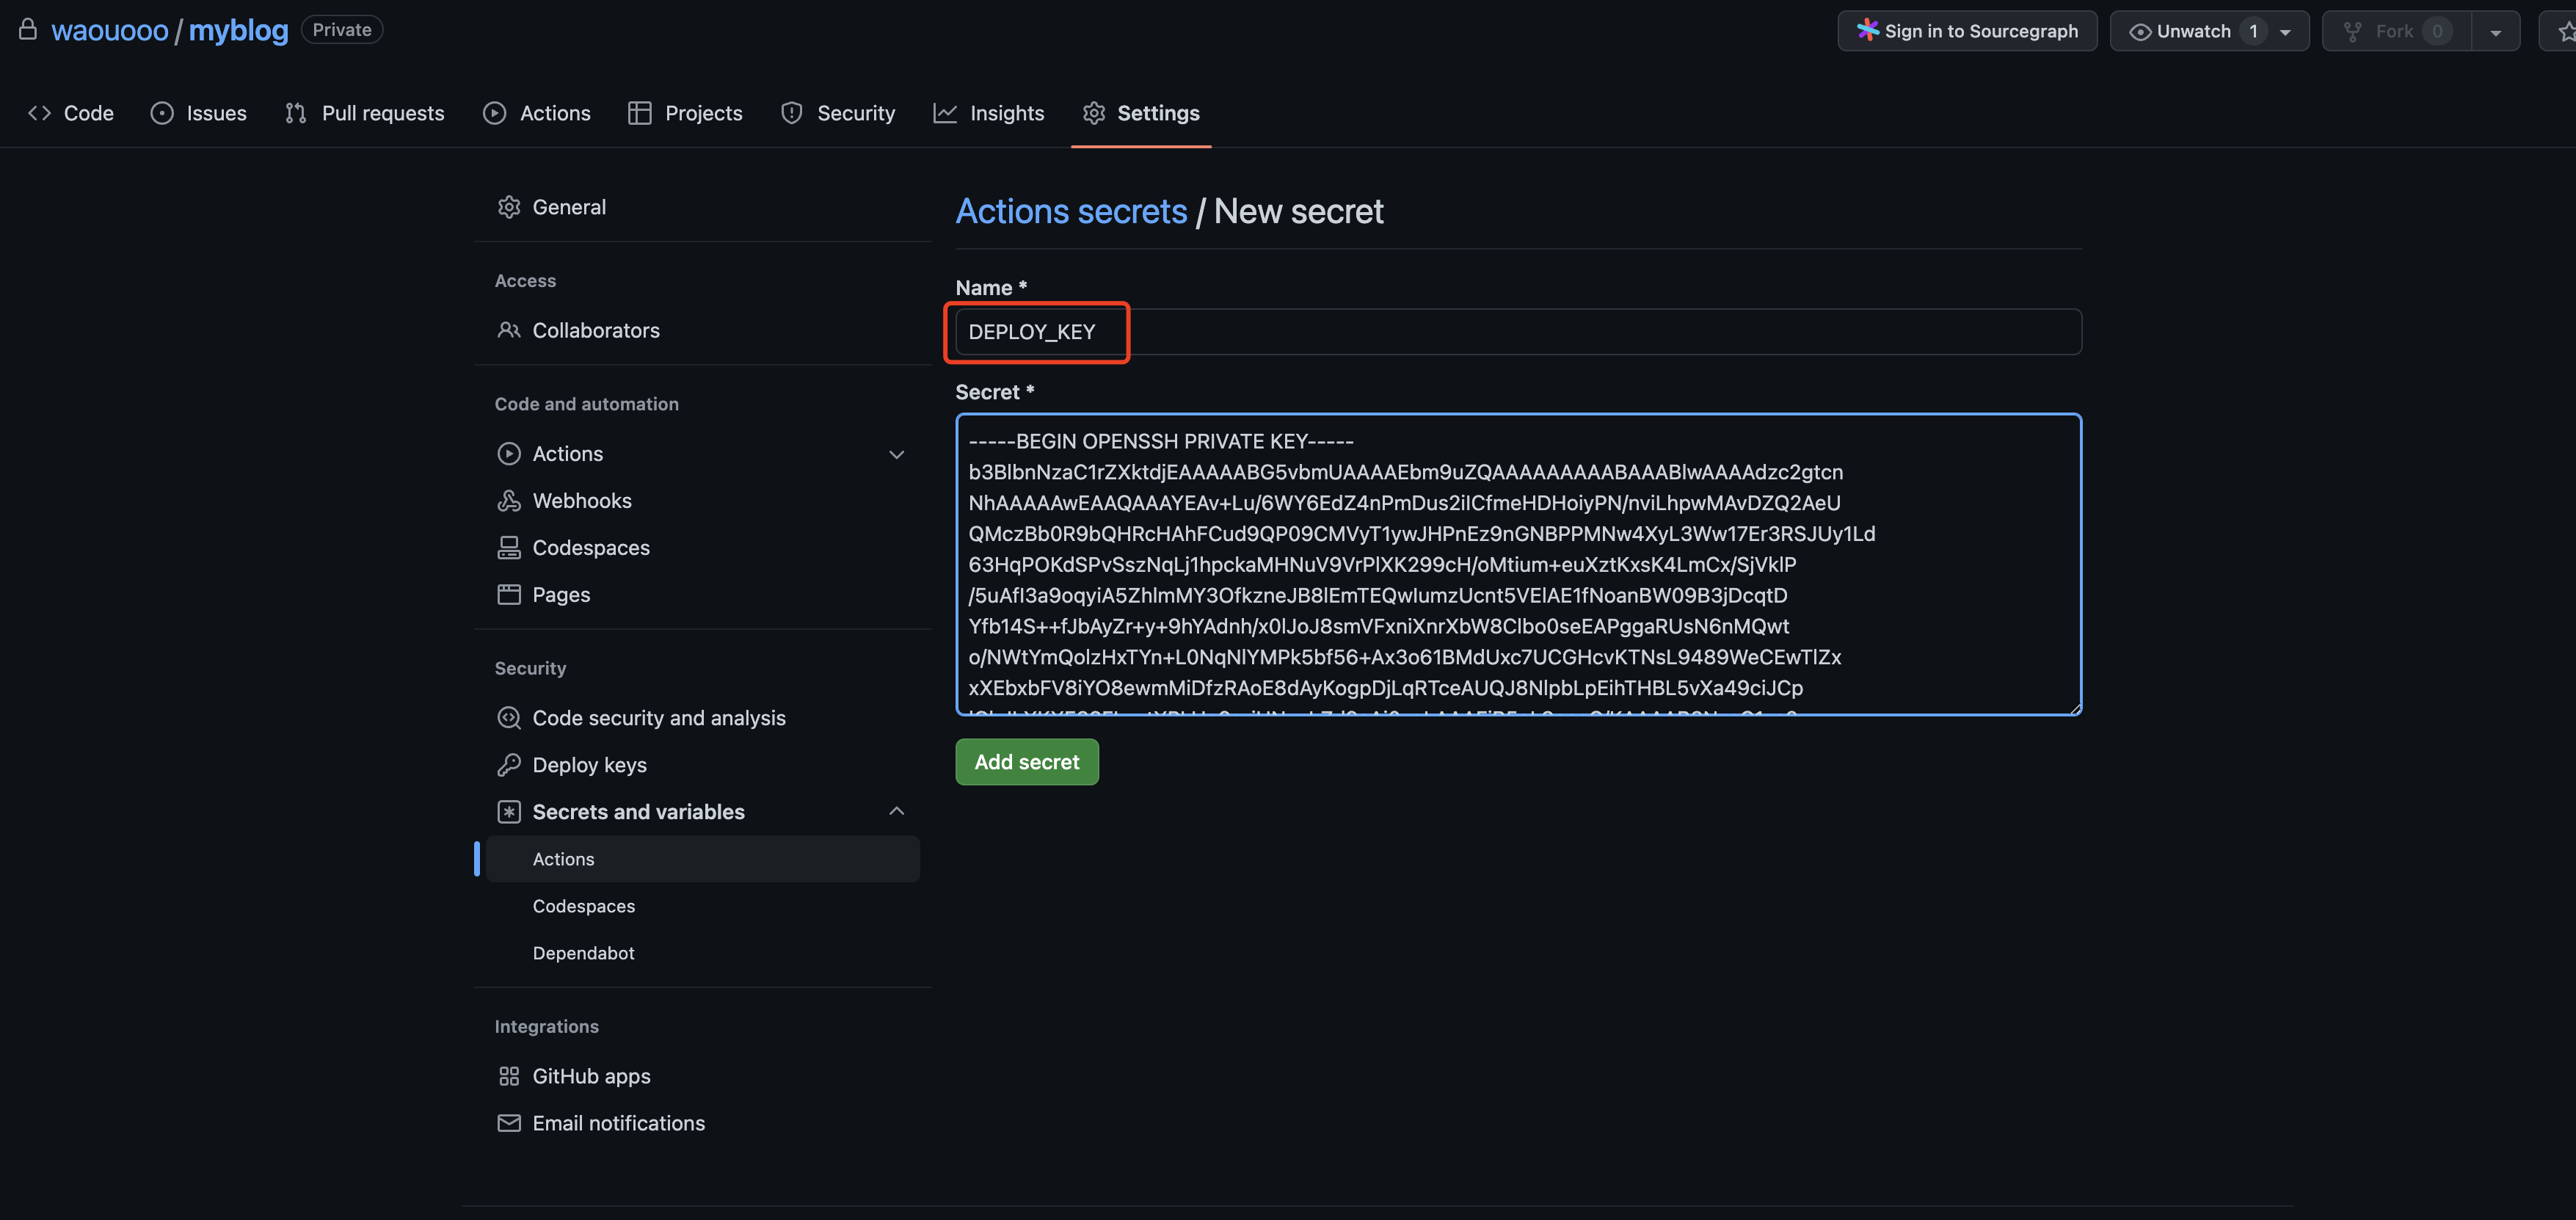
5. 使用ssh私钥: id_rsa_deploy_key 在站点元数据仓库中创建secret
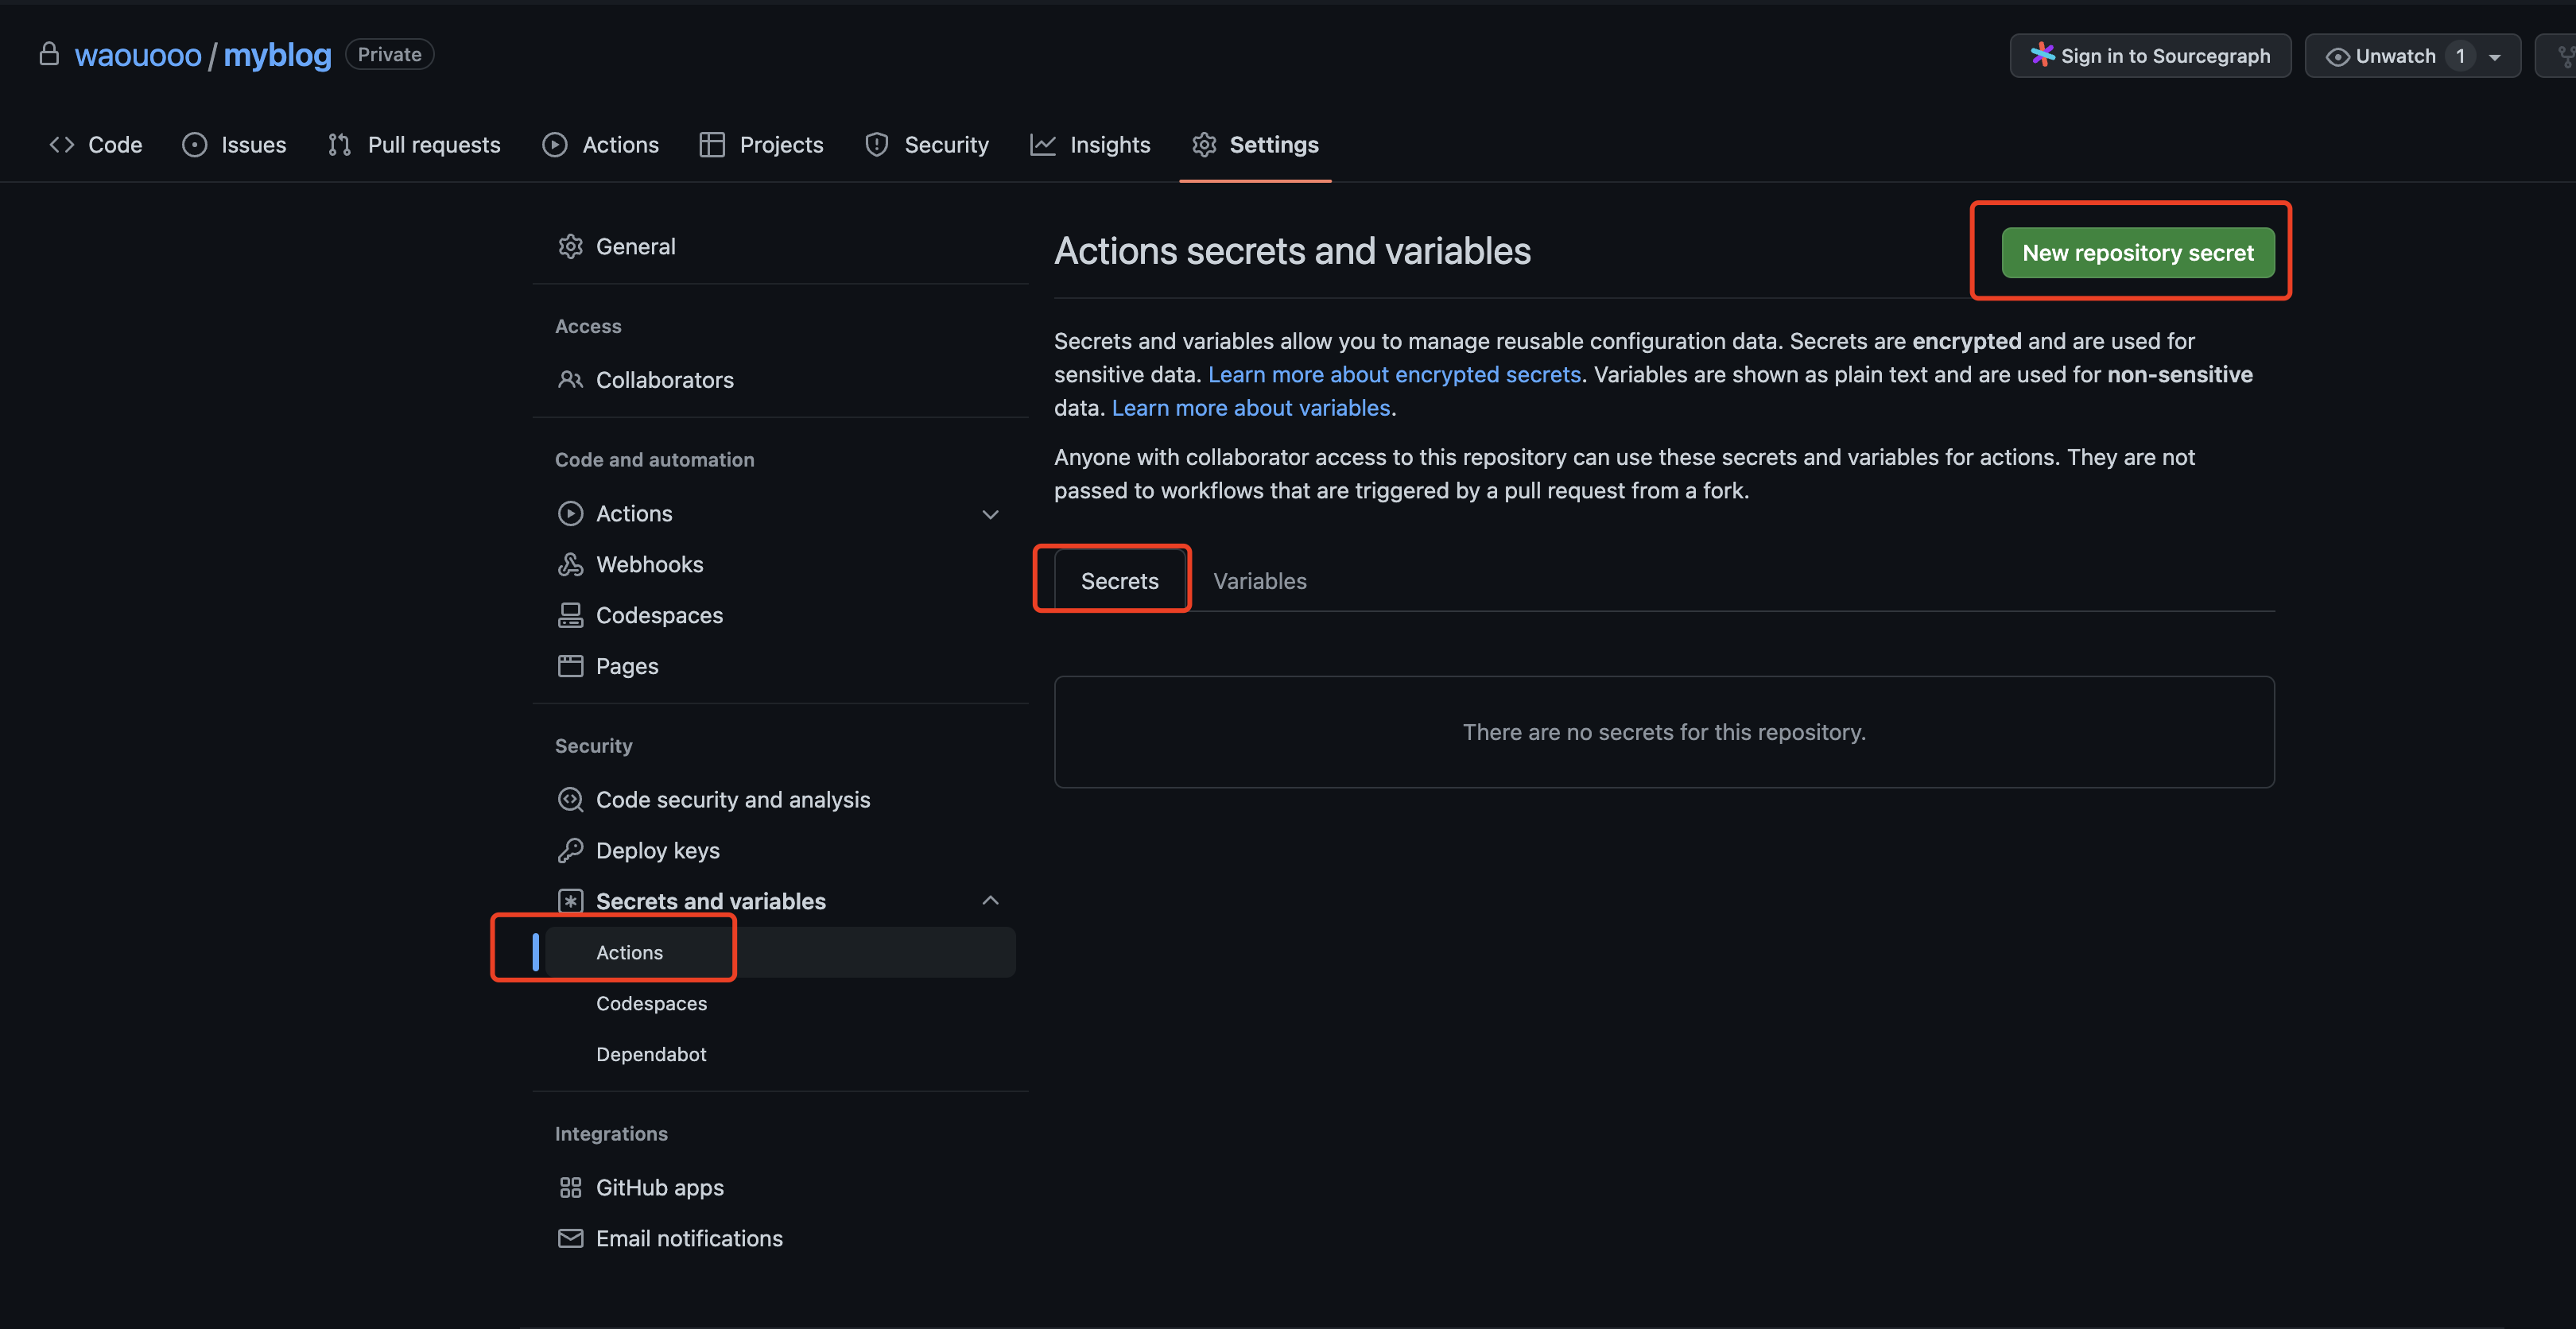 Name建议使用DEPLOY_KEY, 需要下文Github Actions 的Workflow配置文件中使用
6. 创建Github Actions 的工作流(workflow)
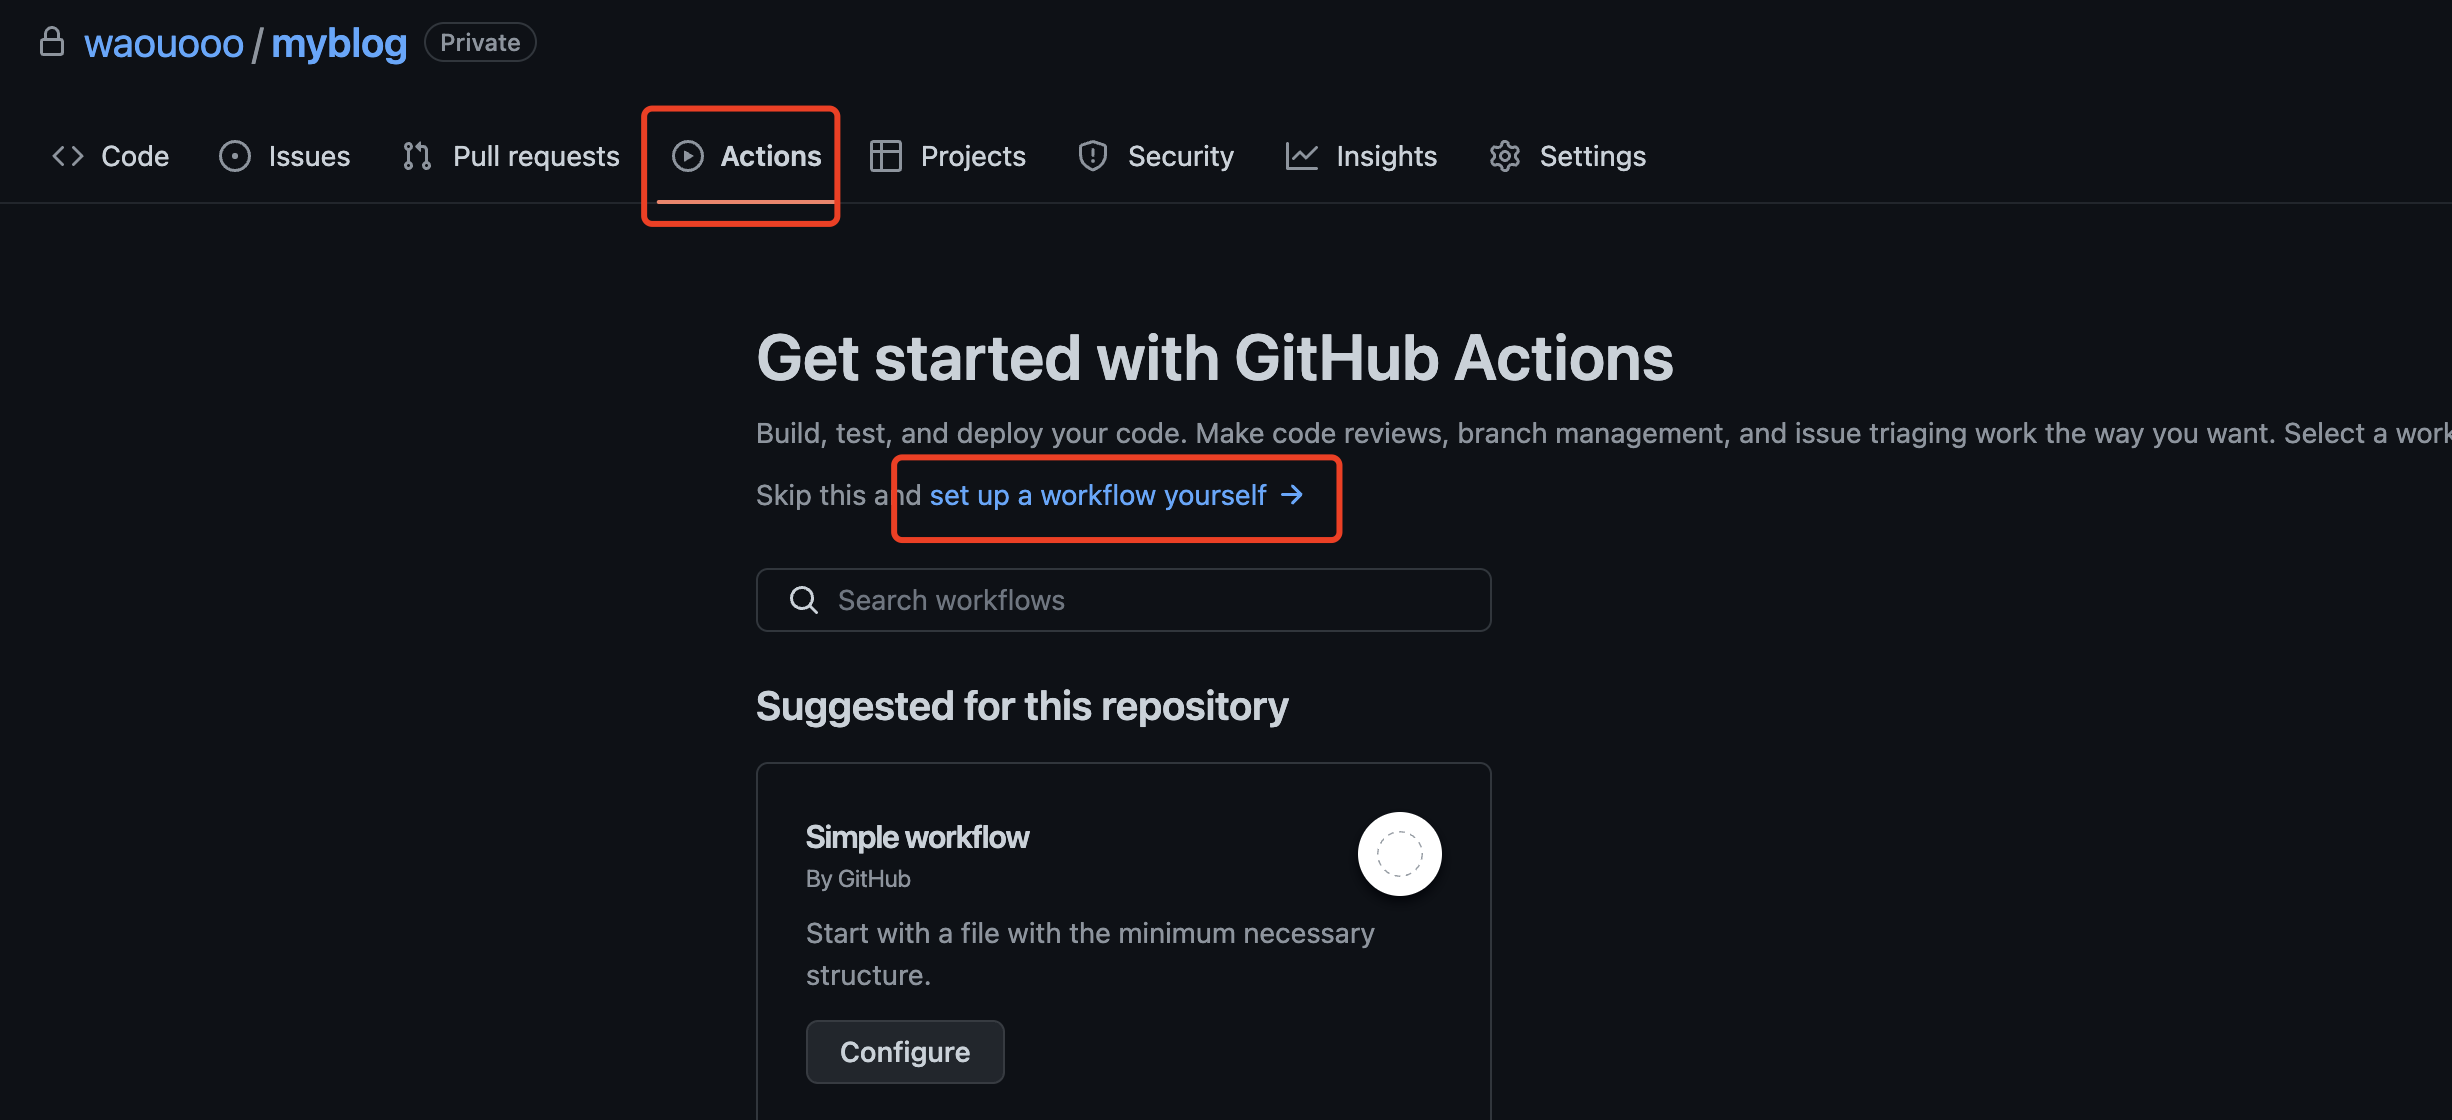
将以下内容填充至配置中:
name: GitHub Pages

on:
  push:
    branches:
      - master  # Set a branch to deploy

jobs:
  deploy:
    runs-on: ubuntu-22.04
    concurrency:
      group: ${{ github.workflow }}-${{ github.ref }}
    steps:
      - uses: actions/checkout@v3
        with:
          submodules: true  # Fetch Hugo themes (true OR recursive)
          fetch-depth: 0    # Fetch all history for .GitInfo and .Lastmod

      - name: Setup Hugo
        uses: peaceiris/actions-hugo@v2
        with:
          hugo-version: 'latest'
          extended: true

      - name: Build
        run: hugo --minify

      - name: Deploy
        uses: peaceiris/actions-gh-pages@v3
        if: ${{ github.ref == 'refs/heads/master' }}
        with:
         deploy_key: ${{ secrets.DEPLOY_KEY }}  # 上文保存至本仓库secrets中的ssh秘钥变量名
         external_repository: waouooo/waouooo.github.io # 需要将静态文件推送的仓库名
         publish_branch: main # 对应目的仓库的目的分支,因为waouooo主分支为main
         publish_dir: ./public # 推送的文件夹,hugo --minify命令会将静态文件生成至./public文件夹中
         commit_message: ${{ github.event.head_commit.message }} # 指定commit信息

完成后点击start commit完成配置
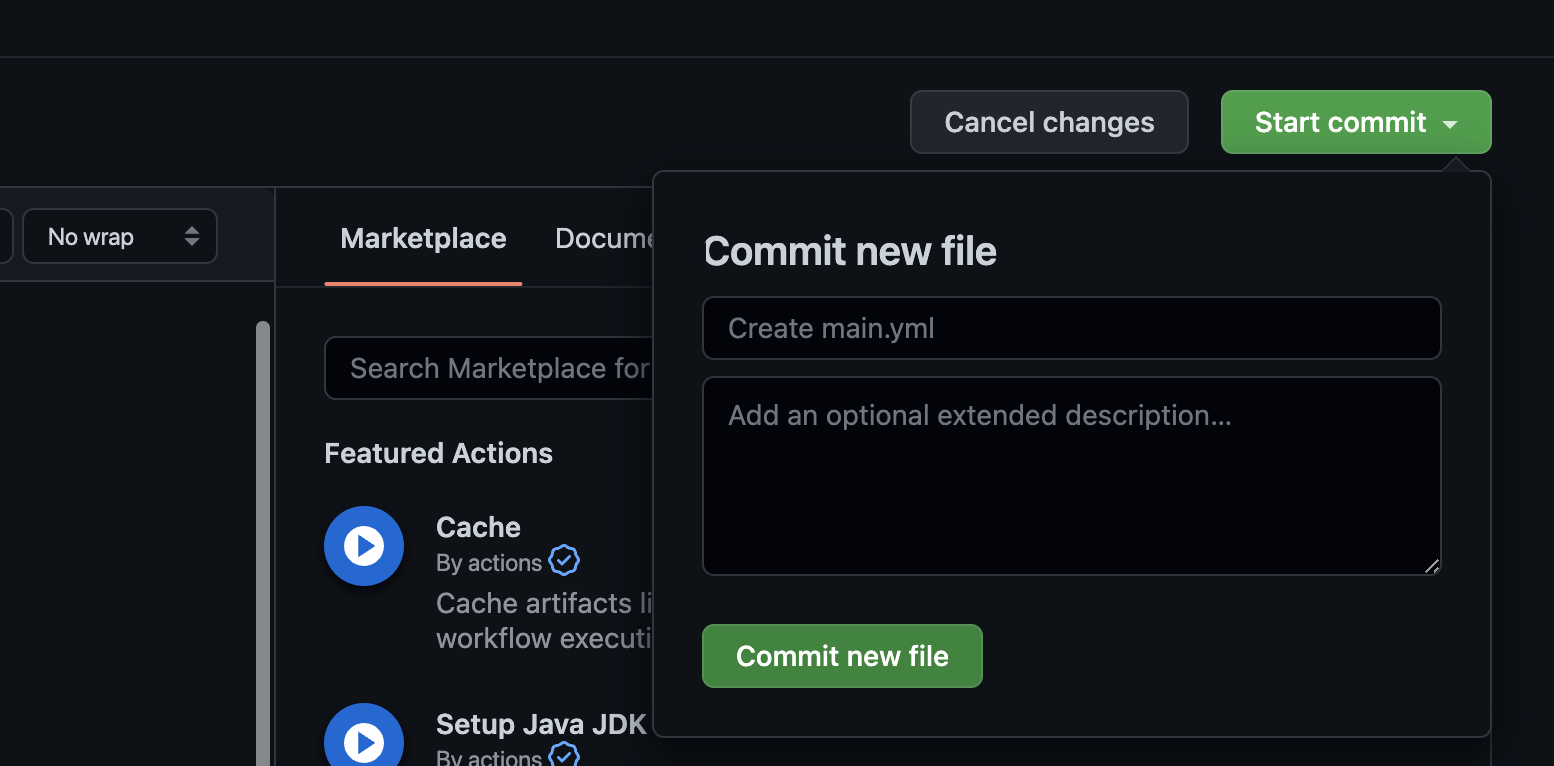
注意:此时仓库中提交了一个.github/workflows/main.yml的新文件,需要使用git pull 同步至本仓库先,方式下次推送时发生冲突
总结
至此自动化推送已经实现,之后只需要添加文章之后将其推送到远端仓库即可自动触发Github Actions执行自动编译并推送至站点仓库waouooo.github.io中
参考链接
Hugo setup
actions-gh-pages